Configuring Okta For SSO
DataGrail supports two configurations for Okta SSO. You only need to choose one.
| Configuration | Best For | Roles Managed In |
|---|---|---|
| Standard Configuration | Most customers. | DataGrail |
| Group Provisioning | Large organizations. | Okta |
Standard Configuration
This section documents the standard configuration for Okta as an identity provider to support log in to the DataGrail app. With this configuration, user roles must be managed within DataGrail.
Persons Needed to Complete Configuration: IT Person from your organization
-
Sign in to Okta as an admin.
-
Navigate to Applications in the left-hand menu and select Browse App Catalog to search for DataGrail.
-
Select the Add Integration.
-
Enter your DataGrail subdomain and select Done. If you are unclear on what your subdomain would be, please confirm with your Account Manager or reach out to support@datagrail.io.
-
When redirected back to the Applications Page, select the DataGrail Application and navigate to the Sign On tab.
-
Scroll down to the SAML Signing Certificates section. You should see an active certificate that is automatically created.
-
Select the Actions dropdown and View IdP Metadata (this should open in another tab).
-
Copy the URL of the Identity Provider Metadata.
-
Return to the DataGrail SSO setup page, select the Metadata URL tab, and paste the metadata URL. Select Configure to validate and complete the setup.
Please visit Inviting New Users for more instructions on adding users and managing roles.
Group Provisioning
The Group Provisioning functionality is best for advanced users that would like to provision roles automatically based on group assignments within Okta. You cannot manage user roles within DataGrail using this configuration.
Persons Needed to Complete Configuration: IT Person from your organization
Creating the Okta App
The Group Provisioning configuration requires a custom Okta App. You cannot use the DataGrail app in the Okta catalog to complete this configuration.
-
Sign in to Okta as an admin.
-
Navigate to Applications in the left-hand menu and select Create App Integration and choose SAML 2.0.
SAML Application Configuration
- Single Sign On URL:
https://<subdomain>.datagrail.io/saml/auth - Audience URI (SP Entity ID):
https://<subdomain>.datagrail.io/saml/metadata
If you are unclear on what your subdomain would be, please confirm with your Account Manager or reach out to support@datagrail.io.
- Single Sign On URL:
-
Select next and create the application.
-
When redirected back to the Applications Page, select the DataGrail Application and navigate to the Sign On tab.
-
Scroll down to the SAML Signing Certificates section. You should see an active certificate that is automatically created.
-
Select the Actions dropdown and View IdP Metadata (this should open in another tab).
-
Copy the URL of the Identity Provider Metadata.
-
Return to the DataGrail SSO setup page, select the Metadata URL tab, and paste the metadata URL. Select Configure to validate and complete the setup.
Determining Group Mappings
In order to utilize the Group Mapping functionality, mappings between the Okta groups and DataGrail roles must be configured on the DataGrail side.
- Review DataGrail Roles and Permissions.
- Determine what DataGrail roles you want to map to your Okta groups. You can have multiple Okta groups map to the same DataGrail role.
- Once you have established your mappings, please send them support@datagrail.io to be configured.
Configuring Attribute Statements
Once DataGrail support confirms the mappings have been set, the attribute statements can now be configured within Okta:
-
Navigate back to the Okta app you created in the first section and select the General tab.
-
Select Edit in the SAML Settings section.
-
Select Next to get to the Configure SAML tab. Scroll down to Group Attribute Statements.
-
Create a new attribute statement with the name
rolesand utilize filters to isolate the newly created groups.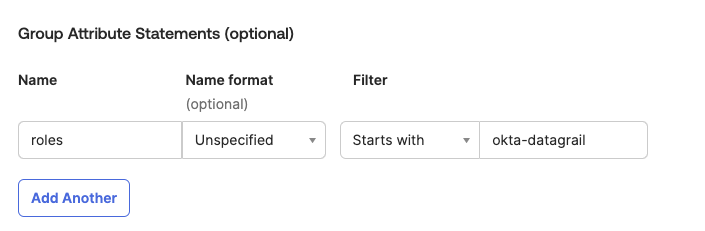
-
Additionally, scroll up to Attribute Statements and configure the following attribute statements:
Attribute Statement Configuration
First Name
- Name:
first_name - Value:
user.firstName
Last Name
- Name:
last_name - Value:
user.lastName
Email
- Name:
email - Value:
user.email
- Name:
-
Select Next and save your changes.
For more information on adding users and managing roles, see Inviting New Users.
Mapping Multi-Brand Groups
DataGrail can be configured to allow Okta to control the assignment of Multi-Brand Groups to your users.
Persons Needed to Complete Configuration: IT Person from your organization
To configure Okta to automatically map your Okta users to the Multi-brand groups you've configured in DataGrail, follow these steps:
-
Decide on a prefix for your Okta group names. The prefix is used to make the groups identifiable in your SAML provider. There are no specific requirements. It will typically be
DataGrail. -
Create a group in Okta for each group you have configured in DataGrail.
Group Name Requirements
All DataGrail groups should start with the same, identifiable prefix and then the Group Display Name of the DataGrail group.
The Group Display Name can be found under Settings, Groups, and Group Settings.
Example:
If your prefix is
DataGrailand you've created three groups in DataGrail namedUSA,Europe, andAsia, create groups in Okta namedDataGrail USA,DataGrail Europe, andDataGrail Asia. -
Assign your users to these new Okta Groups.
-
Find and open the DataGrail SAML app configuration in Okta to ensure the new groups are passed to DataGrail.
Okta Configuration
- Select General and navigate to SAML Settings.
- Select Next to get to the Configure SAML tab. Scroll down to Group Attribute Statements.
- Create a new attribute statement with the name
tagsand filter for the prefix you created to ensure only the newly created groups get passed to DataGrail. - Select Next and save your changes.
- Reach out to your Account Manager, so the setup can be completed on the DataGrail side.
Disclaimer: The information contained in this message does not constitute as legal advice. We would advise seeking professional counsel before acting on or interpreting any material.