Quickstart Guide
To get started using Request Manager to process Privacy Requests, the following components will need to be configured:
Foundation Connections
Request Manager requires two integrations to support processing Privacy Requests, a Transactional Mailer and a Cloud Storage Bucket.
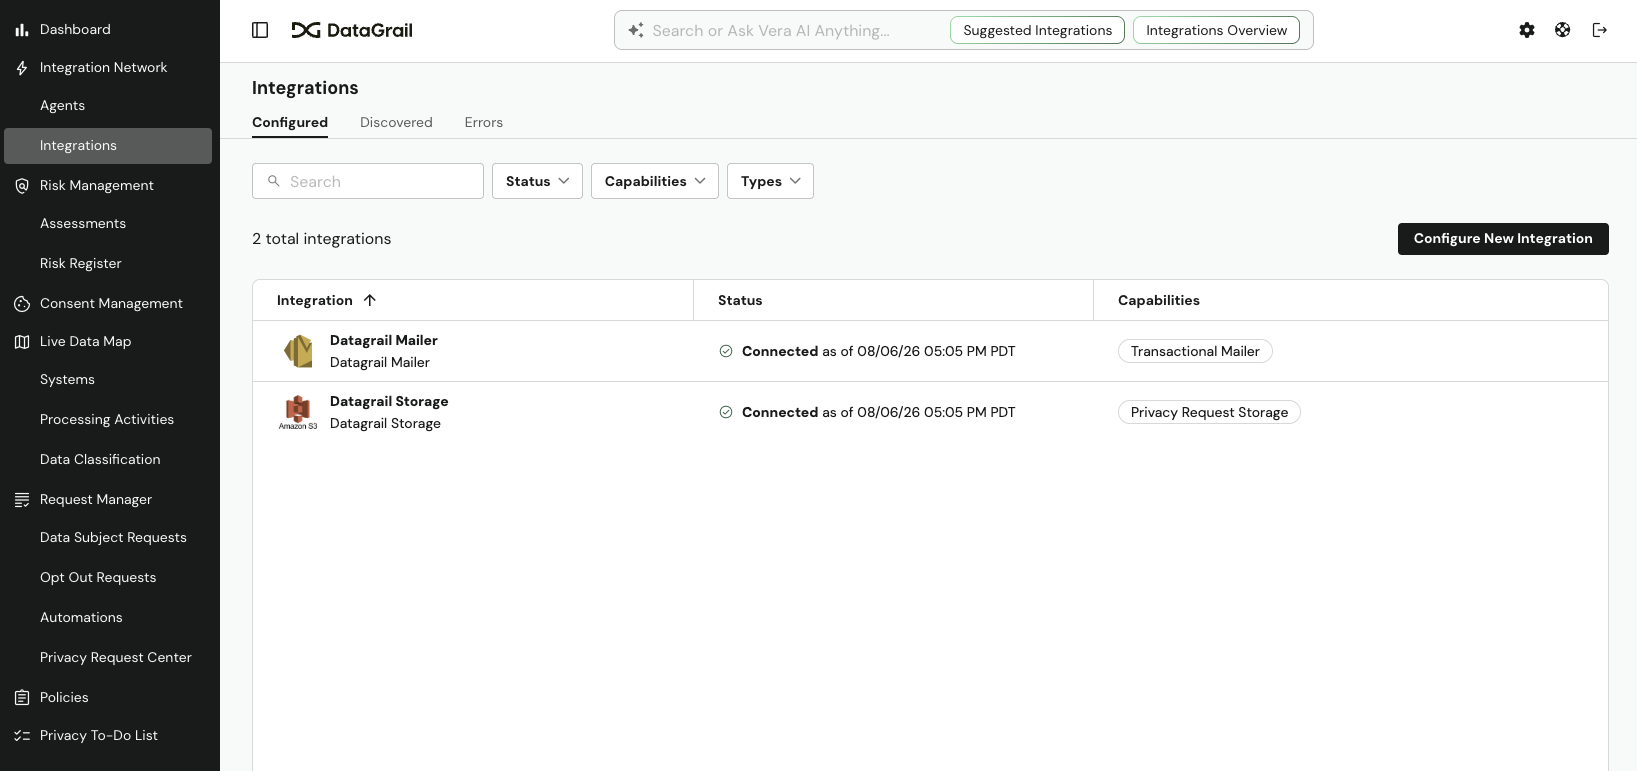
Transactional Mailer
Persons Needed to Complete Configuration:
- DataGrail user with a role of Connections Manager or Super Admin
- Technical admin from your organization
Email messages are used to communicate with and verify a Data Subject's identity, as well as service the Direct Contact Workflow. A Transactional Mailer is a service that allows DataGrail to send email messages on your behalf. If you use your own mailer, these messages are sent from an address on your domain; if you use the DataGrail-hosted mailer, they are sent from a datagrail.io subdomain assigned to your account.
DataGrail can host a transactional mailer for you, so you can start sending without configuring your own. Hosted mailing is optional—request it at account creation or anytime via support@datagrail.io. See DataGrail-Hosted Storage & Mailer for details. To use your own mailer instead, follow the steps below.
Connecting Your Mailer
The first step in setting up your transactional mailer is to create the API connection with DataGrail:
-
Determine what transactional mailer you already have.
Supported Transactional Mailers
The following Transactional Mailers are supported by DataGrail:
-
Select the Integrations page from DataGrail's side menu.
-
Select Configure New Integration.
-
Search for the mailer you would like to connect and select Configure.
-
Ensure only the Transactional Mailer capability is selected (i.e. do not select “Access” or “Deletion”).
-
Select the View Connection Instructions button and follow the steps to enter the credentials for your mailer.
-
Select Configure Integration.
Configure Sender Settings & Test Deliverability
After connecting the integration, configure the sender name and email address that will appear on all outgoing privacy communications to Data Subjects, then send yourself a test email to confirm deliverability—no need to contact support.
- Select Edit Integration.
- Under Sender Configurations, select Add Sender.
- Enter a Sender Name (e.g.
Customer Privacy Requests)—this is the display name that will appear in the "From" field of emails sent to Data Subjects. - Enter a From Address (e.g.
privacyrequests@customer.com)—this must be a verified email address or domain within your mailer account. - Select Send Test Email, then Send Email to confirm your configuration is working. You will receive a test email from the address entered.
- Select Save Sender.
In order for the DataGrail platform to function as intended, it is crucial that the messages sent from your transactional mailer are delivered consistently to your users. If the test email does not arrive or the sender shows an Error status, review the deliverability guidance below or contact support@datagrail.io for help.
Ensuring Successful Deliverability
Since your transactional mailer is sending on behalf of your company (and your domain), it is important emails are properly authenticated to avoid appearing malicious or as spam to recipients. As a result DataGrail recommends customers configure the following:
- Sender Identity: Many transactional mailers, like SendGrid, offer the ability to verify a Sender Identity. This is often required and serves to uphold legitimate sending behavior. Setting this up usually requires domain verification and access to DNS records.
- SPF (Sender Policy Framework): SPF is a form of email authentication that lets you define what mail servers are allowed to send on behalf of your domain. It is highly recommended to configure SPF records for your transactional mailer with your domain to ensure successful deliverability. This will also require access to DNS records.
- DKIM (DomainKeys Identified Mail): DKIM is another form of email authentication that uses a digital signature to verify an email was sent by the authorized owner of a domain. This is also an important step to ensuring that mail sent on your behalf is delivered reliably to your users.
Email Templates
With your mailer successfully configured, you can optionally review/update DataGrail's Email Templates to ensure messages to Data Subjects align with your brand and privacy posture.
Cloud Storage
Persons Needed to Complete Configuration:
- DataGrail user with a role of Connections Manager or Super Admin
- Technical admin from your organization
As a security measure, DataGrail stores data collected for a Privacy Request in a dedicated cloud storage bucket. DataGrail encrypts this data at rest and in transit.
DataGrail provisions and hosts a secure cloud storage bucket for every new account by default, so no setup is required to start processing requests. If you would prefer to use a bucket you own and maintain, you can switch to your own provider at any time using the steps below. See DataGrail-Hosted Storage & Mailer for details on how hosted storage is secured.
Supported Cloud Storage Providers
The following Cloud Storage Providers are supported by DataGrail:
Connecting Your Cloud Storage Bucket
To set up your cloud storage bucket, create an API connection with DataGrail:
- Navigate to the Integrations page.
- Select Configure New Integration and search for your desired solution.
- Select View Connection Instructions for specific connection for your solution.
- After inputting the required credentials, ensure only the Privacy Request Storage capability is selected in the left-hand menu (i.e. do not select “Access” or “Deletion”).
- Select Configure Integration.
Cloud Storage FAQ
How much data will be stored in this bucket?
The volume of data stored in your connected bucket is dependent on the number of records obtained for a Data Subject on a Privacy Request. Each Privacy Request will query your connected integrations for PII and return a set of .tsv files, which are generally quite small.
To estimate the volume of data stored, it is helpful to consider the average amount of data returned for a Privacy Request as well as your monthly request volume.
How is data purged from the bucket?
To purge Data Subject PII from your Cloud Storage Solution, we recommend you configure your storage bucket with a retention policy of at least 90 days. This policy will allow your bucket to automatically purge data, after a specified period of time.
If your retention period is too short and purges data before a Privacy Request is complete, it will encounter an error in DataGrail. We recommend configuring a retention period of at least 90 days.
Privacy Request Center
The Privacy Request Center is a page hosted on your domain that allows Data Subjects to submit Privacy Requests to your organization.
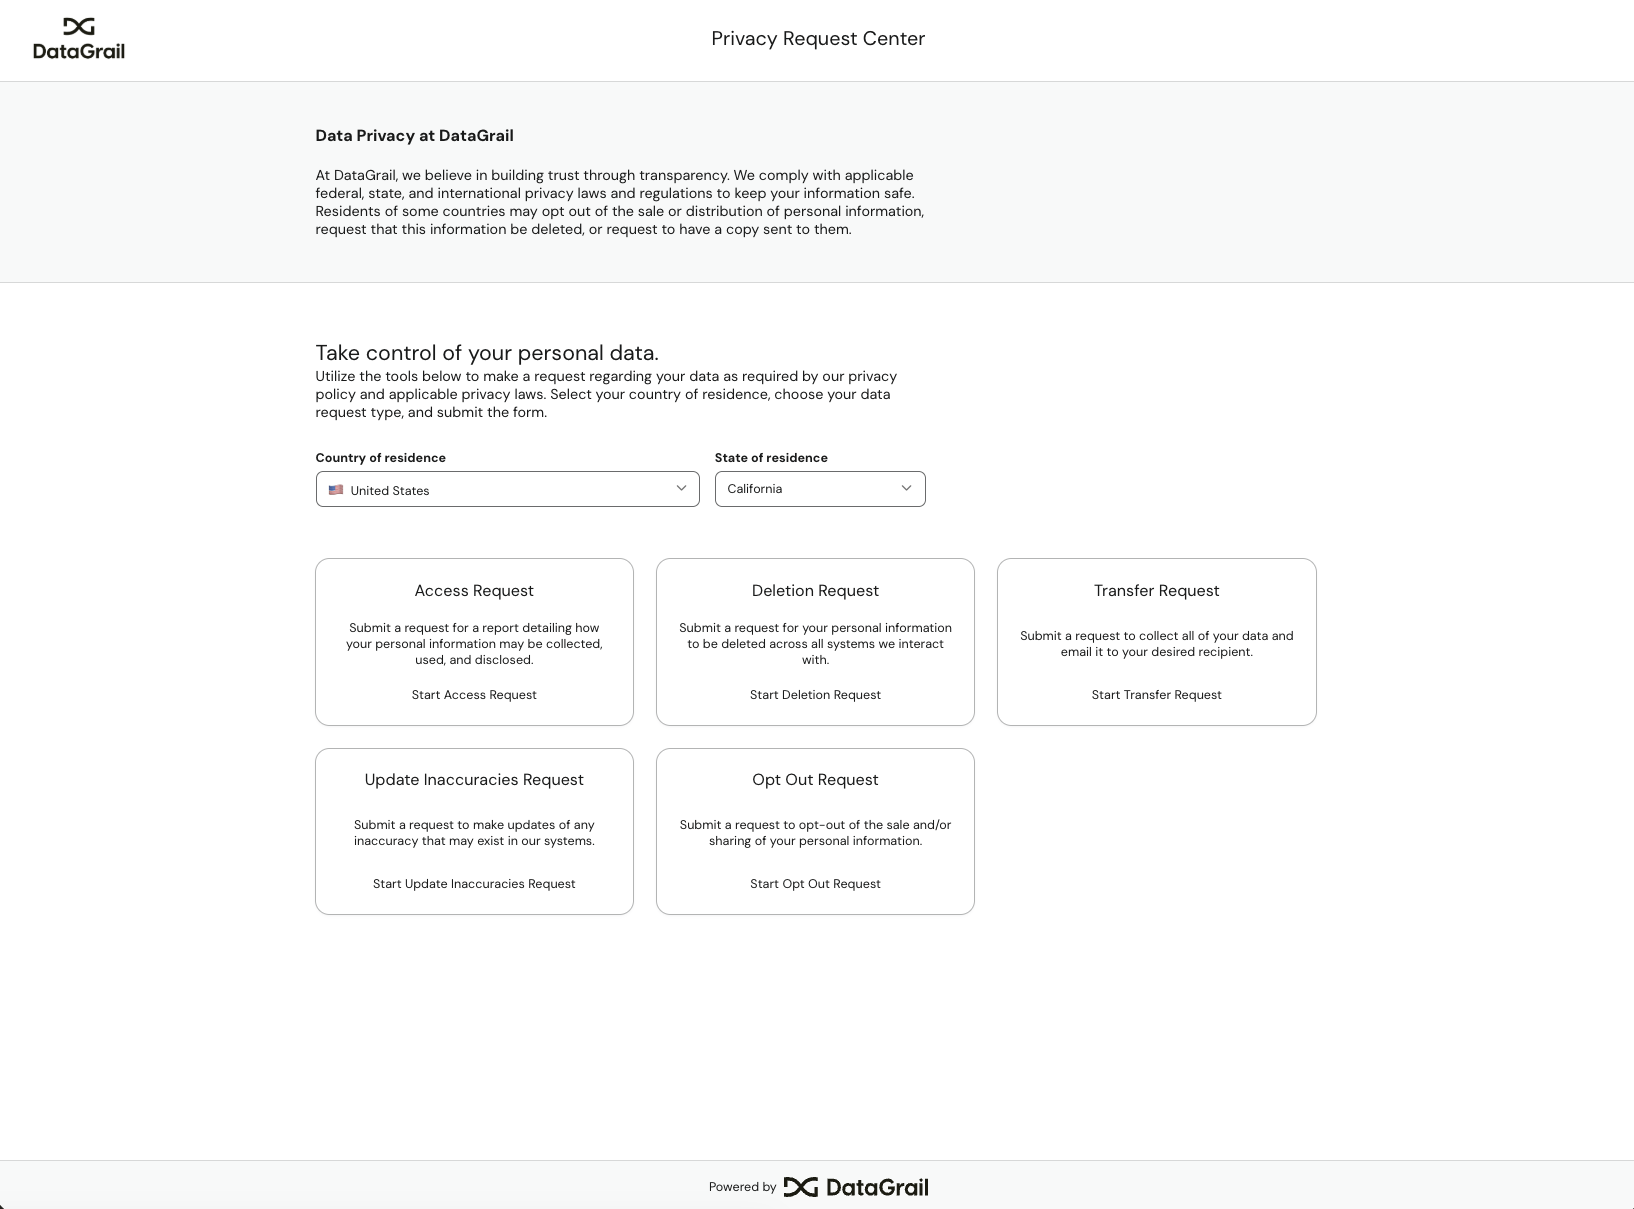
Configuring Your Domain
Persons Needed to Complete Configuration:
- Technical admin from your organization
Your Privacy Request Center is hosted on your own domain (for example, privacy.yourdomain.com). You can set this up yourself from Settings > Privacy Request Center—add your domain, add the DNS records DataGrail generates, and DataGrail verifies ownership and provisions the SSL certificate automatically.
See Custom Domain for step-by-step instructions.
Request Policies
Persons Needed to Complete Configuration:
- DataGrail user with a role of Compliance Lead or Super Admin
Privacy Request Policies determine what Privacy Rights are offered to Data Subjects around the globe. DataGrail provides a comprehensive set of policies by default, which cover common legal frameworks from different countries/states.
We recommend reviewing these policies through the Request Policies page to ensure they meet the needs of your organization.
Please email support@datagrail.io if you would like to make any changes.
Customization
Persons Needed to Complete Configuration:
- DataGrail user with a role of Compliance Lead or Super Admin
With your Privacy Request Center configured on your domain, it's time to make customizations! DataGrail allows you to customize the text throughout the form as well as add custom question questions to collect any necessary data that your organization needs to process a request.
See Customizing The Privacy Request Center for more information on adding custom text and questions.
Integrations
Persons Needed to Complete Configuration:
- DataGrail user with a role of Connections Manager or Super Admin
- Technical admin from your organization
With the infrastructure needed to intake and process Privacy Requests ready to go, it's time to integrate your systems for Request Manager. DataGrail's Integrations support programmatically extracting and deleting Data Subject Information from systems in your organization.
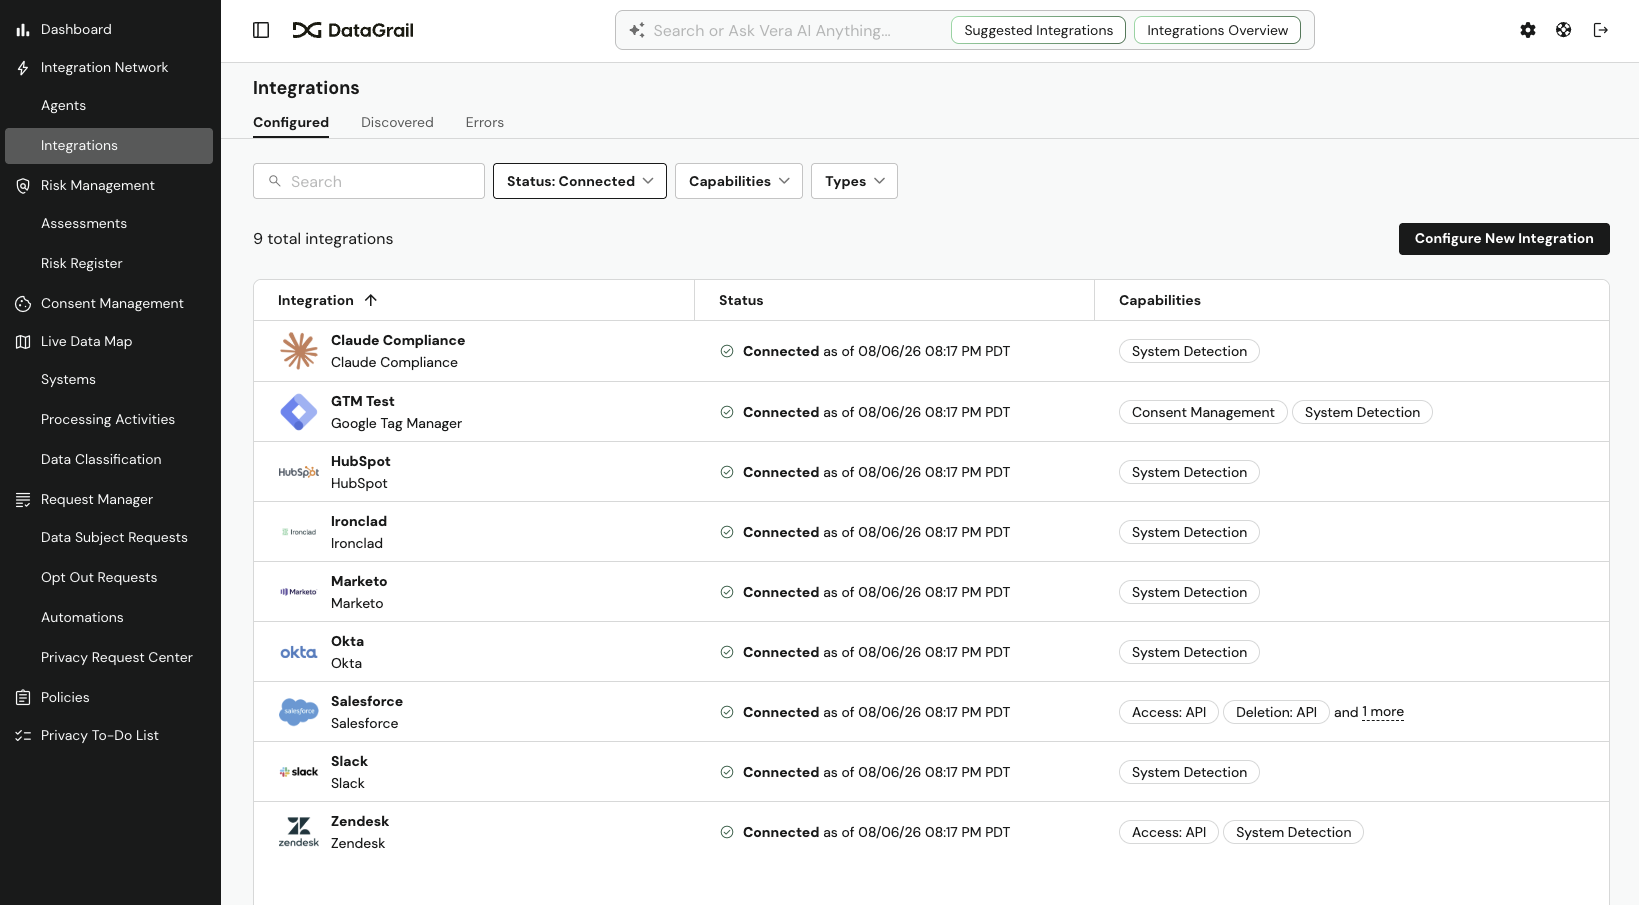
First, the Privacy Team should identify what systems are likely to contain Personally Identifiable Information (PII). DataGrail's Live Data Map, System Detection, and Responsible Data Discovery make this process easy.
With an understanding of where PII lives across your organization, work with the relevant system owners to generate credentials and integrate all systems to DataGrail:
Testing The Privacy Request Workflow
Persons Needed to Complete Configuration:
- DataGrail user with a role of Compliance Lead or Super Admin
- Technical admin from your organization
With your Foundation Connections configured, Integrations connected, and Privacy Request Center live, it's now time to test the Privacy Request workflow before launching DataGrail!
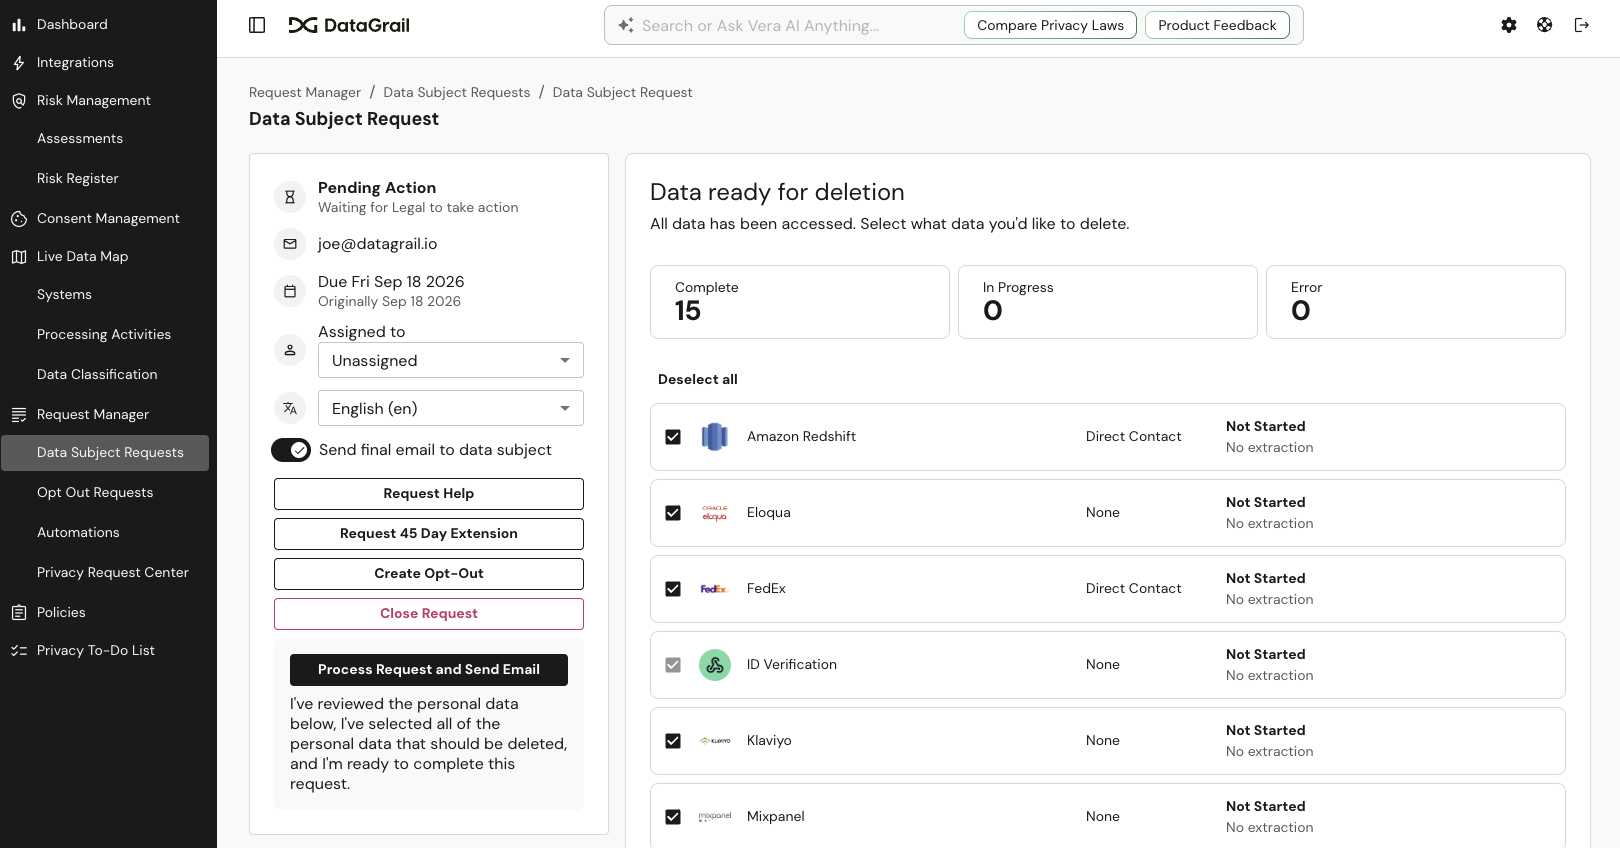
Testing the workflow ensures you are happy with the Privacy Request Center configuration, your Email Templates, and that your integrations are working as expected. Processing a test request also makes sure your team is enabled on the workflow within DataGrail.
- Create test data in connected systems for an email address owned by your organization. For example, create a Salesforce contact, a Zendesk user, etc. with the email
john.doe@yourcompany.com. - Use this email address to submit a Privacy Request through DataGrail!
- Process this Privacy Request to ensure the expected data is retrieved or deleted.
Once you are satisfied with the workflow and confident you are ready to process requests, work with your Account Manager to discuss a rollout plan for your organization.
Helpful Resources:
Disclaimer: The information contained in this message does not constitute as legal advice. We would advise seeking professional counsel before acting on or interpreting any material.