Opt Out Requests
CPRA gives data subjects the Right to Opt-Out of the Sale of their Personal Information to third parties. DataGrail customers have the ability to handle Opt Out Requests through an intake form, verify those requests, and maintain a record log for compliance.
To take action on an Opt Out Request, DataGrail offers integrations with common third-party systems and with your bespoke systems through Internal Systems Integrations.
We additionally set a cookie for users who submit requests through the public Privacy Request Center, which can be utilized to suppress relevant scripts and trackers on your website.
Intake Methods
DataGrail provides three methods to submit Opt Out Requests.
Privacy Request Center
If a Privacy Request Policy for a given location includes the Opt Out right, it will be displayed to Data Subjects on the DataGrail Privacy Request Center.
Once the form is submitted, DataGrail will immediately set a cookie in the Data Subject's browser (regardless of verification status), which can be used to opt the user out of tracking scripts/pixels on your website.
The First and Last Name fields are always shown on the Privacy Request Center, but are not required for Opt Out Requests. If the Data Subject does not want to provide these fields, they can leave them blank.
API
DataGrail's V2 API supports the creation and management of Opt Out Requests.
Manual Intake
Requests can also be created manually within the Opt Out Requests tab in DataGrail by selecting Add Request.
Processing Opt Out Requests
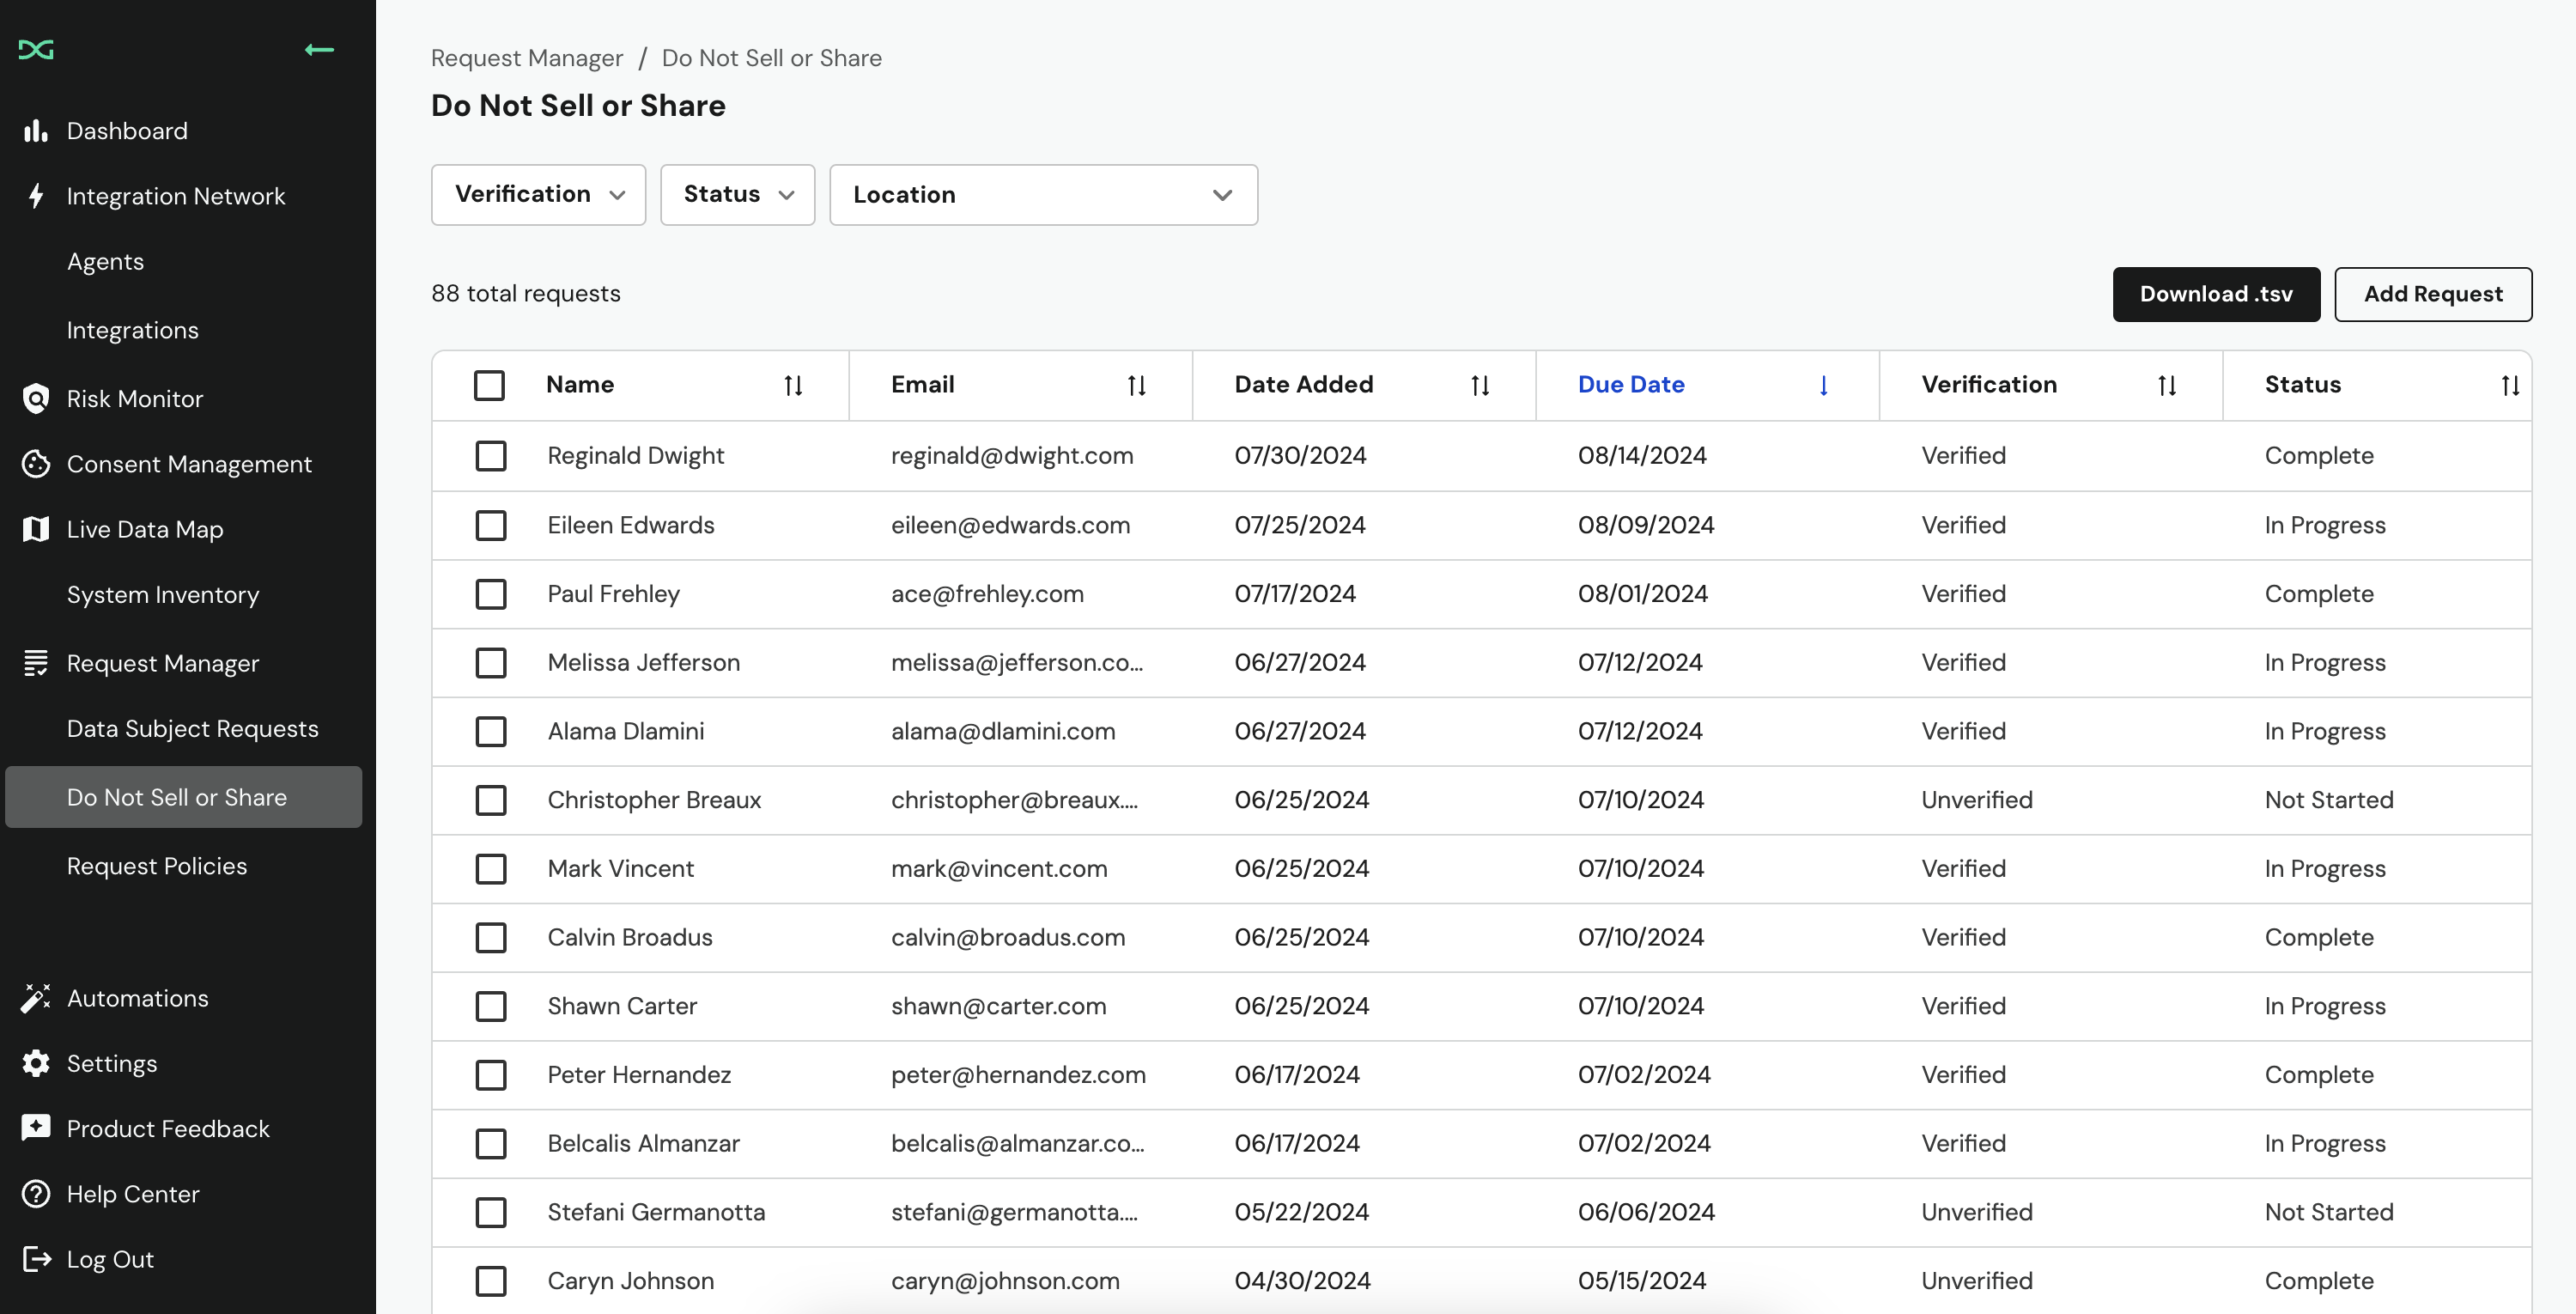
The Opt Out Requests page provides an overview of all Opt Outs submitted to your organization. DataGrail provides filters for Verification Status, Request Status, and Location to allow your team to manage requests effectively.
The lifecycle of an Opt Out Request depends on whether you are using any supported integrations.
Supported Integrations
The following integrations are available for use on Opt Out Requests:
If you are utilizing supported integrations, the Opt Out Request lifecycle will be as follows:
- The Opt Out Request is submitted and will be in the Not Started state until the Data Subject verifies their email. Opt Out Requests will automatically move to the Cancelled state if the Data Subject does not verify within 7 days.
- Once the Data Subject has verified their email or if email verification is disabled, the request will move to the In Progress status, which will initiate supported integrations.
- Once all integrations are complete, the request will move to Complete or will require a DataGrail User to select Mark as Complete, depending on your Automation Settings.
If you are not utilizing integrations, the Opt Out Request lifecycle will be as follows:
- The Opt Out Request is submitted and will be in the Not Started state until the Data Subject verifies their email. Opt Out Requests will automatically move to the Cancelled state if the Data Subject does not verify within 7 days.
- Once the Data Subject has verified their email or if email verification is disabled, the request will move to the In Progress status.
- Your organization should now complete any manual Opt Out processes for the Data Subject, if you have them.
- To close the request, a DataGrail User must select Mark as Complete, which will move it to the Completed state.
An Opt Out Request can be denied at any time by selecting the request, clicking the eclipses, and selecting Deny Request.
An Opt Out Request can be extended by 45 days (once) by selecting the request (directly or through the Opt Out Requests list) and then selecting Request Deadline Extension.
Automation Settings
DataGrail allows the Opt Out workflow to be customized in the Automation tab of the Settings page.
Once a Do Not Sell or Share request has been completed
| Option | Description |
|---|---|
| Send the Do Not Sell or Share confirmation email | Confirmation email sent to the requestor. The confirmation email template can be updated. |
| Do not send the Do Not Sell or Share confirmation email | No confirmation email is sent. |
Once a Do Not Sell or Share request is submitted
| Option | Description |
|---|---|
| Send a verification email | Request will start processing after the requestor has verified their email. |
| Don't send a verification email | Verification will be skipped, and the request will automatically start processing. |
When all integrations have finished processing a Do Not Sell or Share request
| Option | Description |
|---|---|
| Automatically mark the request complete | Request status updated to Complete. No further action required. |
| Manually mark the request complete | You will need to manually update the request status. |
Blocking Trackers & Cookies With an Opt-Out Request
When a user submits an Opt-Out Request, you can tie this to DataGrail Consent or another consent management solution to alter the behavior of trackers on your site.
Integration With DataGrail Consent
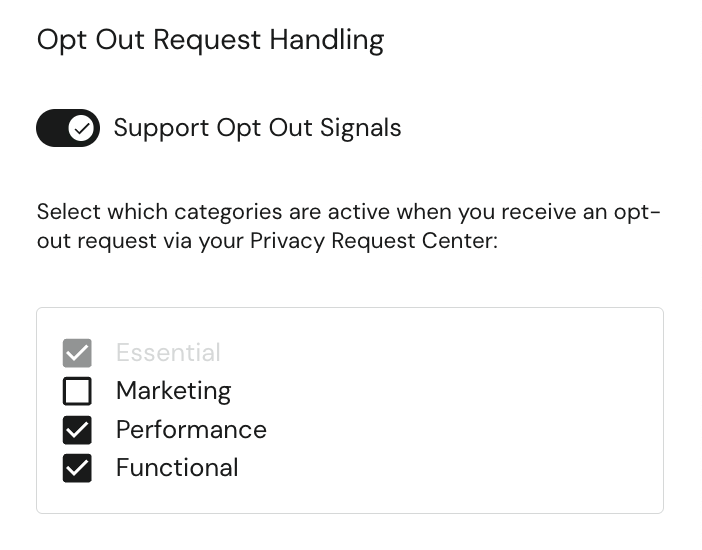
You can configure how DataGrail Consent responds to an opt-out request within the Settings -> Policies page, specifying which tracking categories are enabled upon the submission of an opt-out request. You may need to enable the handling of this signal first, before specifying the categories themselves.
Google Tag Manager Configuration
If you are not a DataGrail Consent customer or otherwise want to integrate with Google Tag Manager directly, you can read the ccpa_dnsmpi cookie (10 year lifetime), which can be used by your organization to opt the user out of tracking on your website.
The ccpa_dnsmpi cookie can only be set on requests created through the Privacy Request Center.
Here's a walkthrough of using the ccpa_dnsmpi cookie with Google Tag Manager to seamlessly opt out users of tracking scripts and pixels deployed on your website.
Create a Variable
- Log in to https://tagmanager.google.com/ and select the appropriate Container.
- Select Variables from the left hand menu and select New under User-Defined Variables.
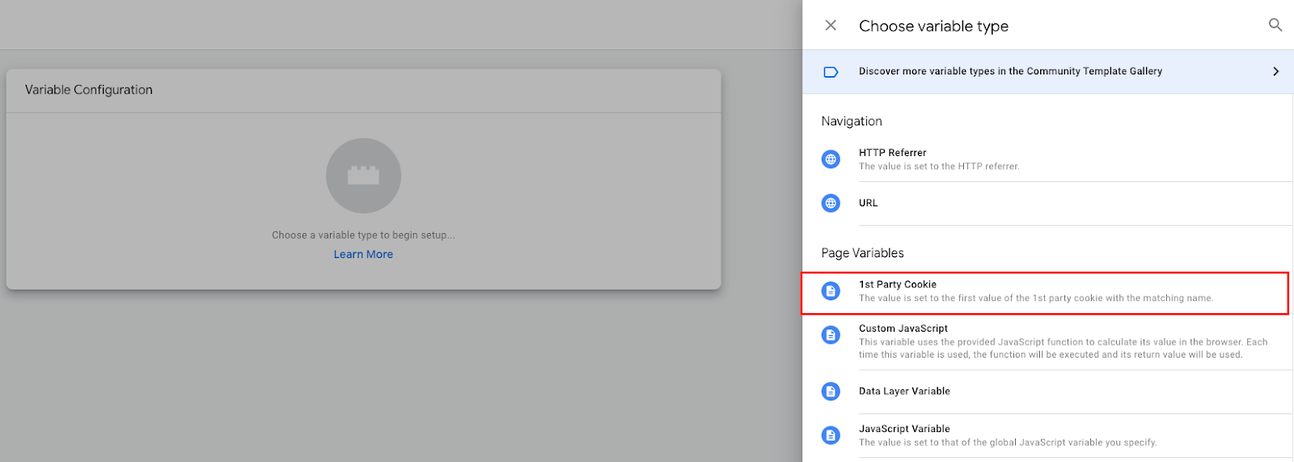
- Open the Variable Configuration nd select 1st Party Cookie from the menu.
- Enter
ccpa_dnsmpias the name for the cookie and the variable, and select Save.
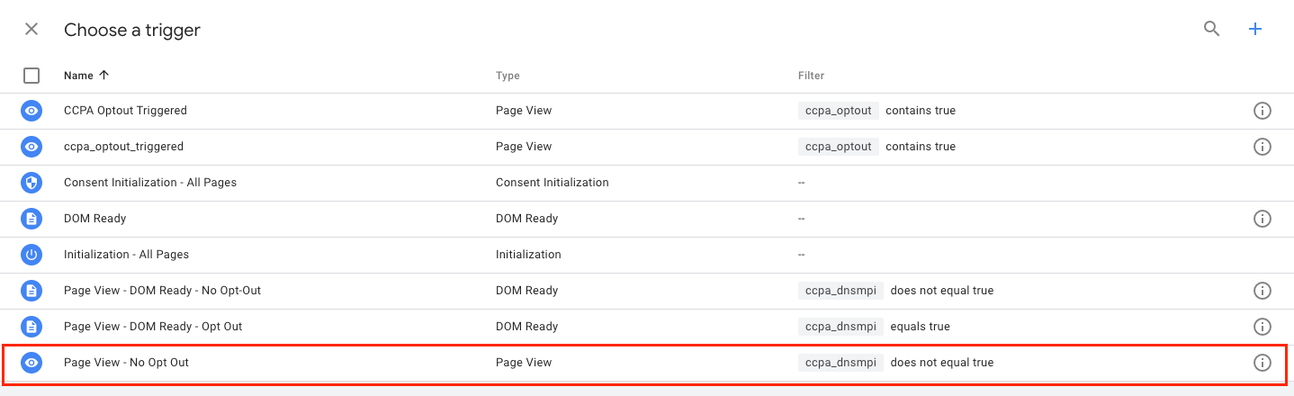
Create a Trigger
- Select Triggers from the left hand menu and then New.

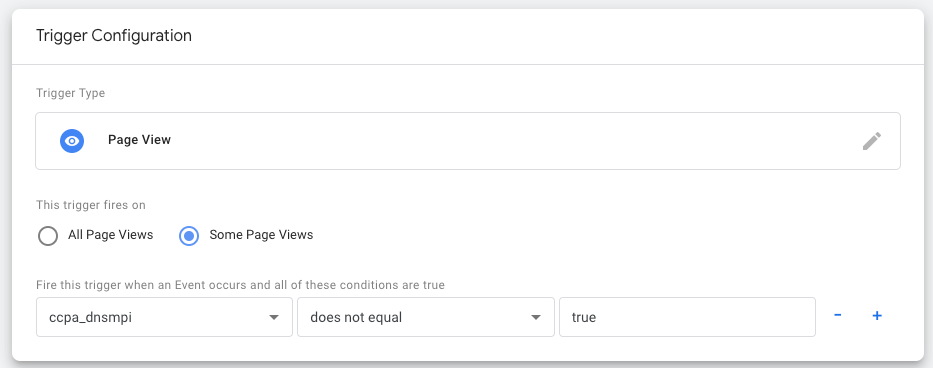
- Open Trigger Configuration and select Page View or DOM Ready and select Page View or DOM Ready, based on the triggers your organization utilizes. If you utilize both, then you will create two triggers.
- Select Some Page Views and set the event condition: ccpa_dnsmpi, does not equal, and true.
- Enter in an applicable name (e.g. Page View - No Opt-Out) and select Save.
Update Tags
- Select Tags from the left hand menu, and select a tag you have identified as implicated in data sales.
- Select the Triggering section and remove the current trigger.
- Select Triggering again and select the trigger you created previously.
-
Select Save.
-
Repeat steps 1-4 for all applicable tags. Ensure you are utilizing the correct trigger, if you utilize both Page View and DOM Ready triggers for tags.
Publish Changes
- Once all changes are complete, select Submit in the top right.
- Provide a Version name and Description and select Publish in the top right.
Disclaimer: The information contained in this message does not constitute as legal advice. We would advise seeking professional counsel before acting on or interpreting any material.