Data Protection Impact Assessments
A Data Protection Impact Assessment (DPIA) is an instrument designed to help organizations systematically analyze, identify, and minimize the data protection risks of a project or system. This feature includes templates, checklists, and workflows to help businesses evaluate the necessity and proportionality of their data processing activities, assess potential risks to individuals' privacy rights, and determine measures to address those risks. It's designed to ensure compliance with the GDPR's requirements for conducting DPIAs where data processing is likely to result in a high risk to individuals' rights and freedoms.
Note : Only customers that have purchased Risk Monitor will have access to this tool.
Common Triggers for DPIAs:
- **New Vendors:**When a company is obtaining a new piece of technology that may encompass “high risk” processing scenarios and/or especially sensitive data and a DPIA is indicated as determined by an earlier risk assessment, such as a PIA.
- **Changing Business Use:**When a vendor has changed something significant about the way they process “high risk” data, or when a customer is changing something about the way they intend to use an existing system.
- e.g. We are going to be using high-risk new features or pursuing a novel use of a technology such that would warrant a new DPIA.
- **High-Risk Projects:**When a company is embarking on a project (e.g. a targeted marketing campaign) that will likely contain high risk processing activities and/or especially sensitive data and a DPIA is indicated as determined by an earlier risk assessment, such as a PIA.
- **Audit:**In response to an audit by an external regulatory body or in due course of litigation.
- **Internal Due Diligence:**When a DPIA has “expired” based on a company privacy program’s internal retention schedule.
DataGrail User Roles
Only the following will have access to the Risk Monitor tab without being assigned as a contributor to an assessment:
- Super Admin
- Risk Monitor Admin
Additionally, only a Super Admin user is able to 'approve' an assessment.
NOTE : Combining any user roles that do not have access to this UI with any of the above user roles that do have access to this functionality will grant a user access to these updates. I.e. If a user had a Connections Manager Role, adding a Super Admin role to their user record in DGAdmin would then allow them access to the new Risk Monitor.
Workflow
When the Risk Monitor Assessment is enabled for a Customer, a new header tab will appear within the Customer’s DataGrail account named Risk Monitor located next to Live Data Map.Clicking on this tab will display:
- All previously created assessments and their associated: name, state and contributor assignee, personal data likelihood, percentage of completion*, due date*, renewal date*, and the Approving user*
- The ability to create a new assessment
- The total count of all created assessments
(* = new features recently added)
All previously created assessments will be sorted in ascending order based on creation date, with the earliest assessment created displaying last on the list.
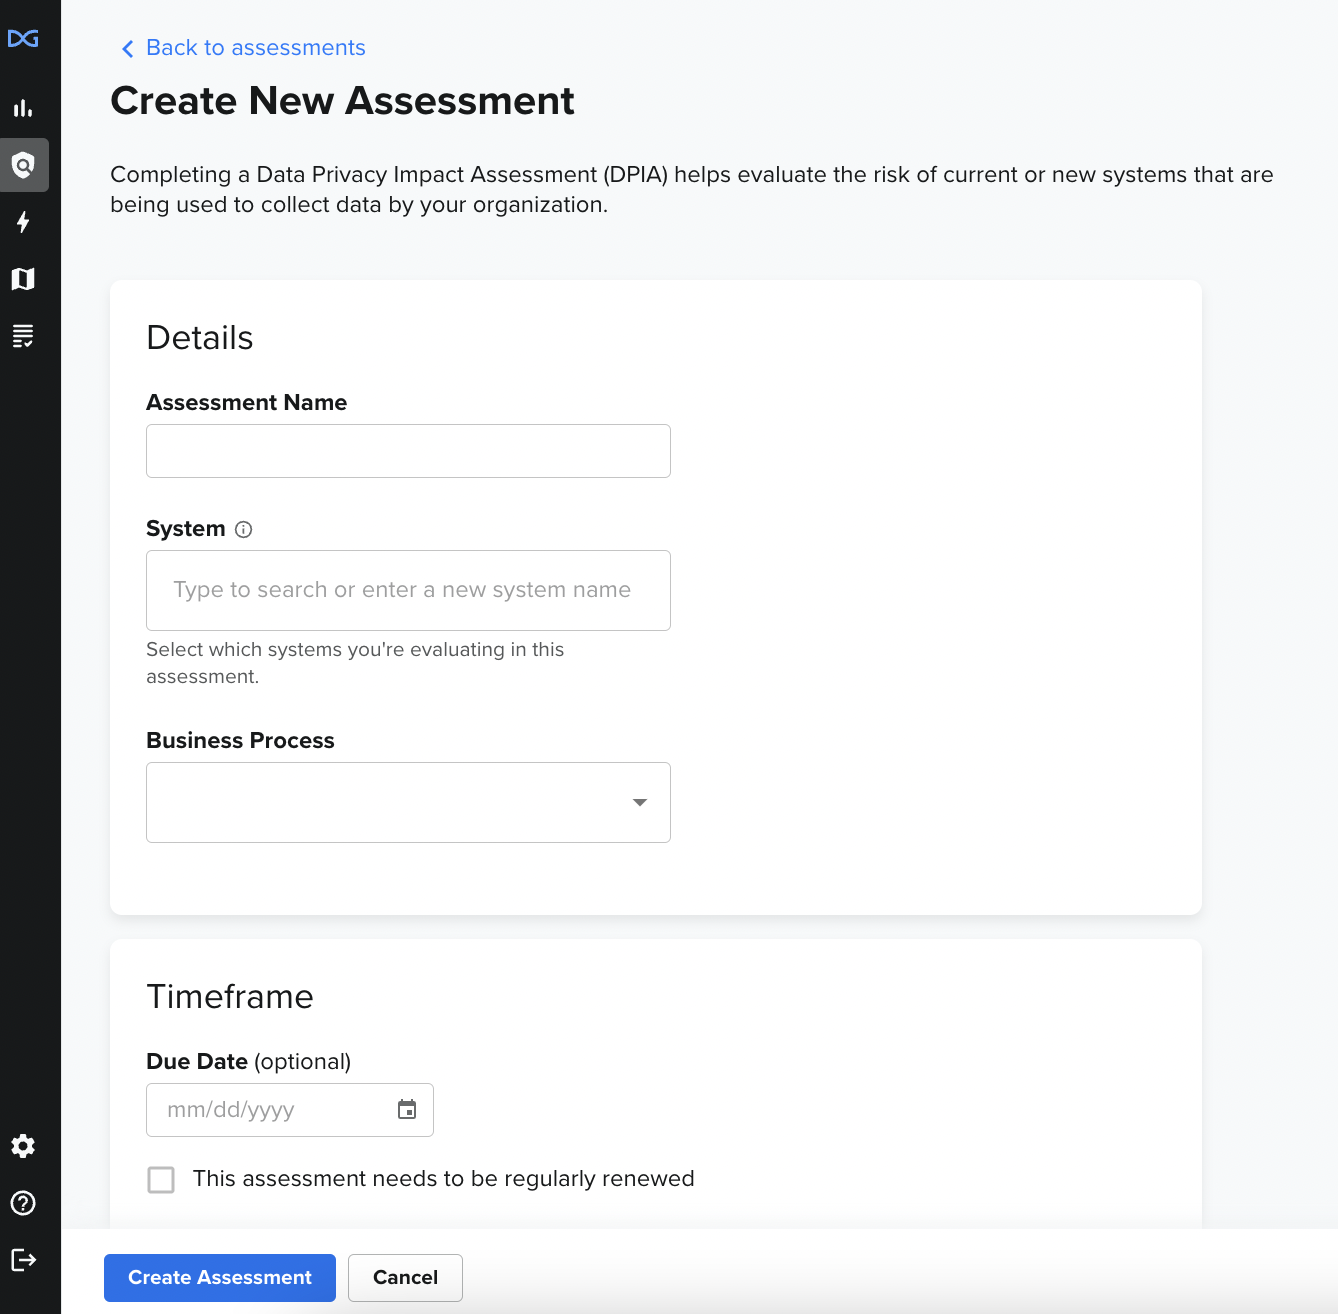
Creating a New Standard Assessment
Clicking on the ‘Create New Assessment' button will direct the user to a creation page where they need to specify:
- Assessment Name
- System(s) *ability to add multiple systems
- Business Process(es) (optional)
- Due Date (optional)*
- Renewal Cycle*
(* = new features recently added)
Adding a Contributor
When a contributor email is added to an assessment, an invite email is sent to the email address with:
- Subject: “Inviter (first name and last name) from Customer’s_Datagrail_Account_Name has shared an assessment with you”
- Body: First name, last name and email address of the DataGrail Customer user that created the assessment, the name of the customer’s DataGrail account and the system this assessment is for
- Clickable link to view and edit the assessment
- [Optional] Message for Contributor
A contributor can also be added after an assessment has been created if the assessment is in either a ‘Not Started’ or ‘In Progress’ state.
Clicking on the ‘...’ button to the right of an assessment, a user can add a contributor to an already created assessment, utilizing the Invite Contributor option and filling in the email address and an [optional] message to send them an invite.
If a contributor has already been added to an assessment, clicking on the ‘...’ button to the right of an assessment will display the options to ‘Resend Invite’ or ‘Remove Contributor’. Clicking to Remove Contributor will load a confirmation with context on how the removal of a contributor is also the submission of an assessment. Confirming this action will result in a green notification, will move this assessment into an ‘In Progress’ status (if it was not already), and remove the contributor.
Note : Contributors can be internal to your business or external, as the Vendor
Filling out an Assessment
All created assessments have a total of 10 sections where the user is able to add information related to the system on the assessment.
- General Information
- Need for DPIA
- Consultation Process
- Data Processing Content
- Benefits of Processing
- Lawfulness & Fairness
- Privacy Rights & Expectations
- Protective Measures
- Special Topics
- Risks & Mitigations
All questions within these sections are optional to complete and will be available
A user can move back and forth between sections by (1) utilizing the Back and Next buttons respectively or (2) by clicking on the section they want to jump to via the list of sections available on the left hand side of the assessment. When a user is on a certain section, that section will be highlighted in blue.
Creating a Custom Template Assessment
Clicking on the ‘Create Template' button will direct the user to a template creation page where they need to specify:
- Assessment Name
- Section Title
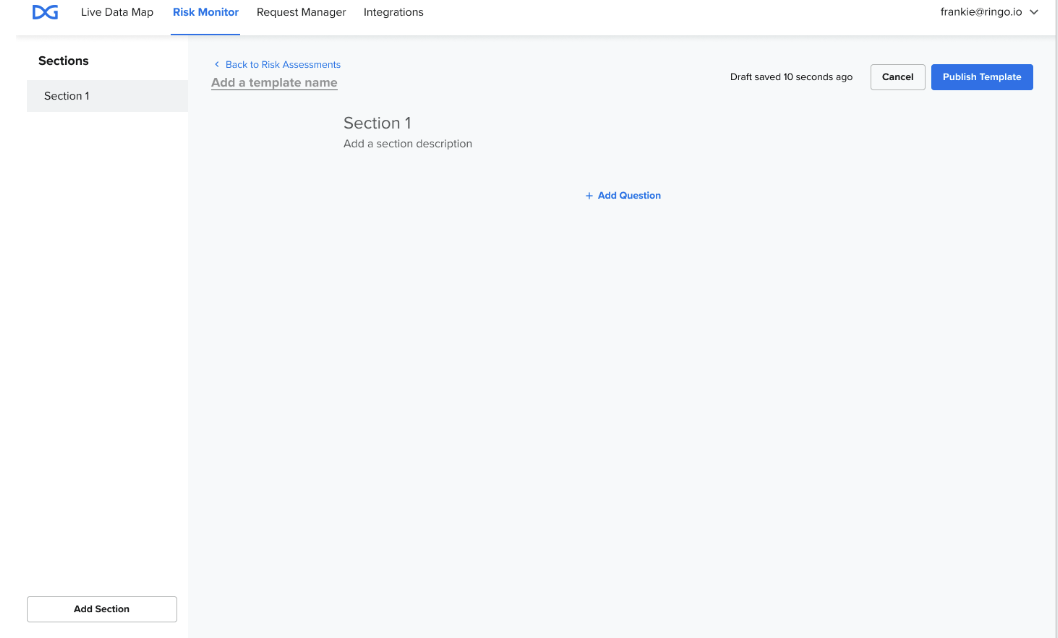
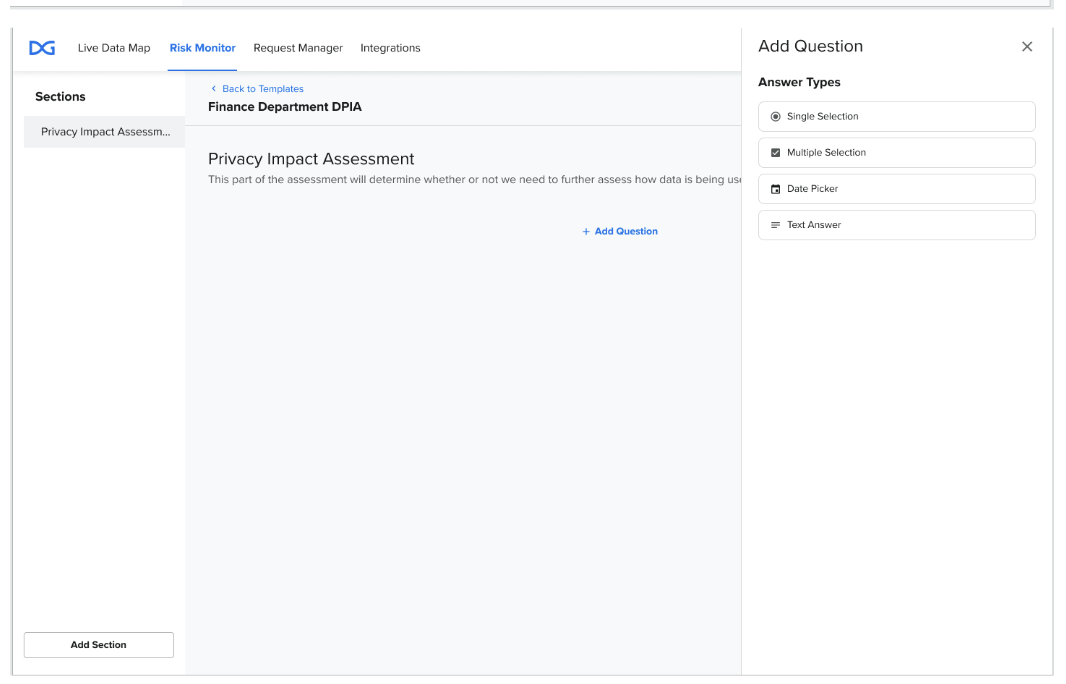
After creating a section, click on + Add Question to begin building out the information applicable for the section.
Next, select the type of answer that will be provided for the question out of the following options;
- Single Selection
- Multiple Selection
- Date Picker
- Text Answer
After creating your Question, you can make that question conditional and chose if, and when, to show the next question, by Adding a Rule.
(Note : to Add a Rule, you must first add a second question. Once the second question is added, you will see the "Add Rule" button generate)
To Add a Rule, follow the below steps;
- On the newly created question, click "Add Rule" button at the bottom
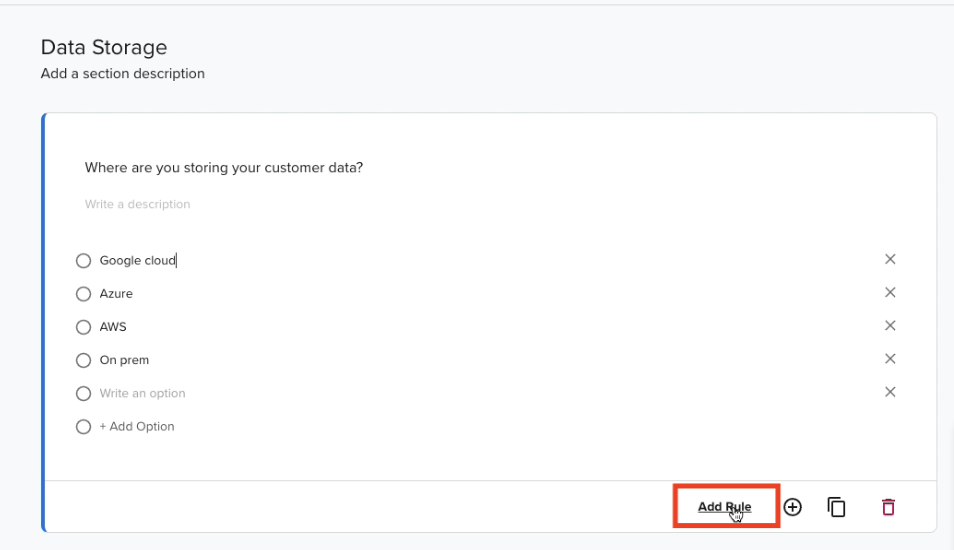
- Select the answer to the question
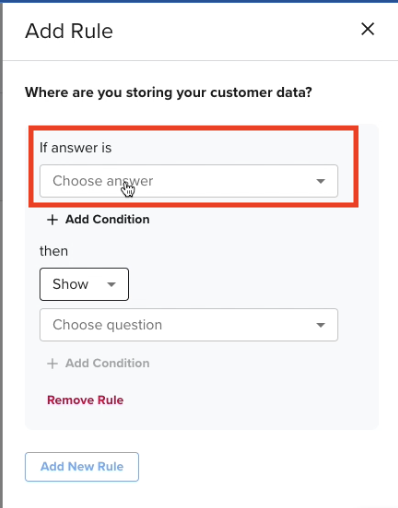
- Select the action to take place when the above selected answer is chosen
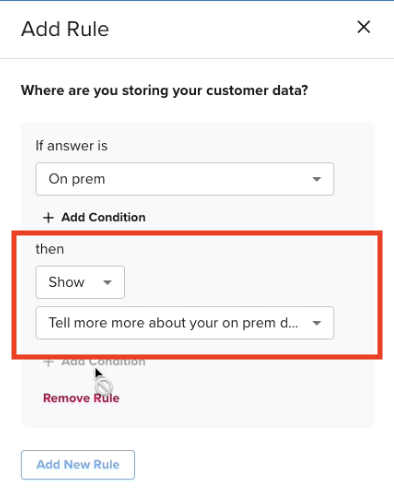
- When the rule is complete, select "Add New Rule" (note : if you'd like to start over or cancel the rule, select "Remove Rule")
When a rule has been added, the selected question with the rule assigned with show "1 Rule Added" and the following question will show "Conditional" as it will only be visible to the User if they select the answer provided in the created rule

After you've created your Section, Question, and Answer, repeat for as many Sections are applicable for your Assessment then click "Save Assessment".
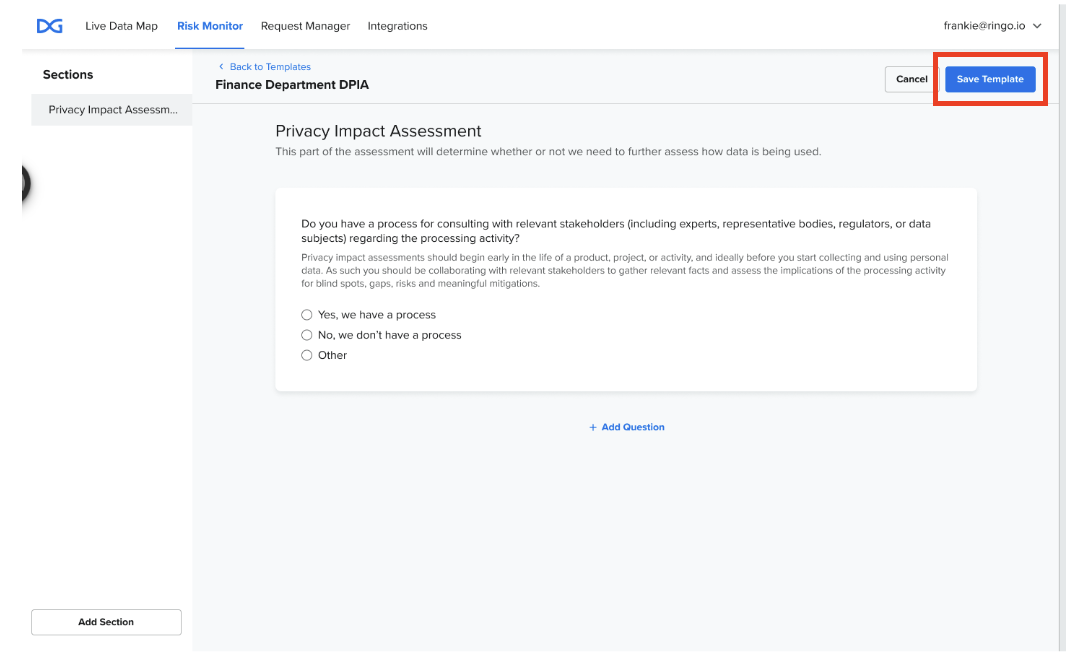
After saving, the assessment will be viewable to edit and approve on the main Risk Monitor Assessment page.
Submitting vs. Approving an Assessment
Submitting an Assessment
When an invited contributor has completed filling in the assessment, they are able to Submit this assessment. Clicking this button prompts a confirmation pop up to the user with:
- Context around what this action means
- The ability to add an [Optional] message to the Assessment Owner
- Buttons to both Cancel and Submit Assessment
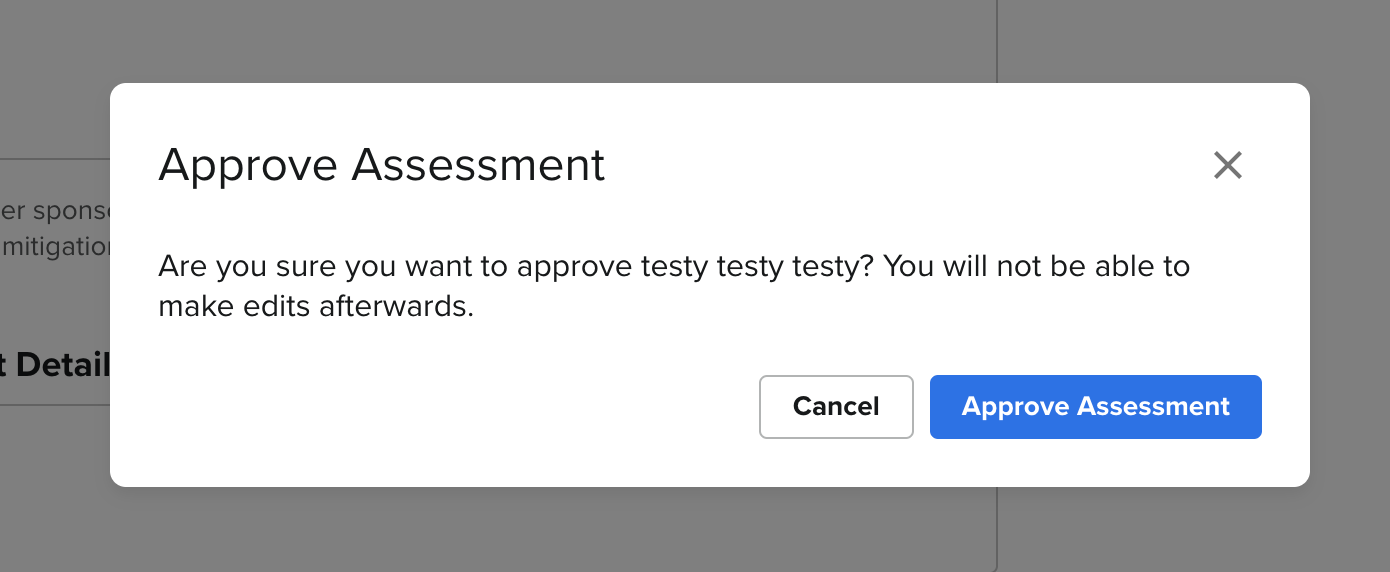
Approving an Assessment
A Super Admin user is the only user type that can approve an assessment. When an assessment has been submitted by the editing user, it is in an In Progress state. Clicking on the ‘...’ button on the right of this assessment will only display the option to View the assessment.
Clicking "View" will load the submitted assessment with the option to Approve Assessment. Clicking on this button will load a confirmation modal that the super admin will need to confirm for the assessment to be submitted.
When an assessment is successfully submitted, all approval and change saving ability is replaced at the bottom of the assessment with the option to Download as PDF.
Assessment Statuses
There are four statuses an assessment can be in:
- Not Started
- In Progress
- Pending Approval
- Approved
Each status will provide a percentage of completion. If the Assessment is "Not Started", the percentage will show as 0%.
Not Started
No edits have been saved on this assessment yet by the editing user. This state is still editable by the editing user.
In Progress
This state can occur if:
- Edits have been saved on this assessment by the editing user. This state is still editable by the editing user.
- The invited contributor on the assessment was removed from the assessment by a Super Admin. This state is still editable by a Super Admin user.
- The invited contributor on the assessment completed the assessment and submitted it. This state is still editable by a Super Admin user.
Pending Approval
This state occurs when the invited collaborator(s) completes the assessment and submits for approval.
Approved
This state can only occur if a Super Admin approves an assessment. This state is not editable, only viewable, regardless of user permissions.
If you have any questions about this feature, please reach out to your dedicated CSM or support@datagrail.io.
The information contained in this message does not constitute as legal advice. We would advise seeking professional counsel before acting on or interpreting any material.