Automating Request Manager Workflows
Automations allow customers to build out their business processes for ticket processing. Customers can utilize workflows to programmatically configure how tickets process based on their own unique processes.
DataGrail User Roles
Only users granted specific user roles will have access to this page. The following roles are able to view and interact with Automations:
- Super Admin
- Request
Only customers that have purchased Request Manager will have access to this tool. Combining any user roles that do not have access to this UI with any of the above will grant a user access to these updates. For example, if a user has the "Live Data Map Admin" role, adding the "Super Admin" role to their user record would then allow them access to Automations.
Automations in DataGrail
Within Automations, customers can create workflows to programmatically define how each phase of a data subject request is processed. Workflows can be set for each phase of request processing. Workflows are driven by the ability for customers to define conditional sets for requests that can branch and add actions, such as selecting which integrations process, or how they process, and setting specific actions that need to occur for different processes.
Data Subject Request - Portal Ticket Processing Life Cycle
The general lifecycle for portal tickets includes ticket creation, phases to manage verifications, ticket configuration (policy, relationship, etc.), data extraction, pending actions, and pending deletion.
With automations, a user can configure processing actions in three phases: extracting personal data, pending action, and pending deletion. In the future, automations may add more processing phases for configuration.
Each phase has specific functions in the DataGrail application and can affect the following phase. Below are examples of portal ticket functions that are available today without automation.
Extracting Personal Data
When a request is in the "Extracting Personal Data" phase, it is preparing to perform the access portion of the request, meaning it searches configured integrations to find personal identifying (PII) data. All request types and tickets move through this phase to determine whether PII exists throughout a customer's integration ecosystem.
Pending Action
Once a request has completed the extracting personal data phase, it moves into the "Pending Action" phase. This phase provides different actions a user can take once the PII has been extracted. A user can process the request as is, down select specific integrations or files for processing, deny it, or mark it as non-responsive. This phase defines how the ticket will be processed. In this phase, actions can be down-selected, so they are not included in the processing phase; when down-selected, an integration is excluded from downstream processing. For example, no action can be taken in an access request if no data is returned for a specific integration, and no processing will occur.
Pending Delete
This phase is specific to deletion request types. Pending Delete is the deletion processing phase where PII is removed from a customer's integration network through the configured integrations. In this phase, the related information found in the action phase and the configuration set in the pending action phase are deleted.
Setting up Workflows
Workflow Definitions and Terms
| Term | Definition |
|---|---|
| Automations | Actions and functions in DataGrail that replace manual processes. |
| Workflow | A user-created collection of nodes. It contains conditions and actions that will be triggered automatically based on the completion status of a previous action or the result of a condition. |
| Node | A node represents a condition or action. In the UI, it appears as a box connected by directed lines to one or more other boxes (nodes). |
| Condition | A piece of logic that verifies whether a condition (or set of conditions) holds. It will return a single boolean value, true or false (e.g., policy == 'GDPR'). This allows us to create branching logic within our workflow (e.g., if X, do Y, else do Z). |
| Action | A node in which some action is taken (e.g., sending an email to the user). In the above case, most actions will likely accept some parameters, such as one or more email addresses. We must be able to track each action's completion and error state. In this first pass, we will only automate actions currently in the DataGrail application. |
| Workflow Phase | The workflow phase is the portal ticket phase affected by the automation. Portal tickets have three phases that may have associated workflows. The internal portal ticket phases that correspond with these workflow phases are extracting personal data (pending_datagrail), pending action (pending_legal), and pending delete (pending_delete). Each phase corresponds to a processing stage that a ticket goes through to process and complete the request. |
Creating An Automated Workflow
To create an Automated Request Manager Workflow, navigate to Automations in the sidebar navigation.
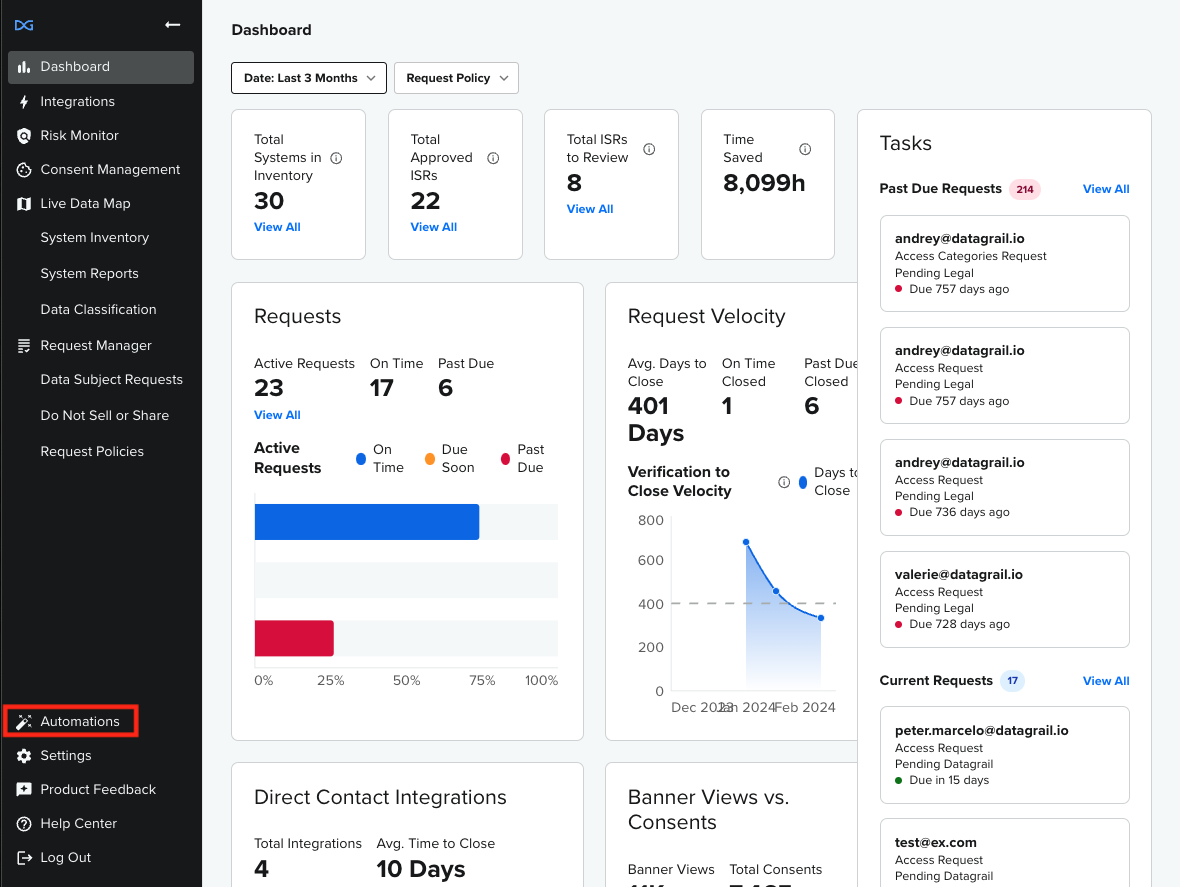
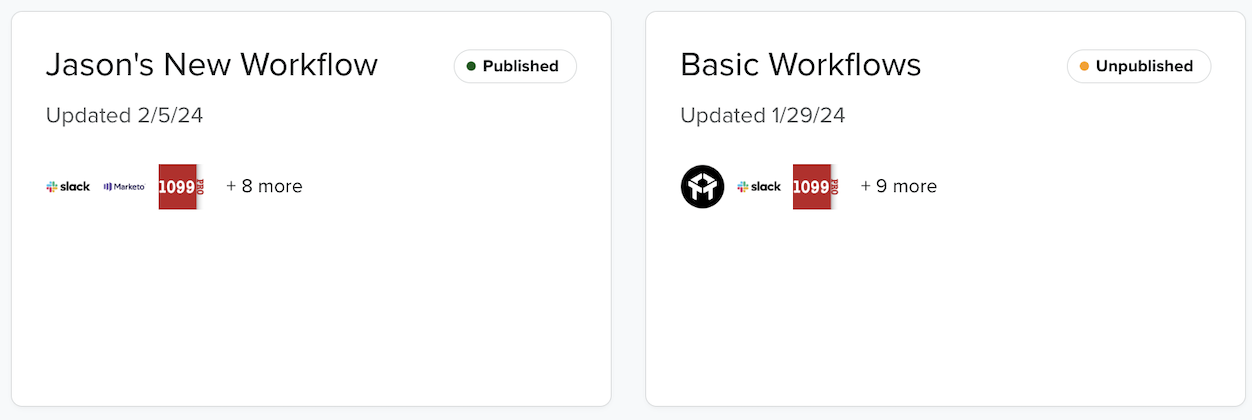
Once users have navigated into Automations for the first time, they should see an Automations Home Page. This page will show all workflows that customers have created and published.
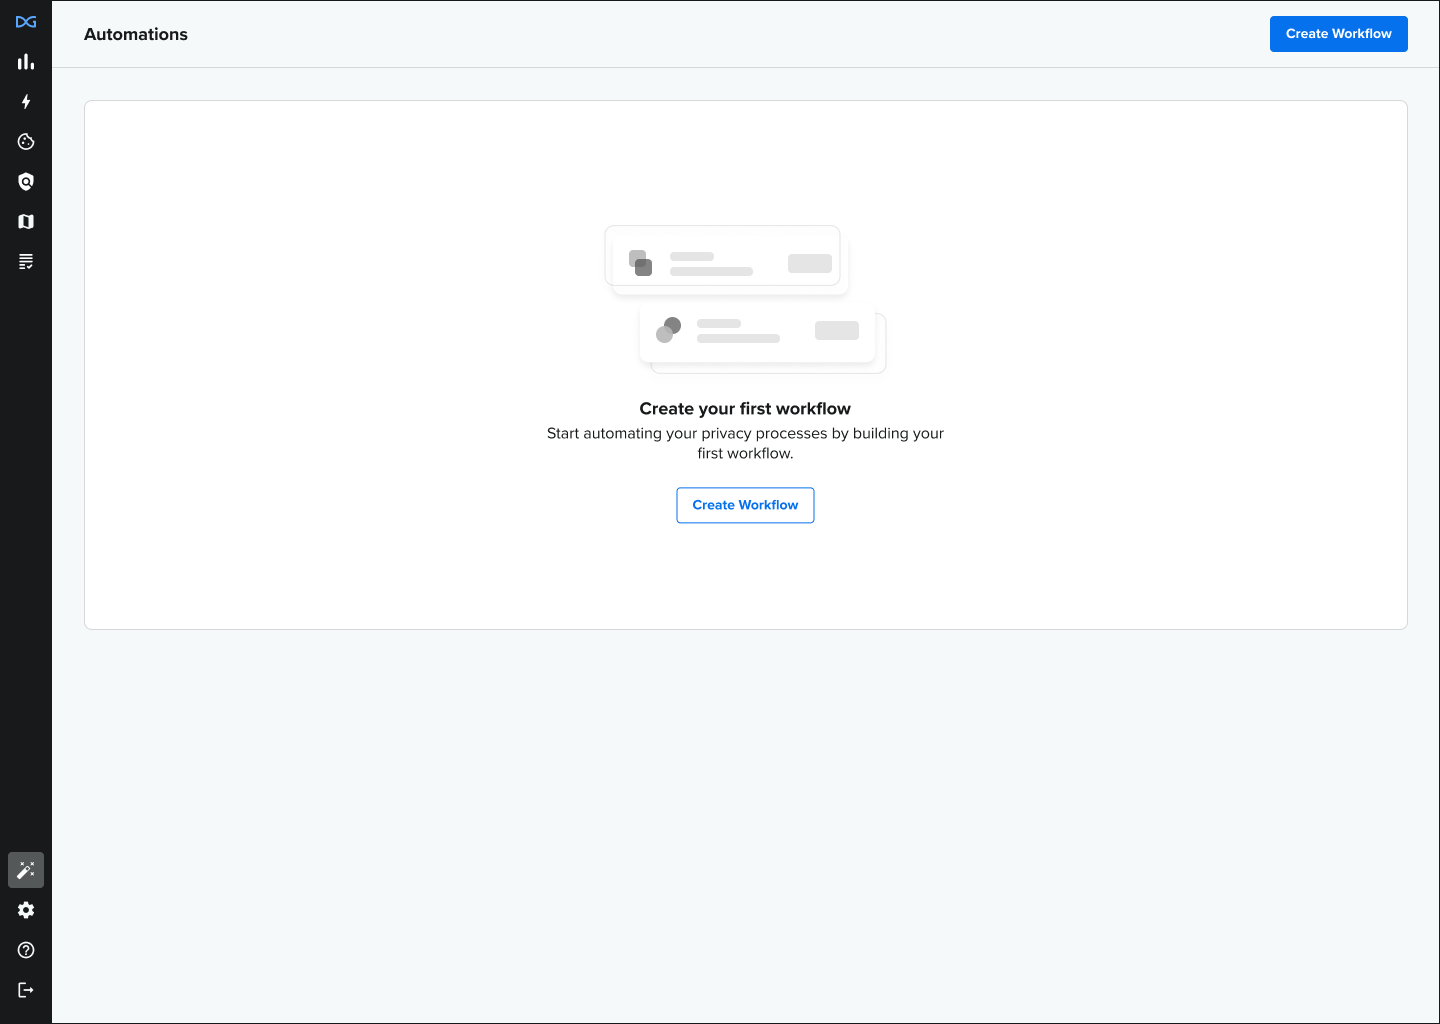
Users can click the Create Workflow button to create a workflow. There are three required fields when creating a workflow:
- Creating a title
- Adding a description
- Selecting the workflow phase (Extracting Personal Data, Pending Action, or Pending Delete)

If a customer wants to refer to which phase they are in, the first node will always define which phase the workflow is for.
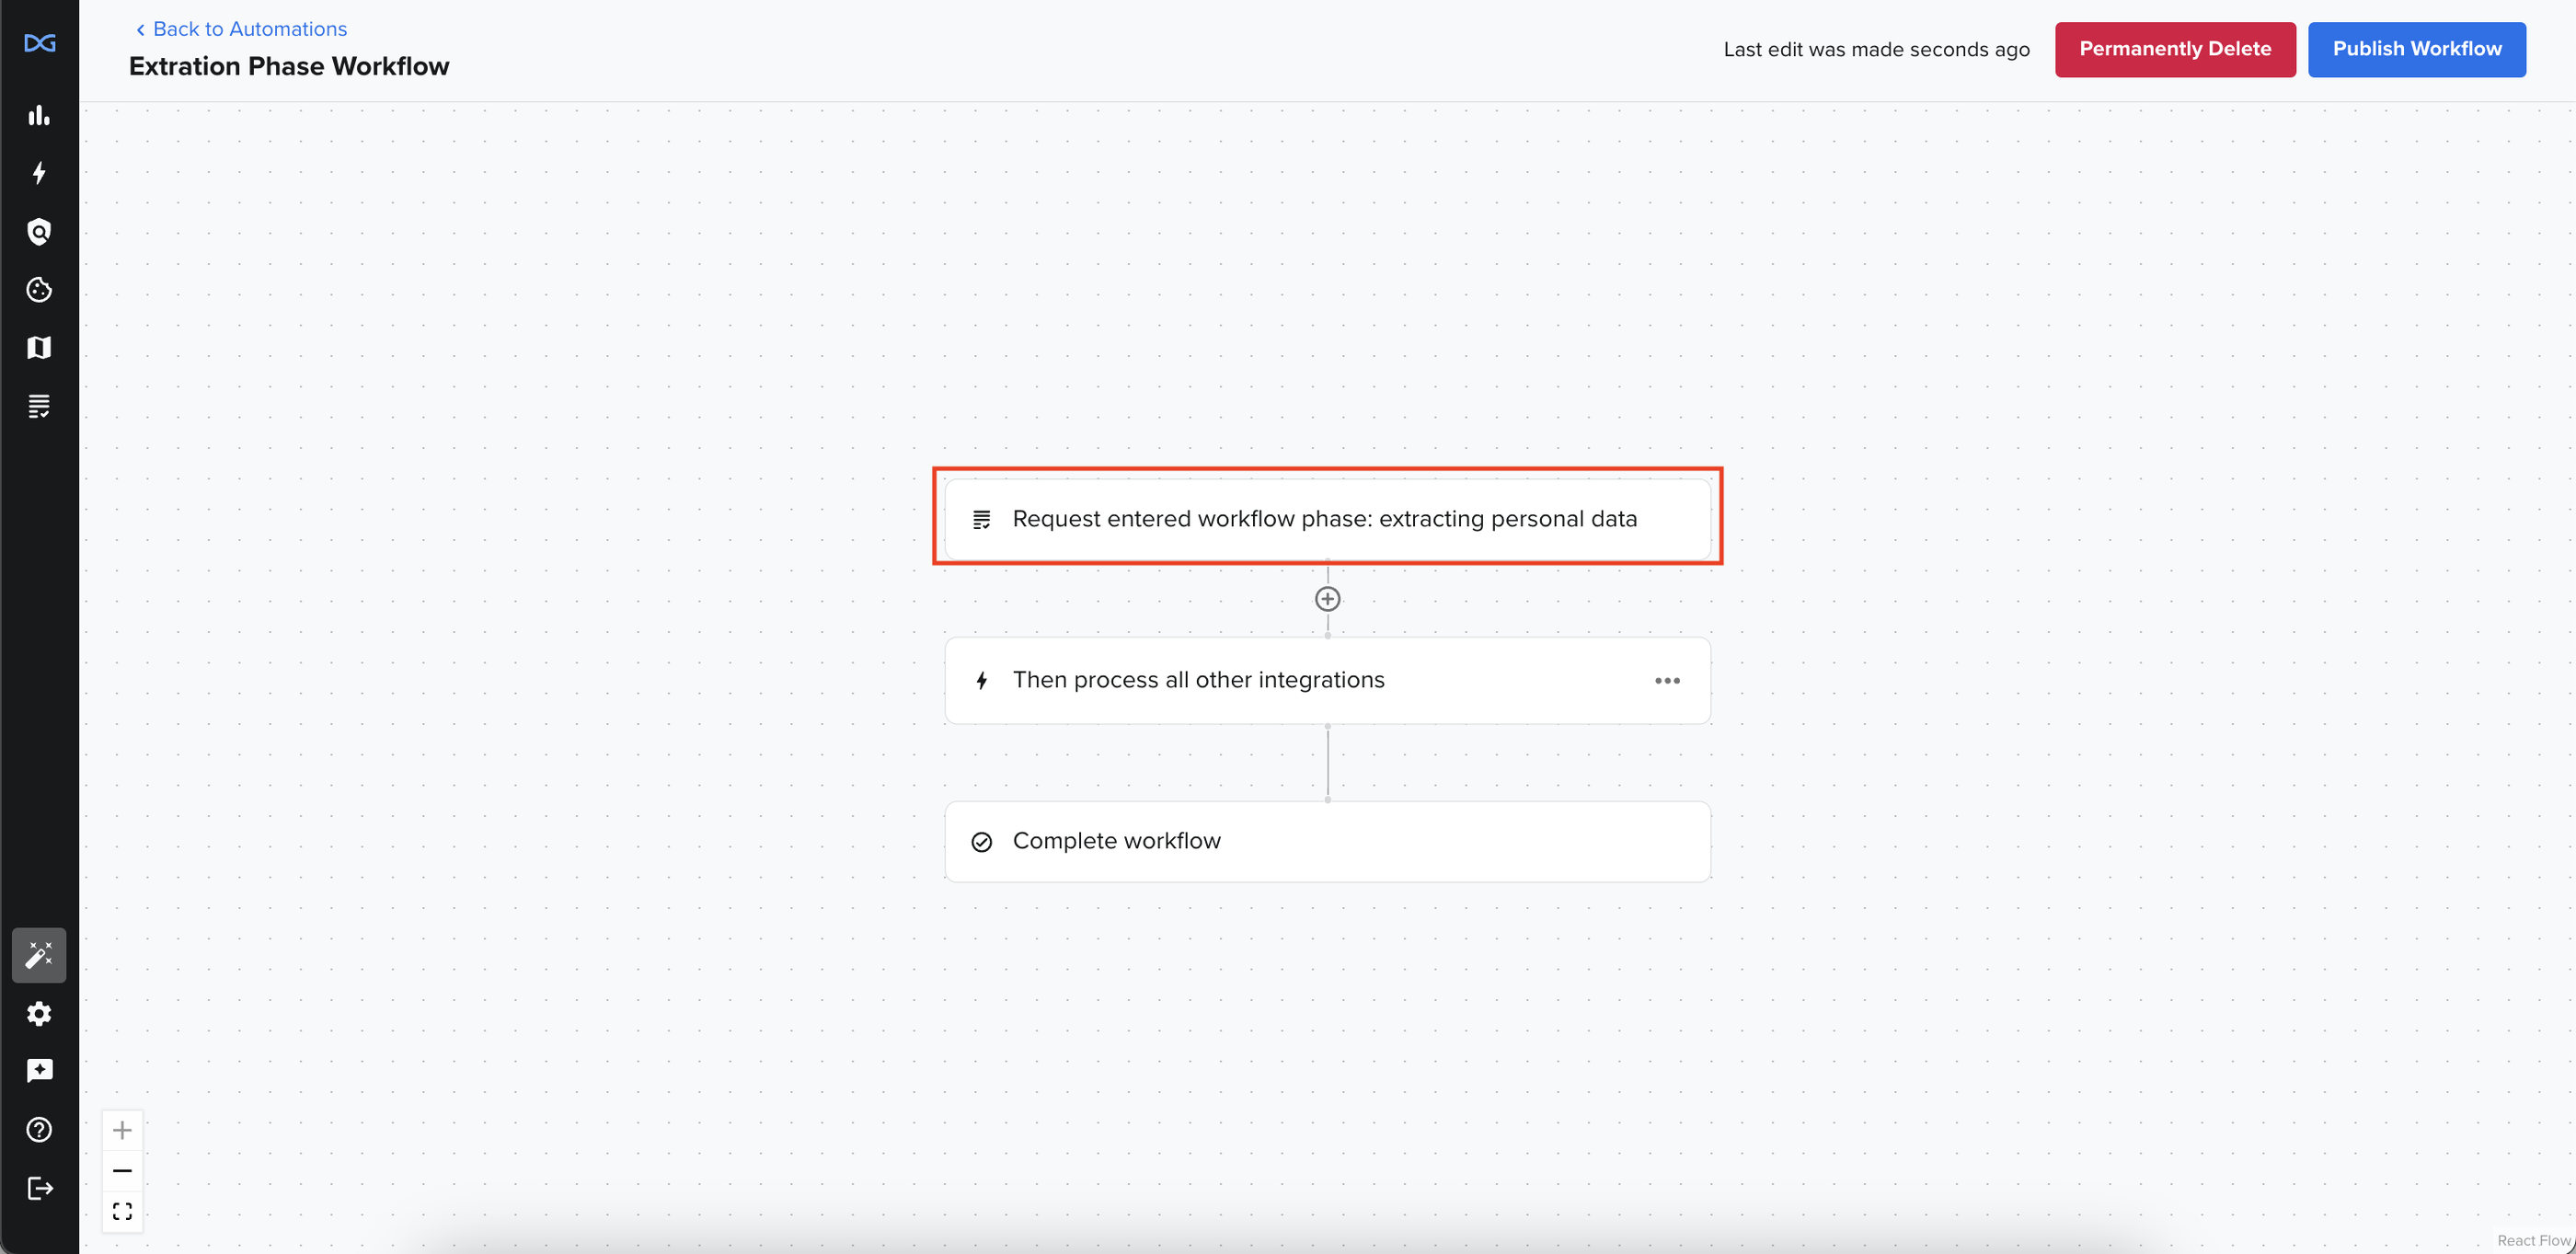
The remaining screenshots are of the Extraction Phase. In this phase, any branch created will default to having a node for "Process all unselected integrations." This node appears only in the extraction and pending delete phase. All phases will default to showing the "Complete Workflow" node.
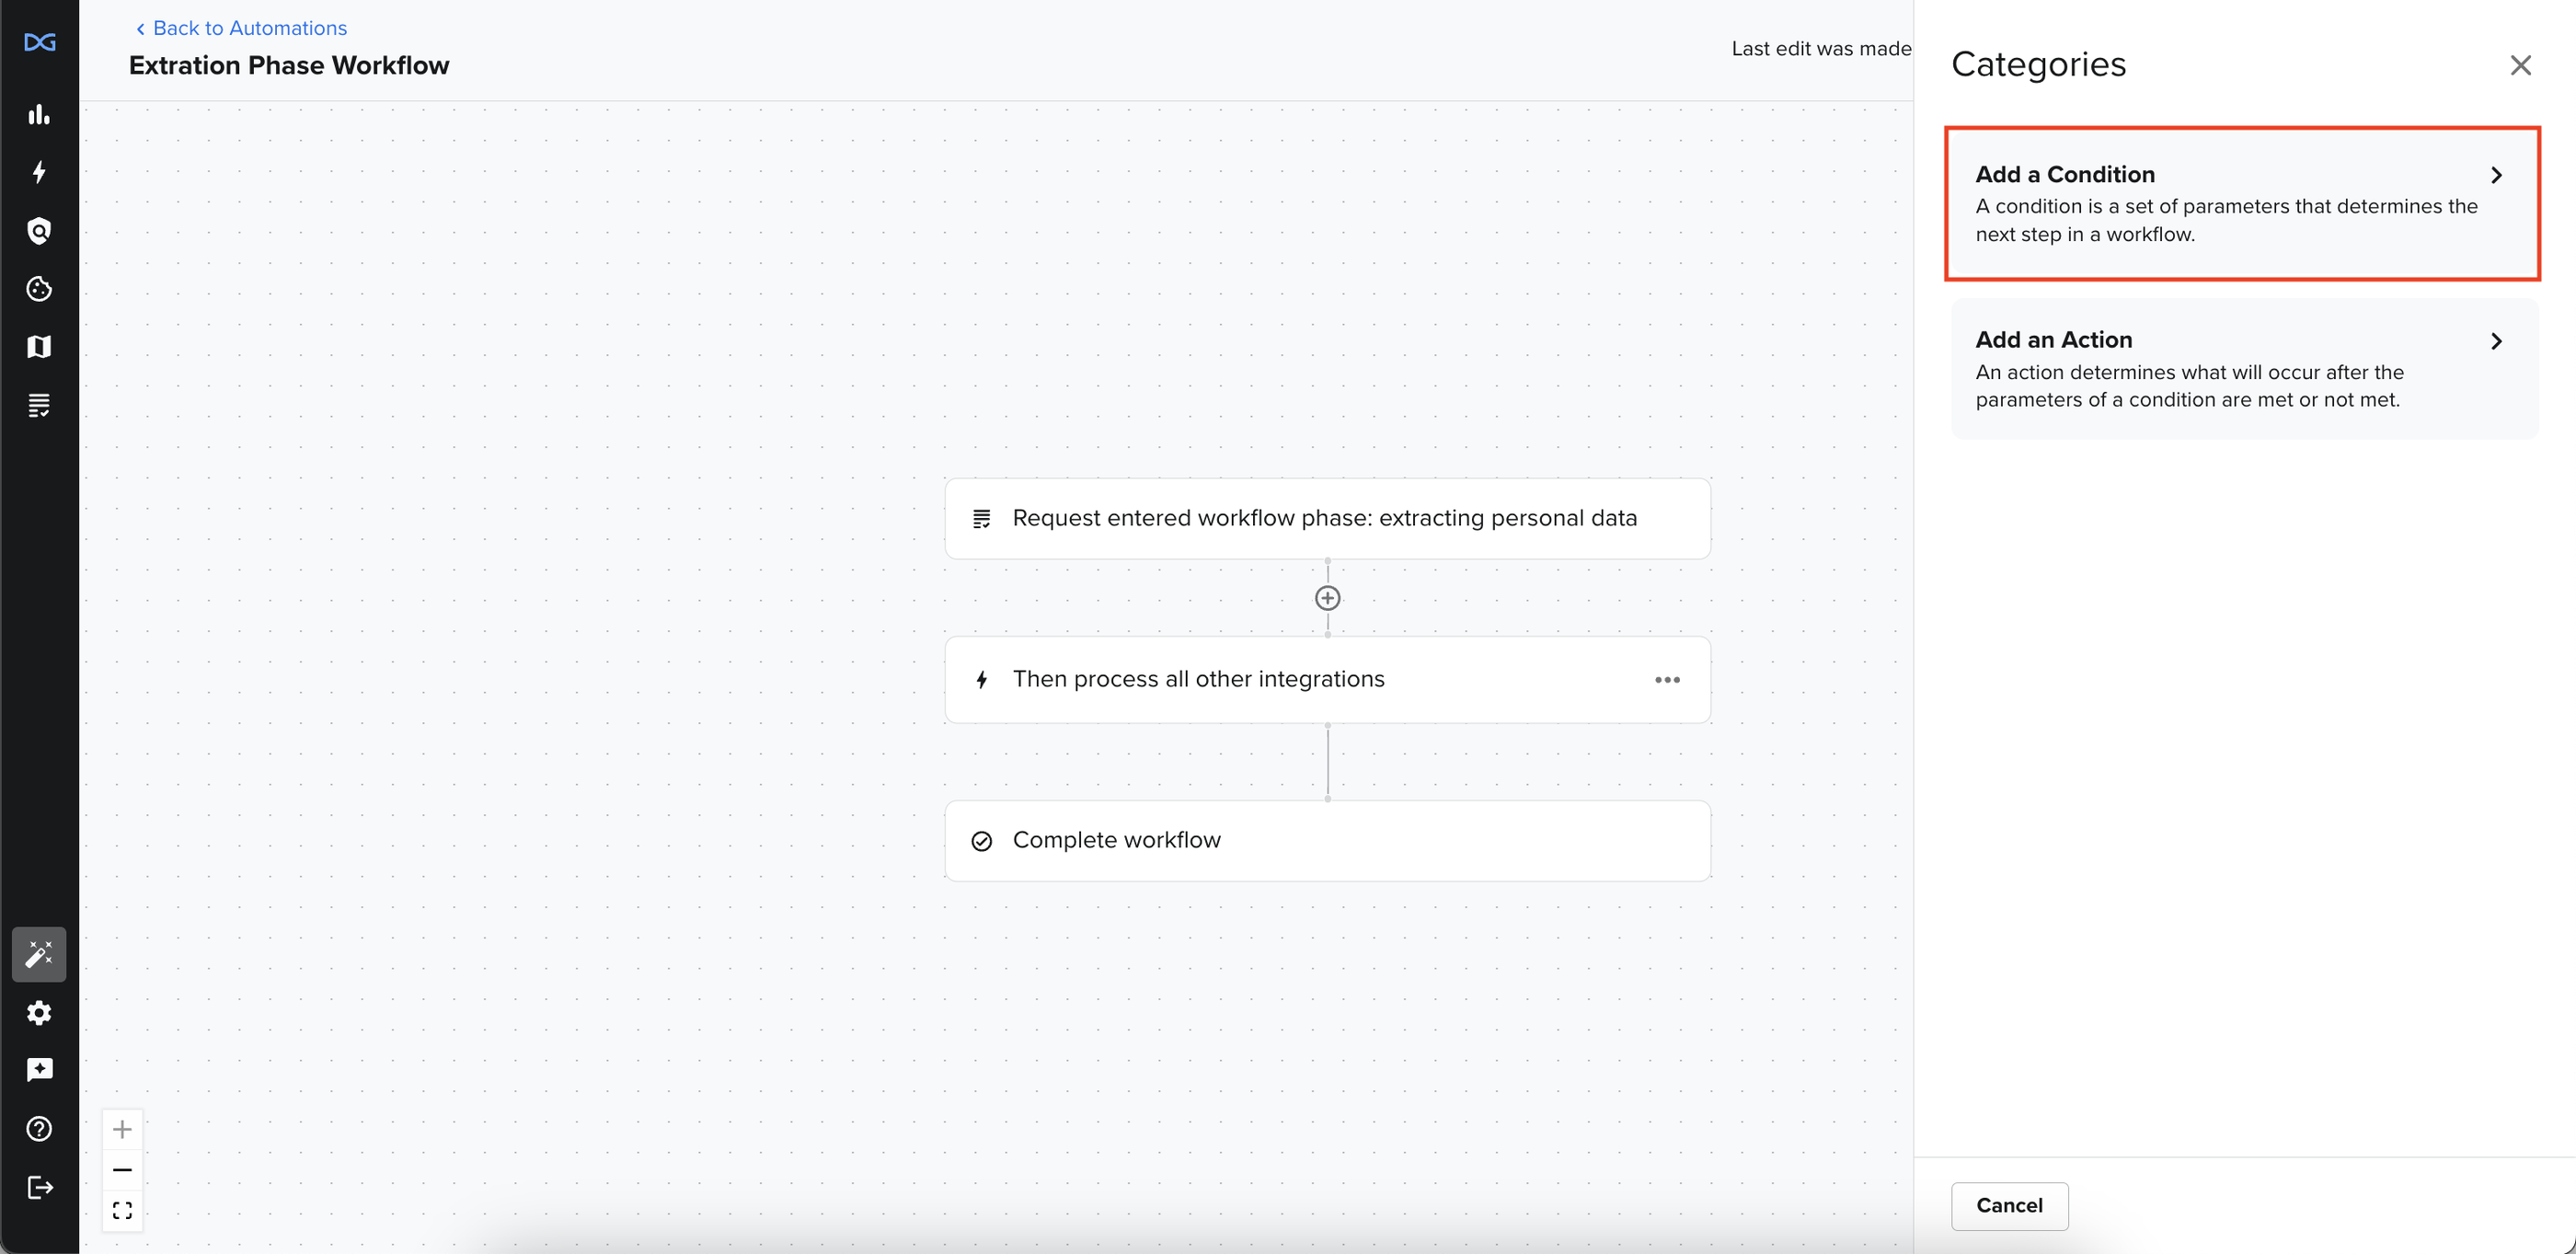
When building a workflow, there are two main types of nodes: Conditions and Actions. Users can click the "+" button to add a condition or action. This will open a drawer with options for selecting actions or conditions.
Adding a Condition
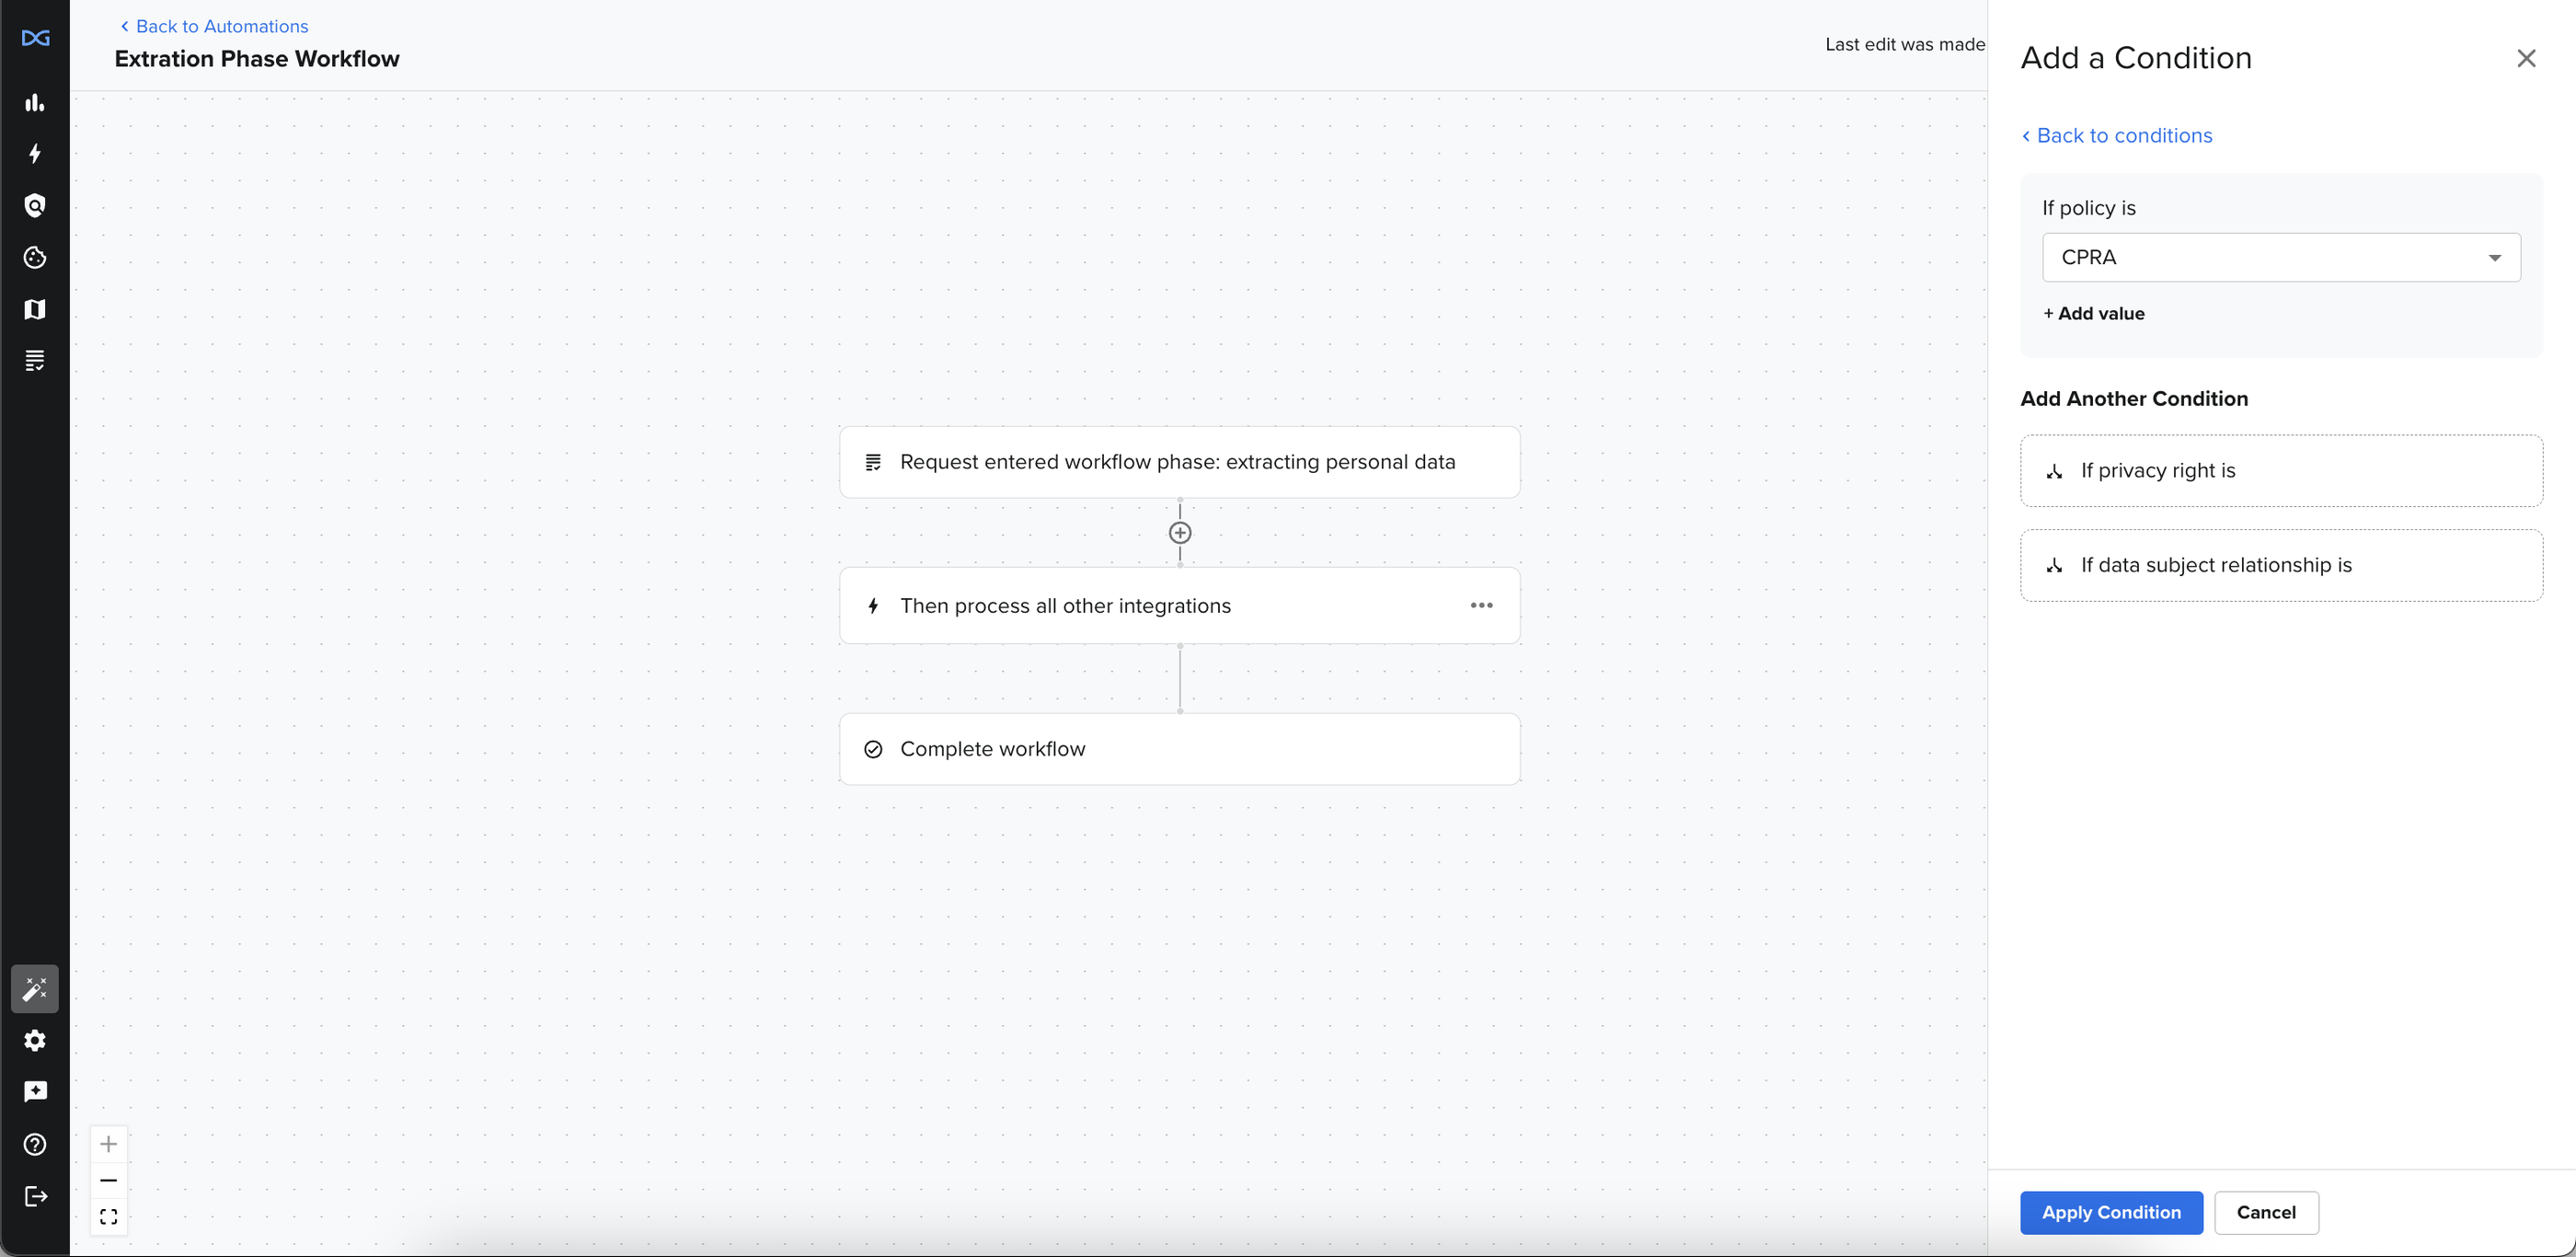
Conditions can be used to define specific processing scenarios. For example, a customer can create a specific processing scenario based on a request policy, privacy rights, or the data subject relationship field. Conditions utilize "and/or" logic so a customer can use multiple conditions in the same node.
To begin creating a condition node, a user will need to select Add a Condition and select which condition they would like to start with. Note: not all conditions will appear, there are certain conditions that need to proceed.
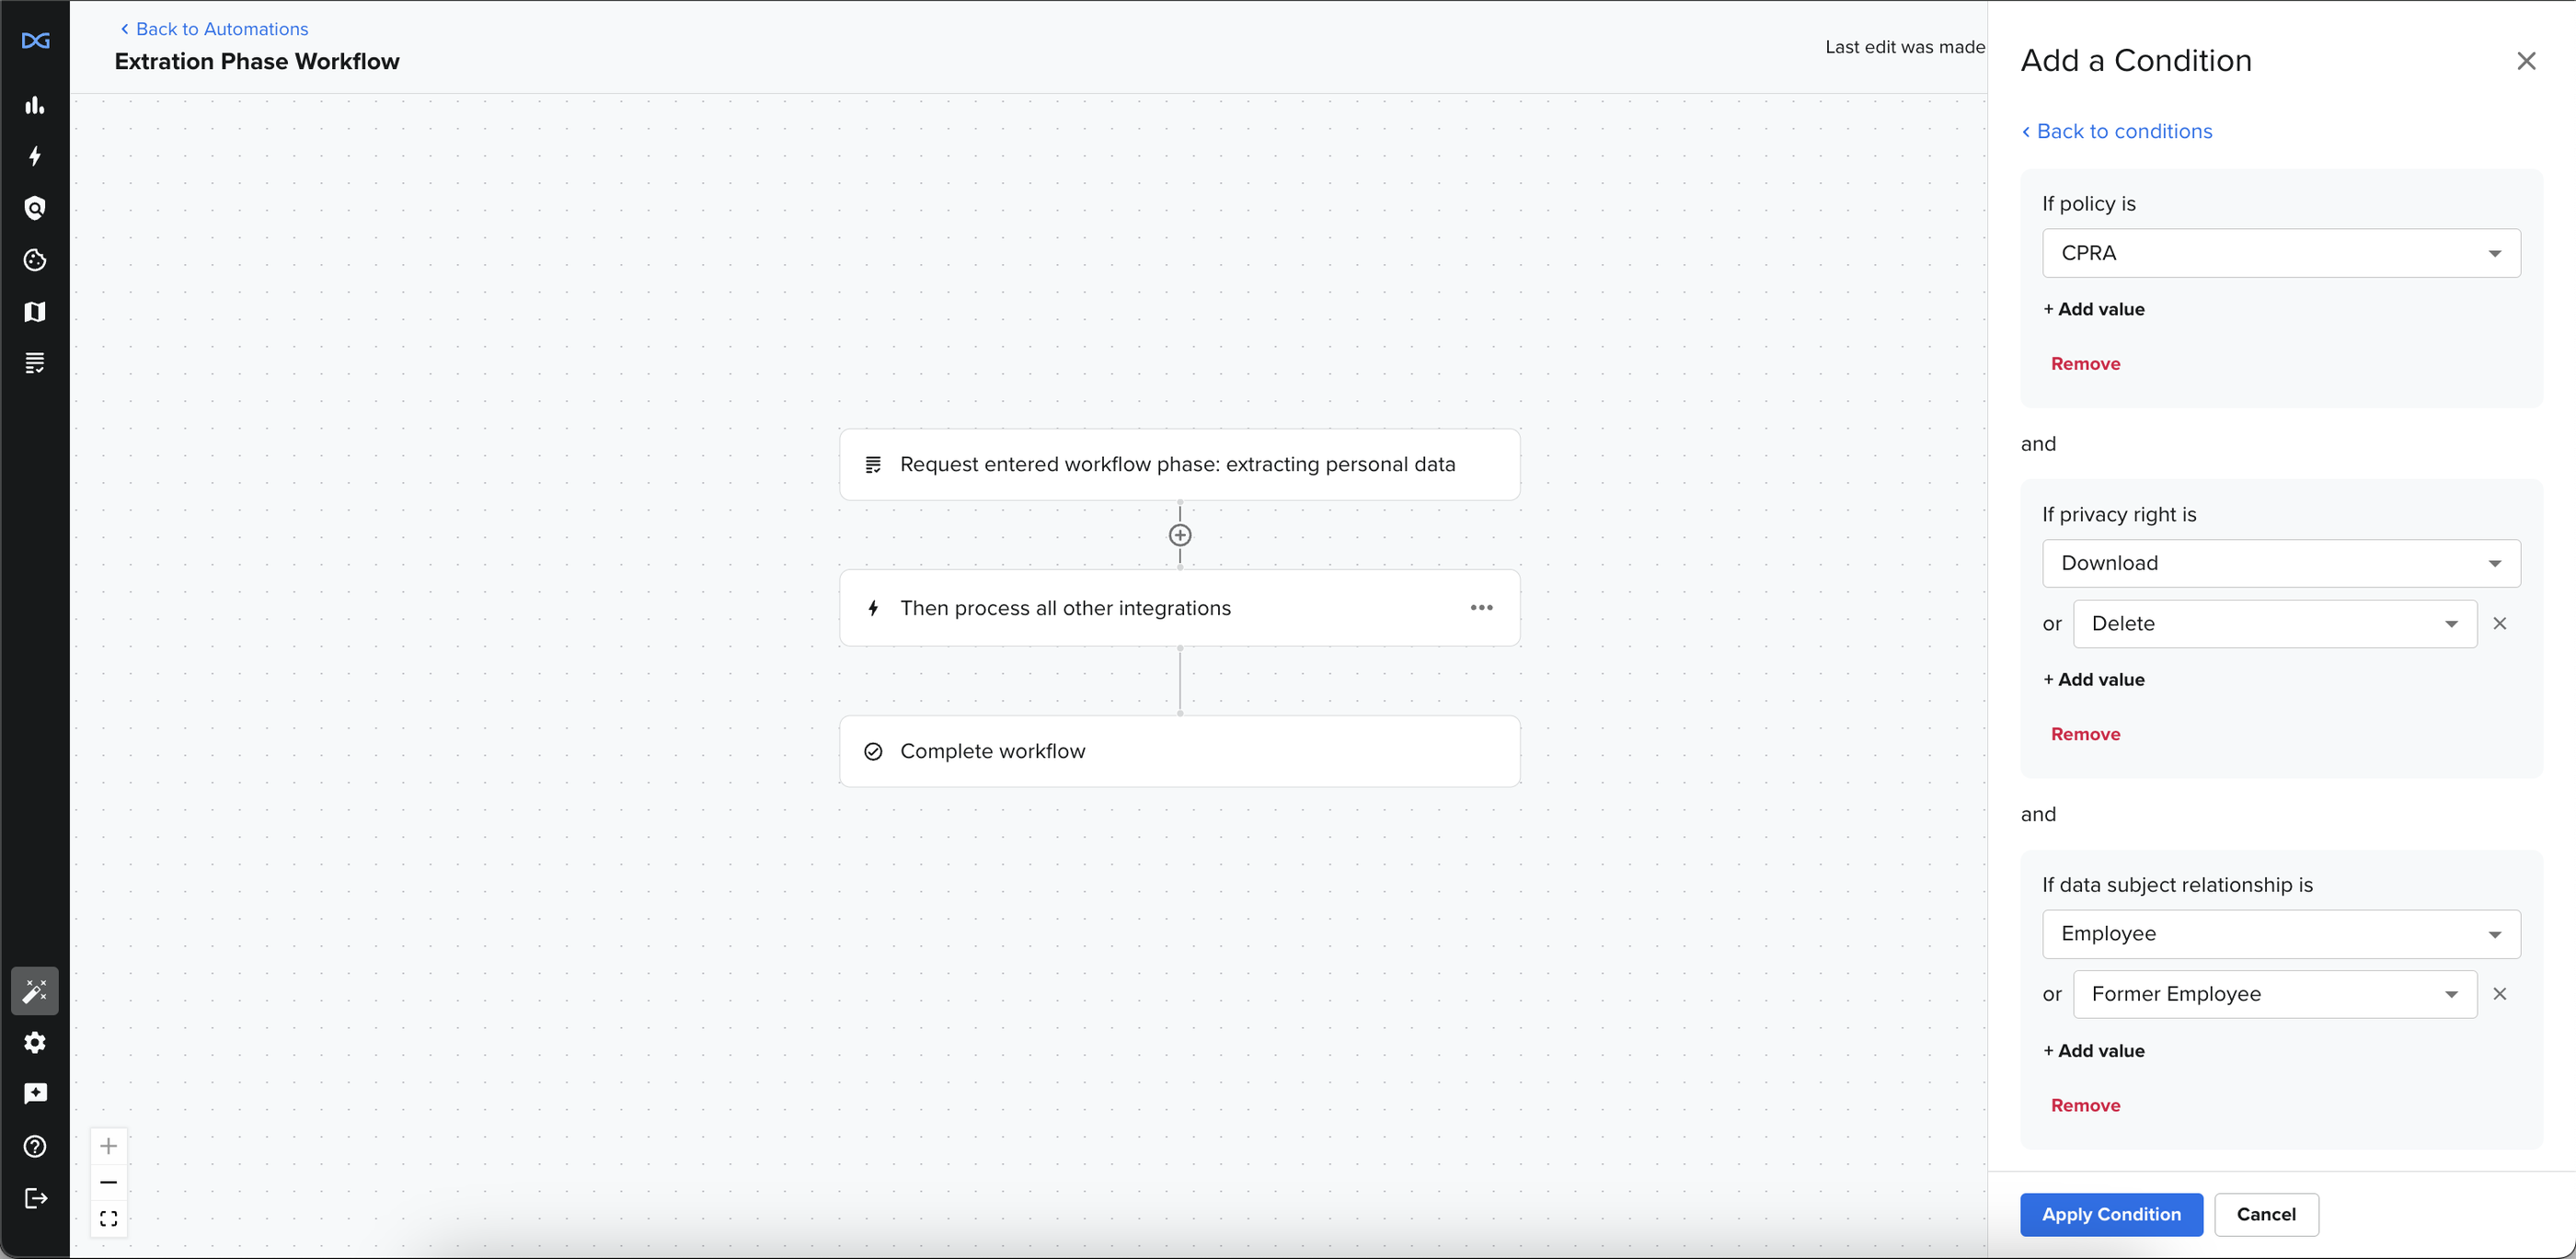
This will bring up a secondary drawer where multiple conditions can be selected. Any available condition can be utilized from the "Add Another Condition" section. When a condition set contains multiple conditions, there is always an "And" operator between the two. "Or" operators can only be added in the same condition using the "+Add Value" button.
When adding a condition, specific values must be selected via the dropdown. Values are the inputs. For example, the values for Privacy Right will be deletion, download, etc.
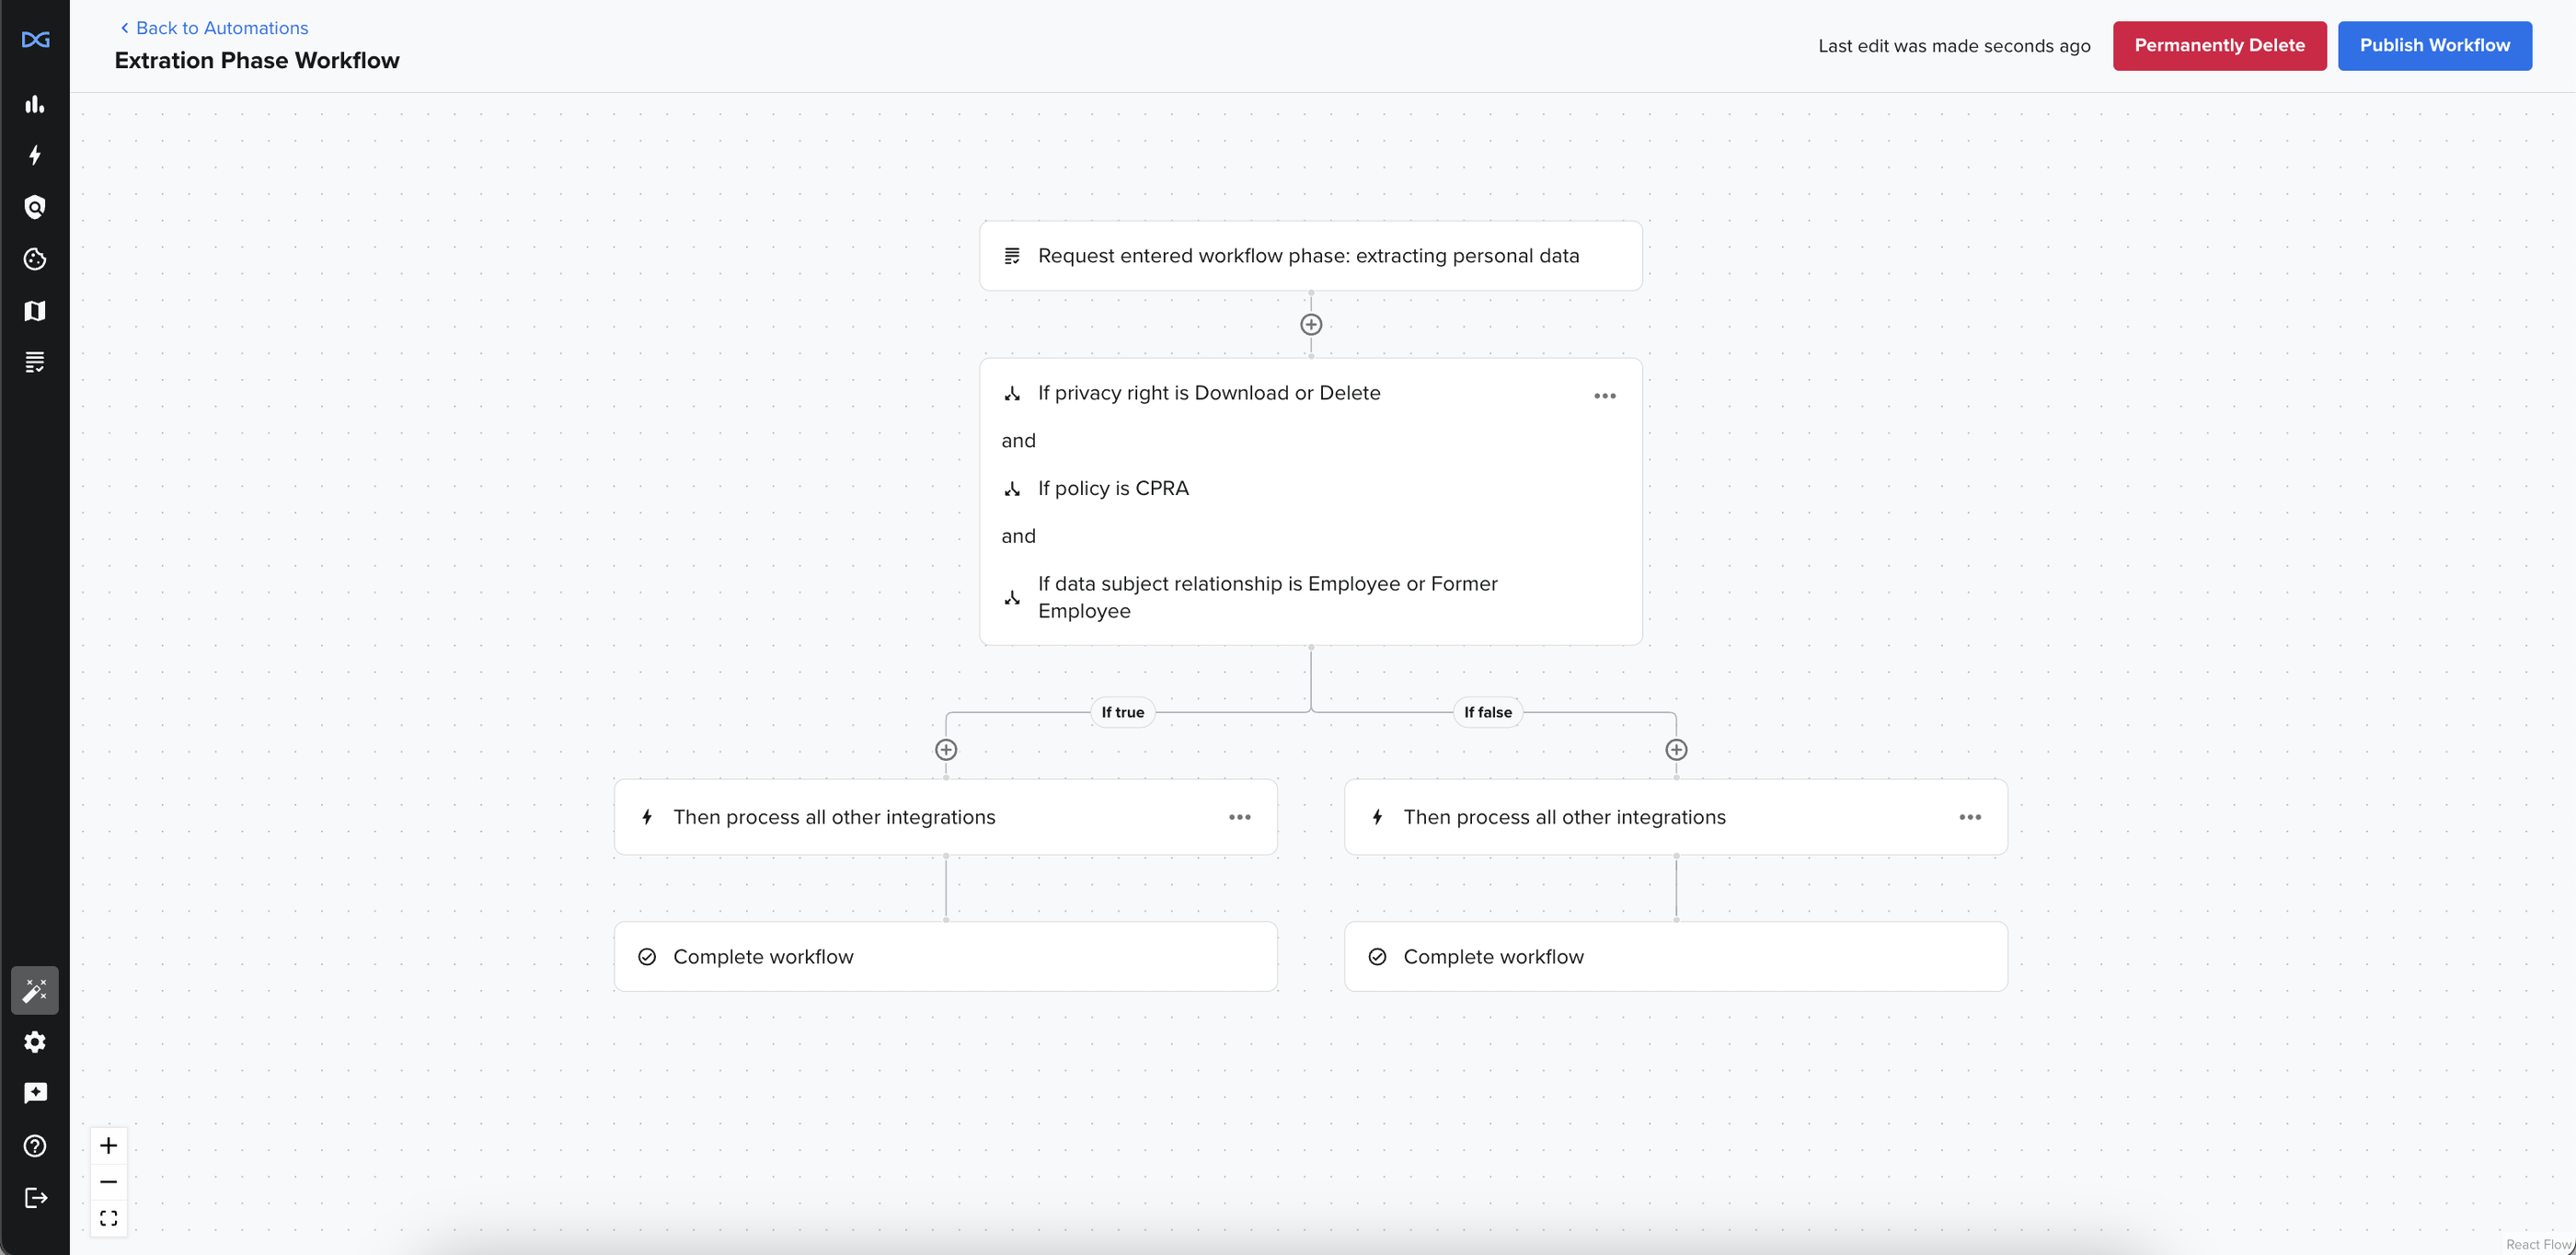
Below is an example of a condition utilizing multiple conditions and values. In this example, the condition set reads "If Policy is CPRA and the Privacy Right is Download or Delete, and the Data Subject Relationship is Employee or Former Employee."
Once a condition node has been applied to another workflow, the workflow will split into two branches: a "true" branch and a "false" branch.
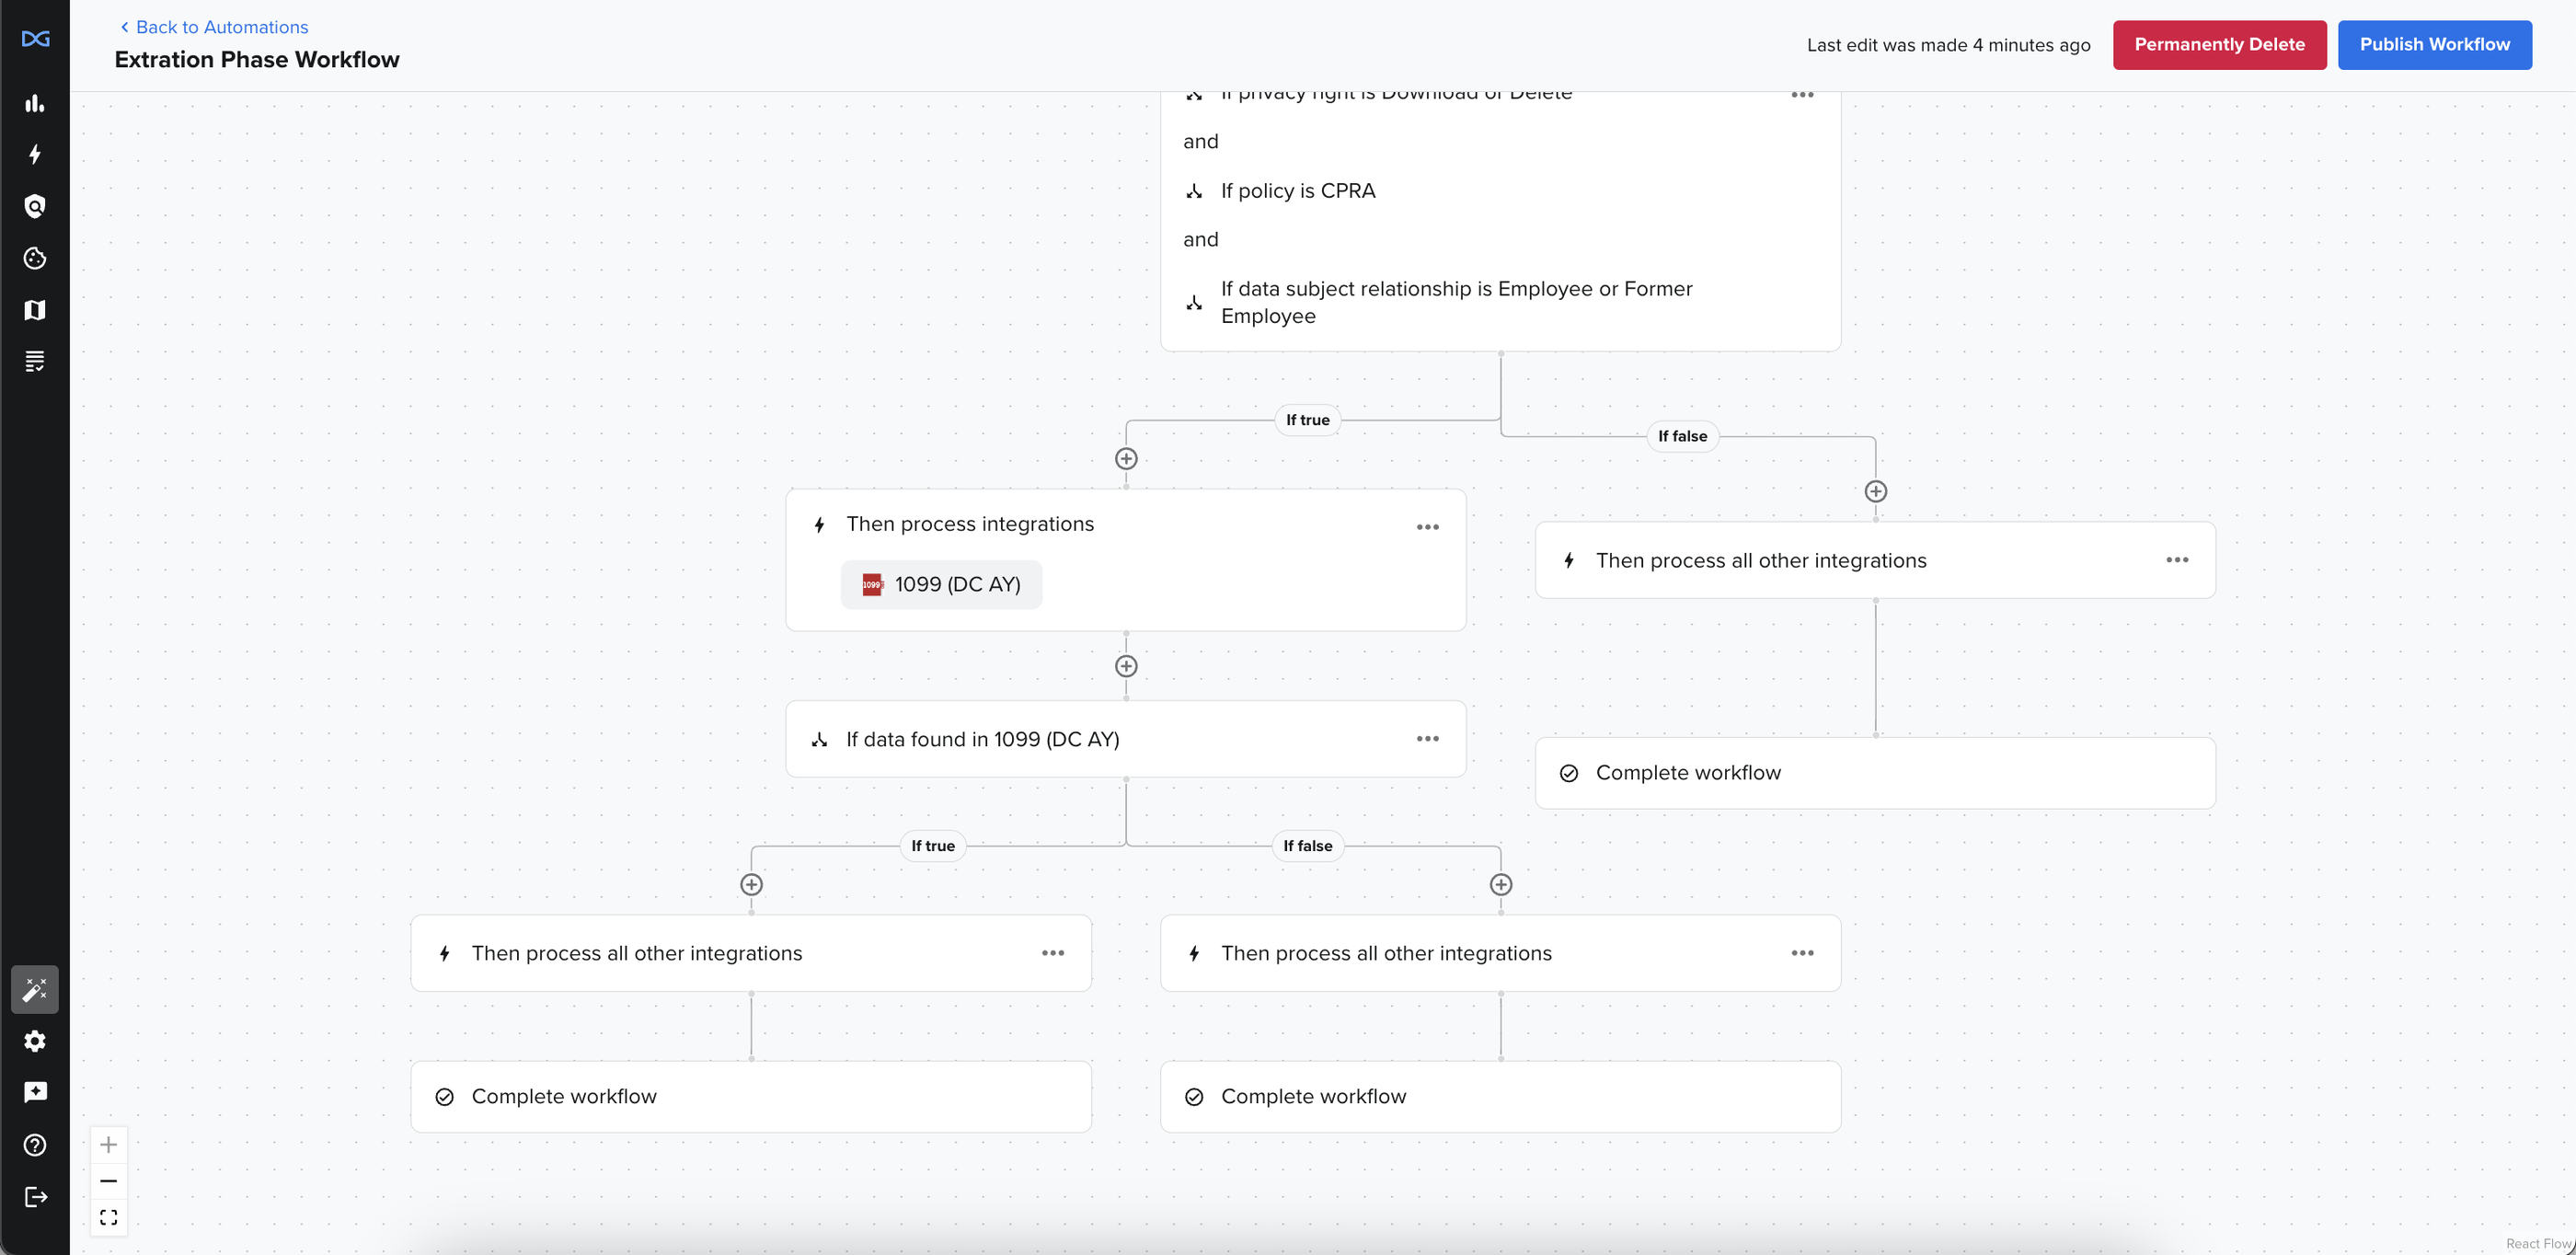
All new branches generated in the Extraction Phase will automatically have the "Process all unselected integrations" and another node for "Complete workflow" because these are the default settings when a new branch is created. When adding a condition, if the existing "processing all other integrations" has been configured to skip, that configuration is preserved and is sent to the "true" branch.
Conditions can be added to different branches. Some conditions and actions can only be used after specific workflow criteria are met (for example, the "data is found" condition can only be utilized if a processing step precedes it).
Adding an Action to a Workflow
Action can be added in various places in a workflow. Certain actions are only available after a specific condition is met or at a terminating point in a workflow phase. Actions Nodes are denoted by a lightning bolt icon (⚡️).
To create an action node, a user must select its placement in a workflow. This can be done by choosing the "+" button on the workflow. Once the node's placement has been defined, a user can select Add an Action in the drawer.
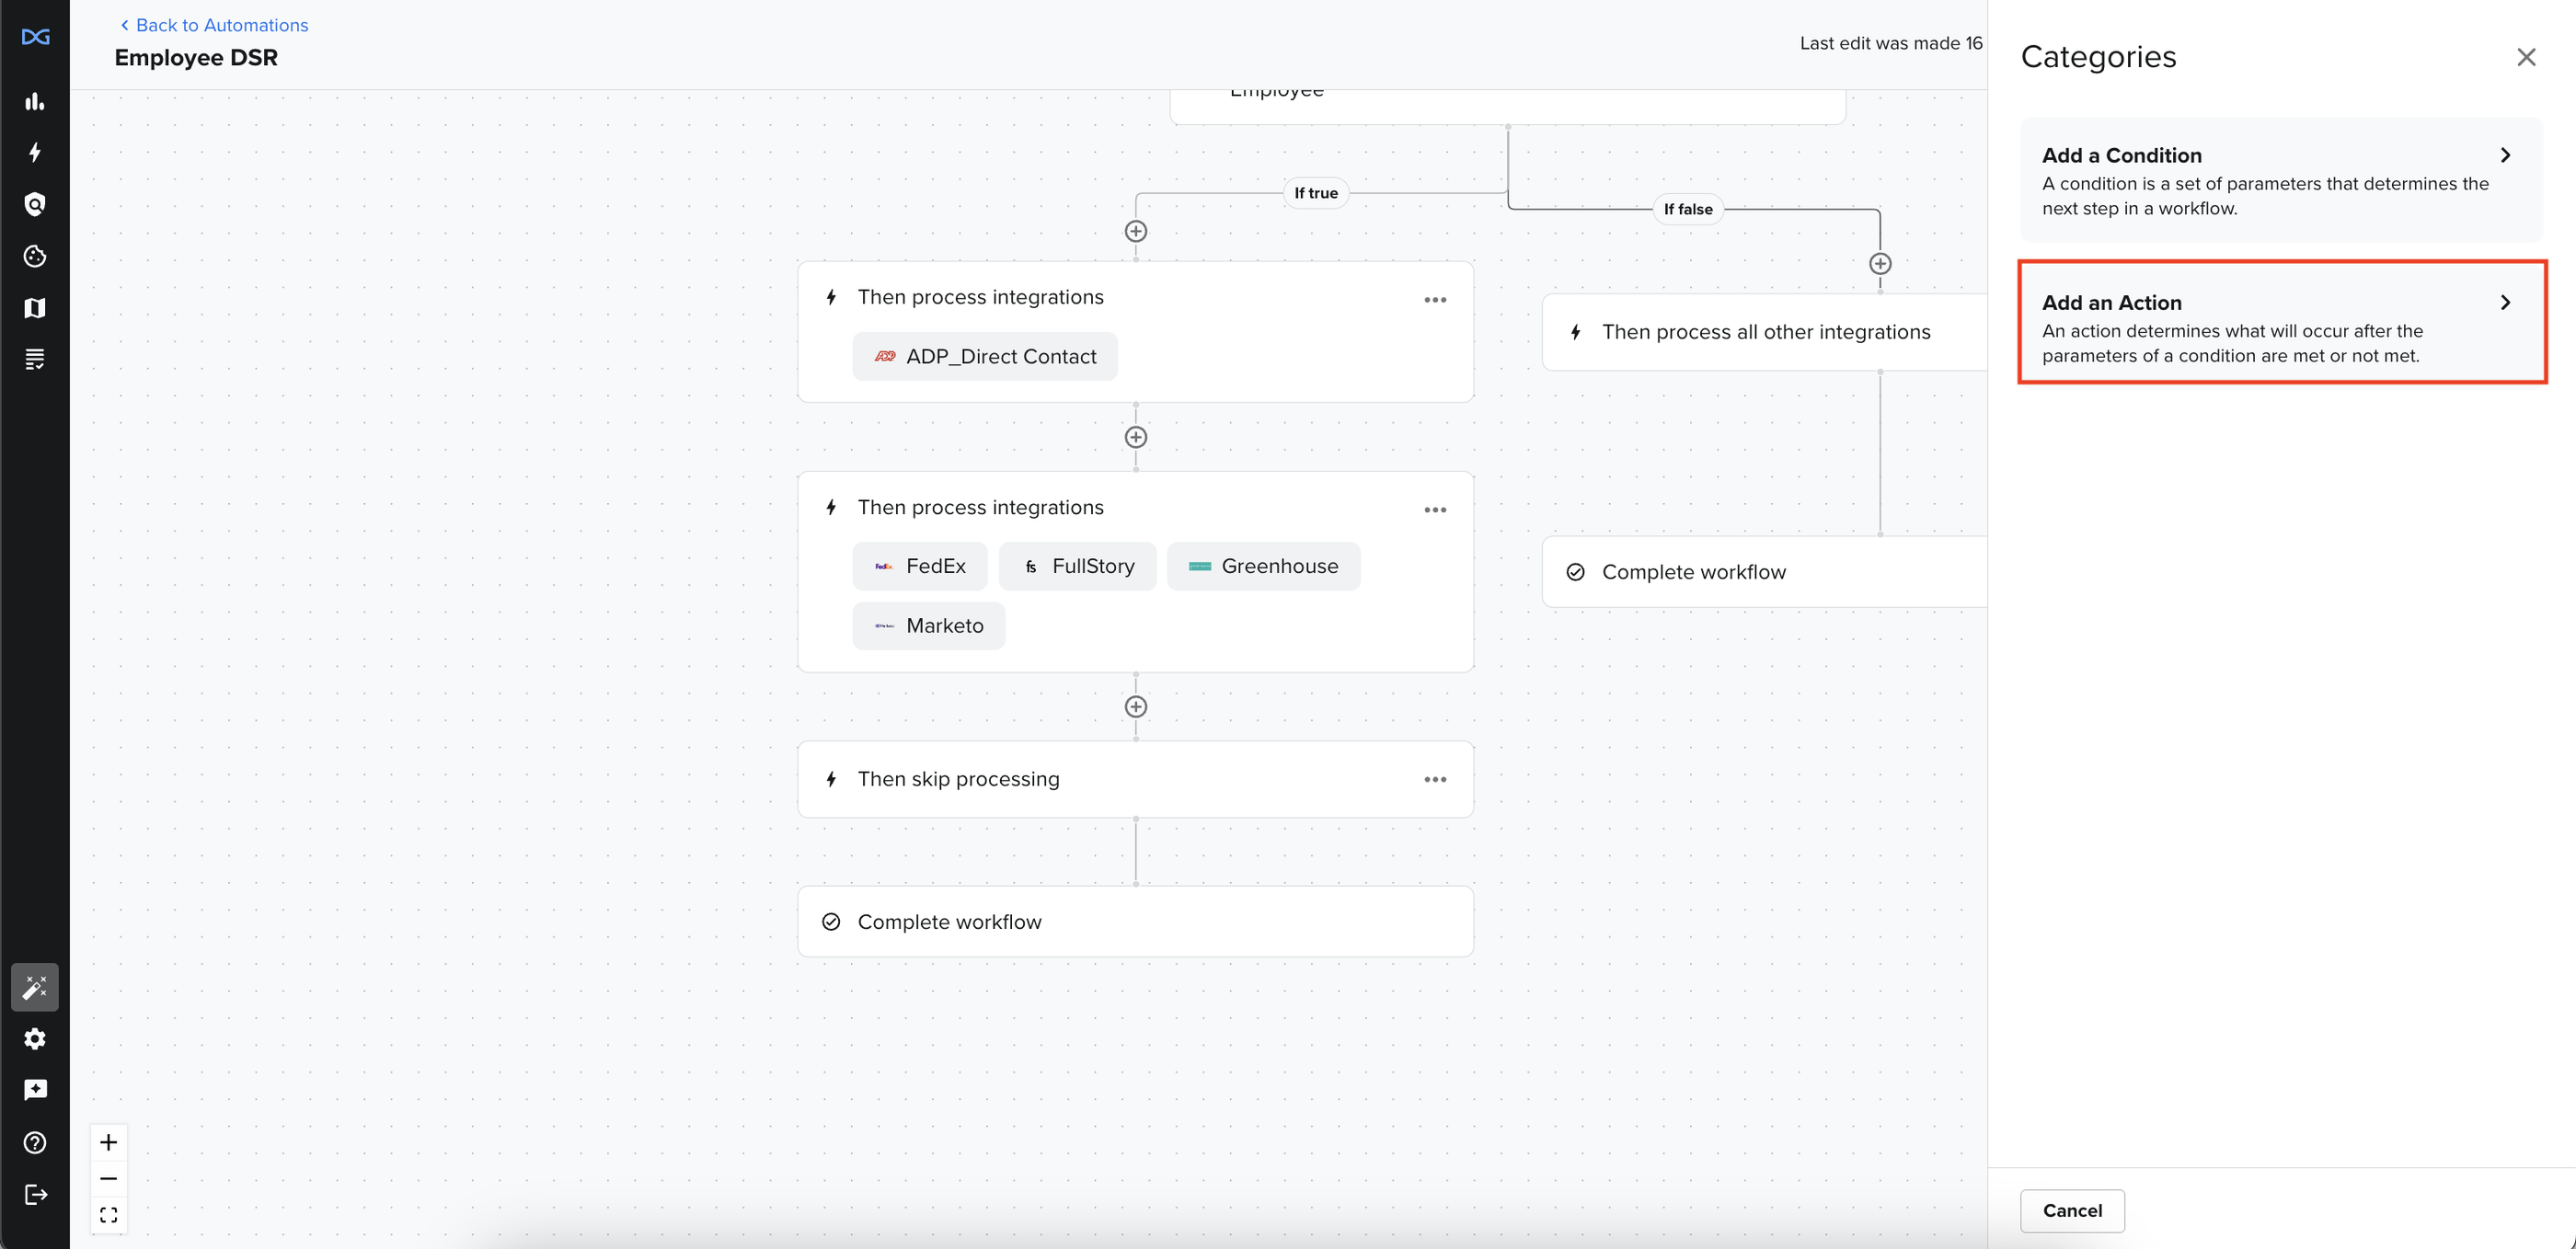
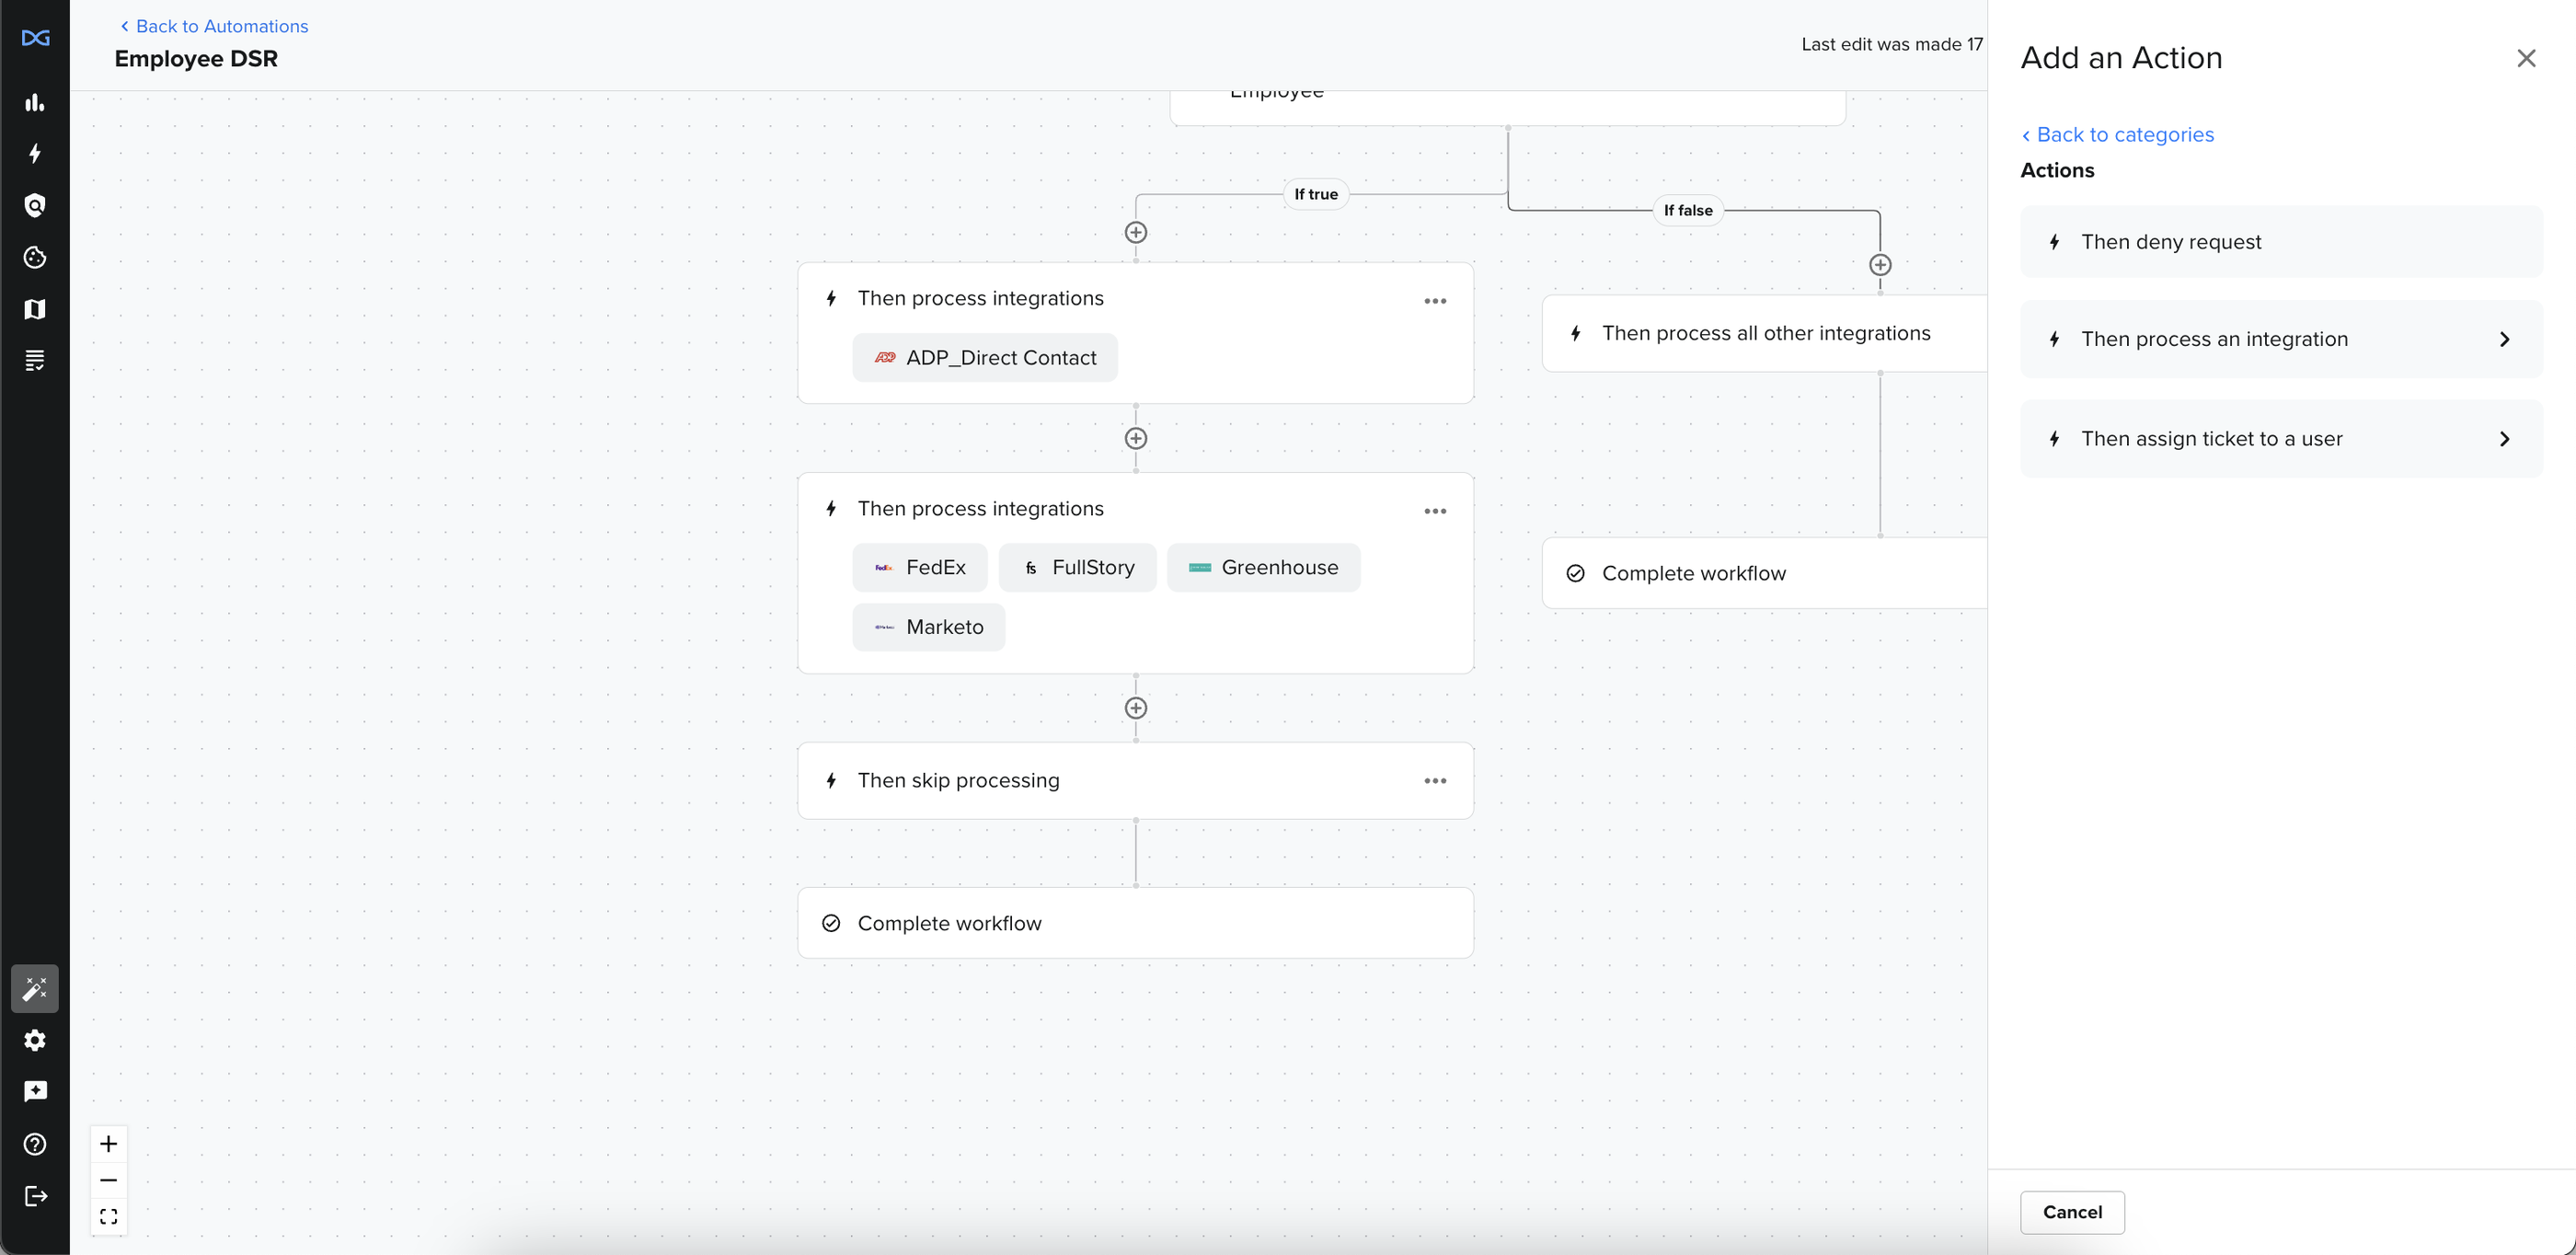
Users can select the action they want to add from the drawer.
Once this has been done, some configuration may be involved in adding the action. We use the "assign ticket to a user" action in this example. In this case, we must select a valid DataGrail user.
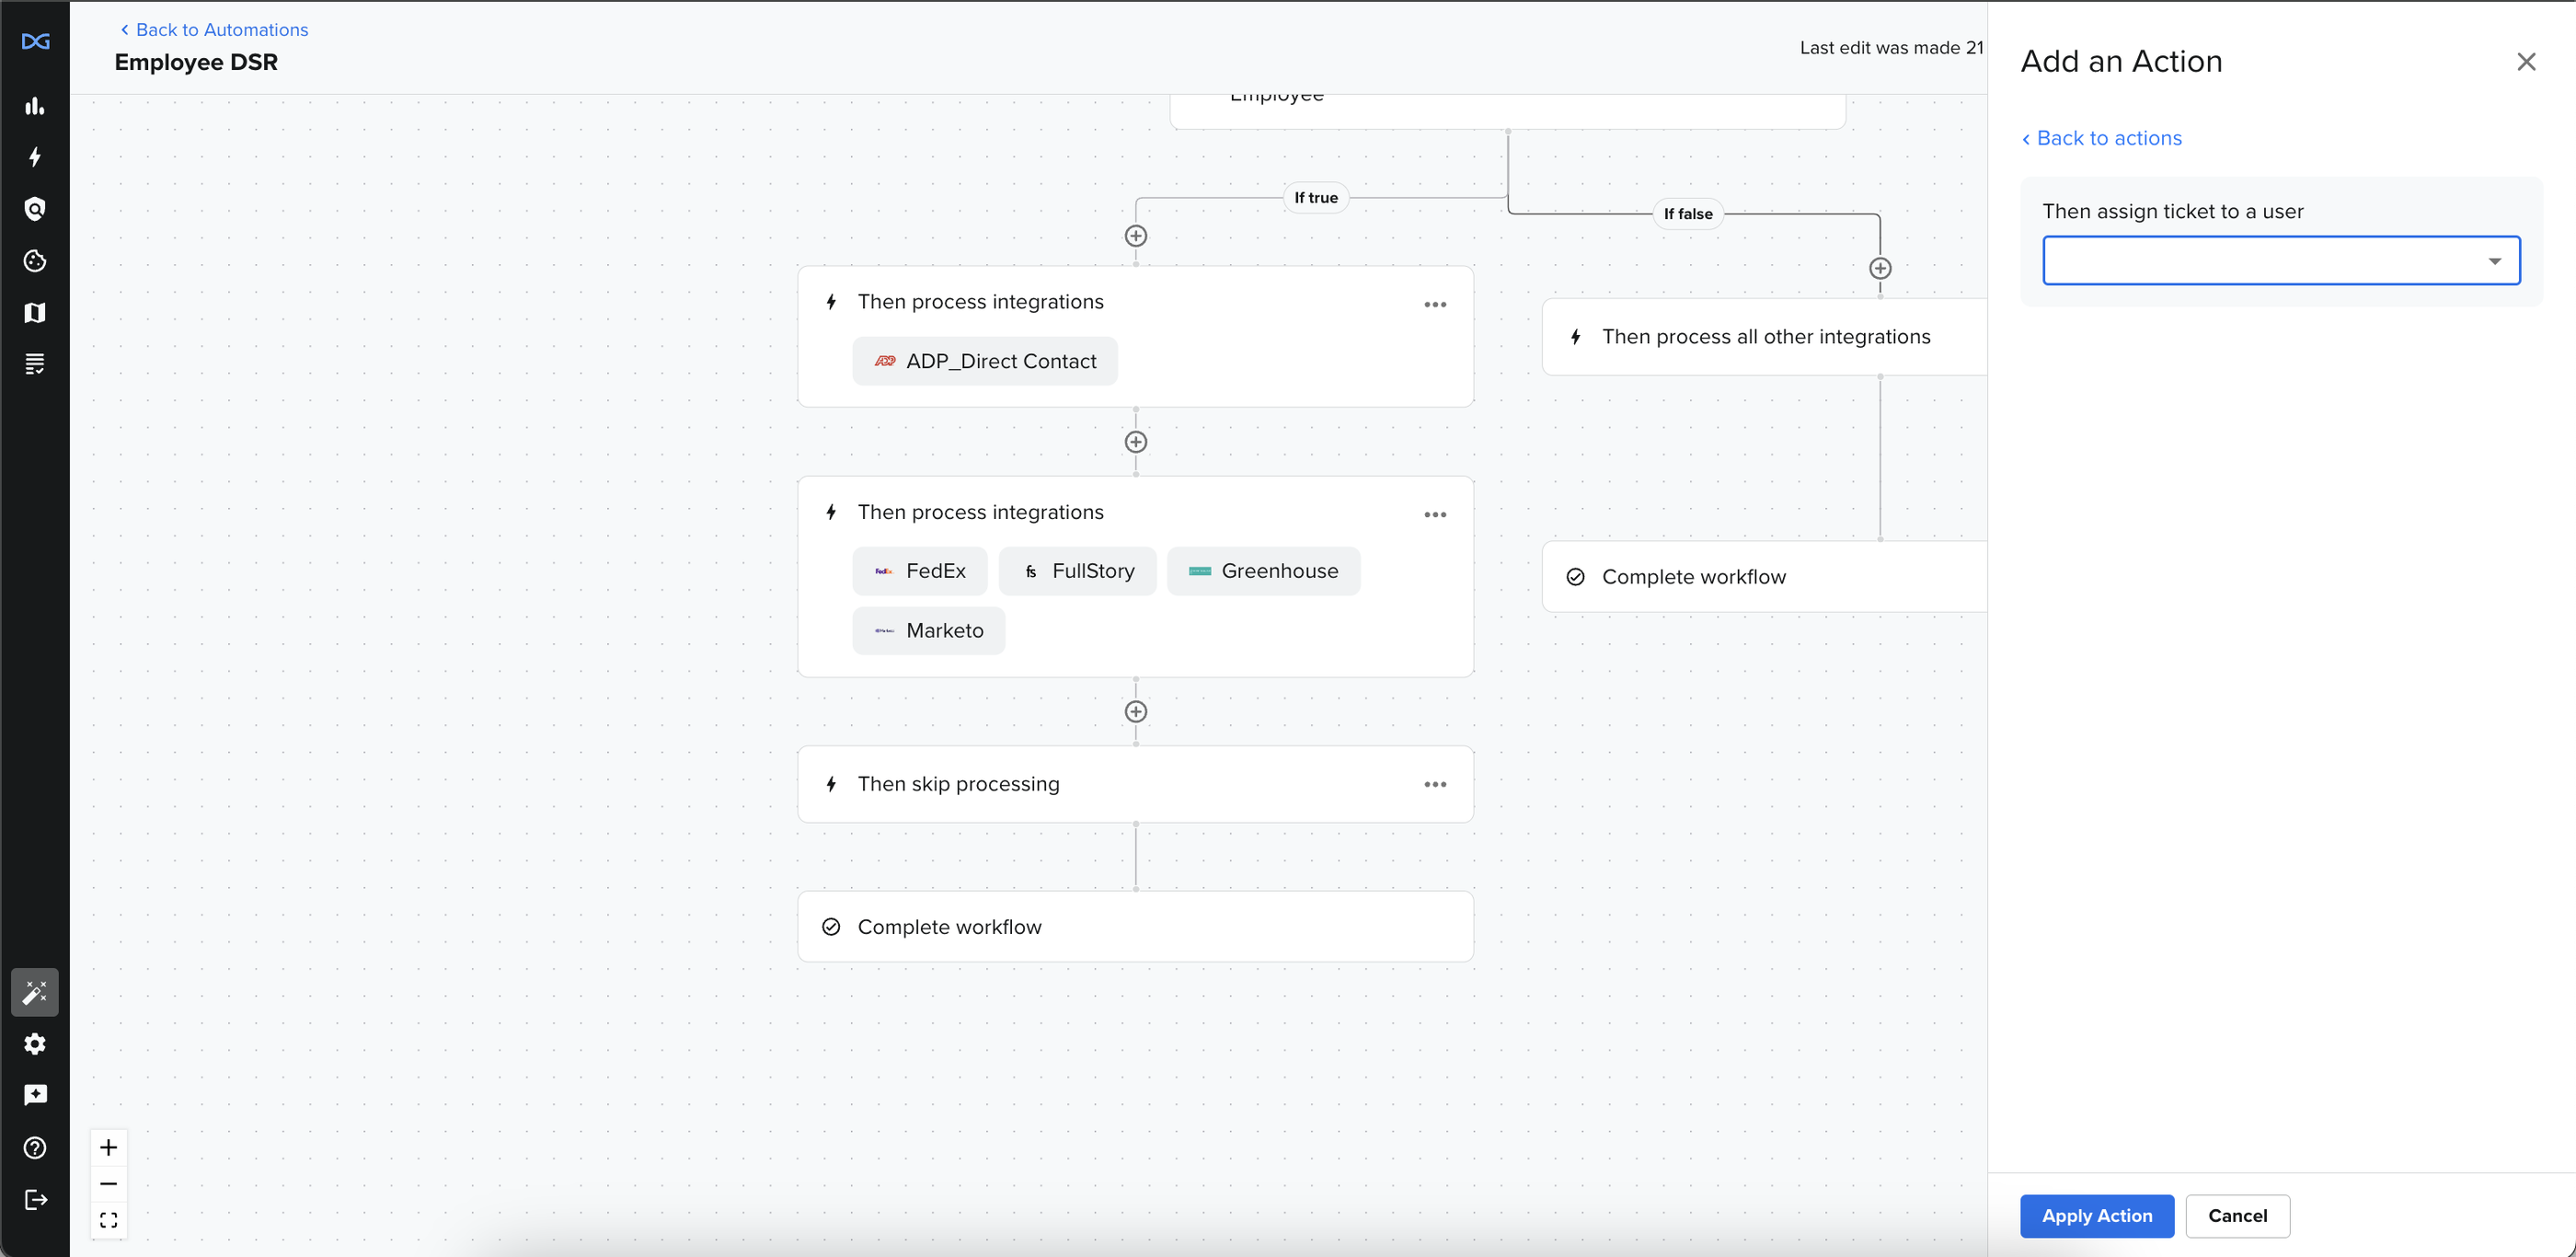
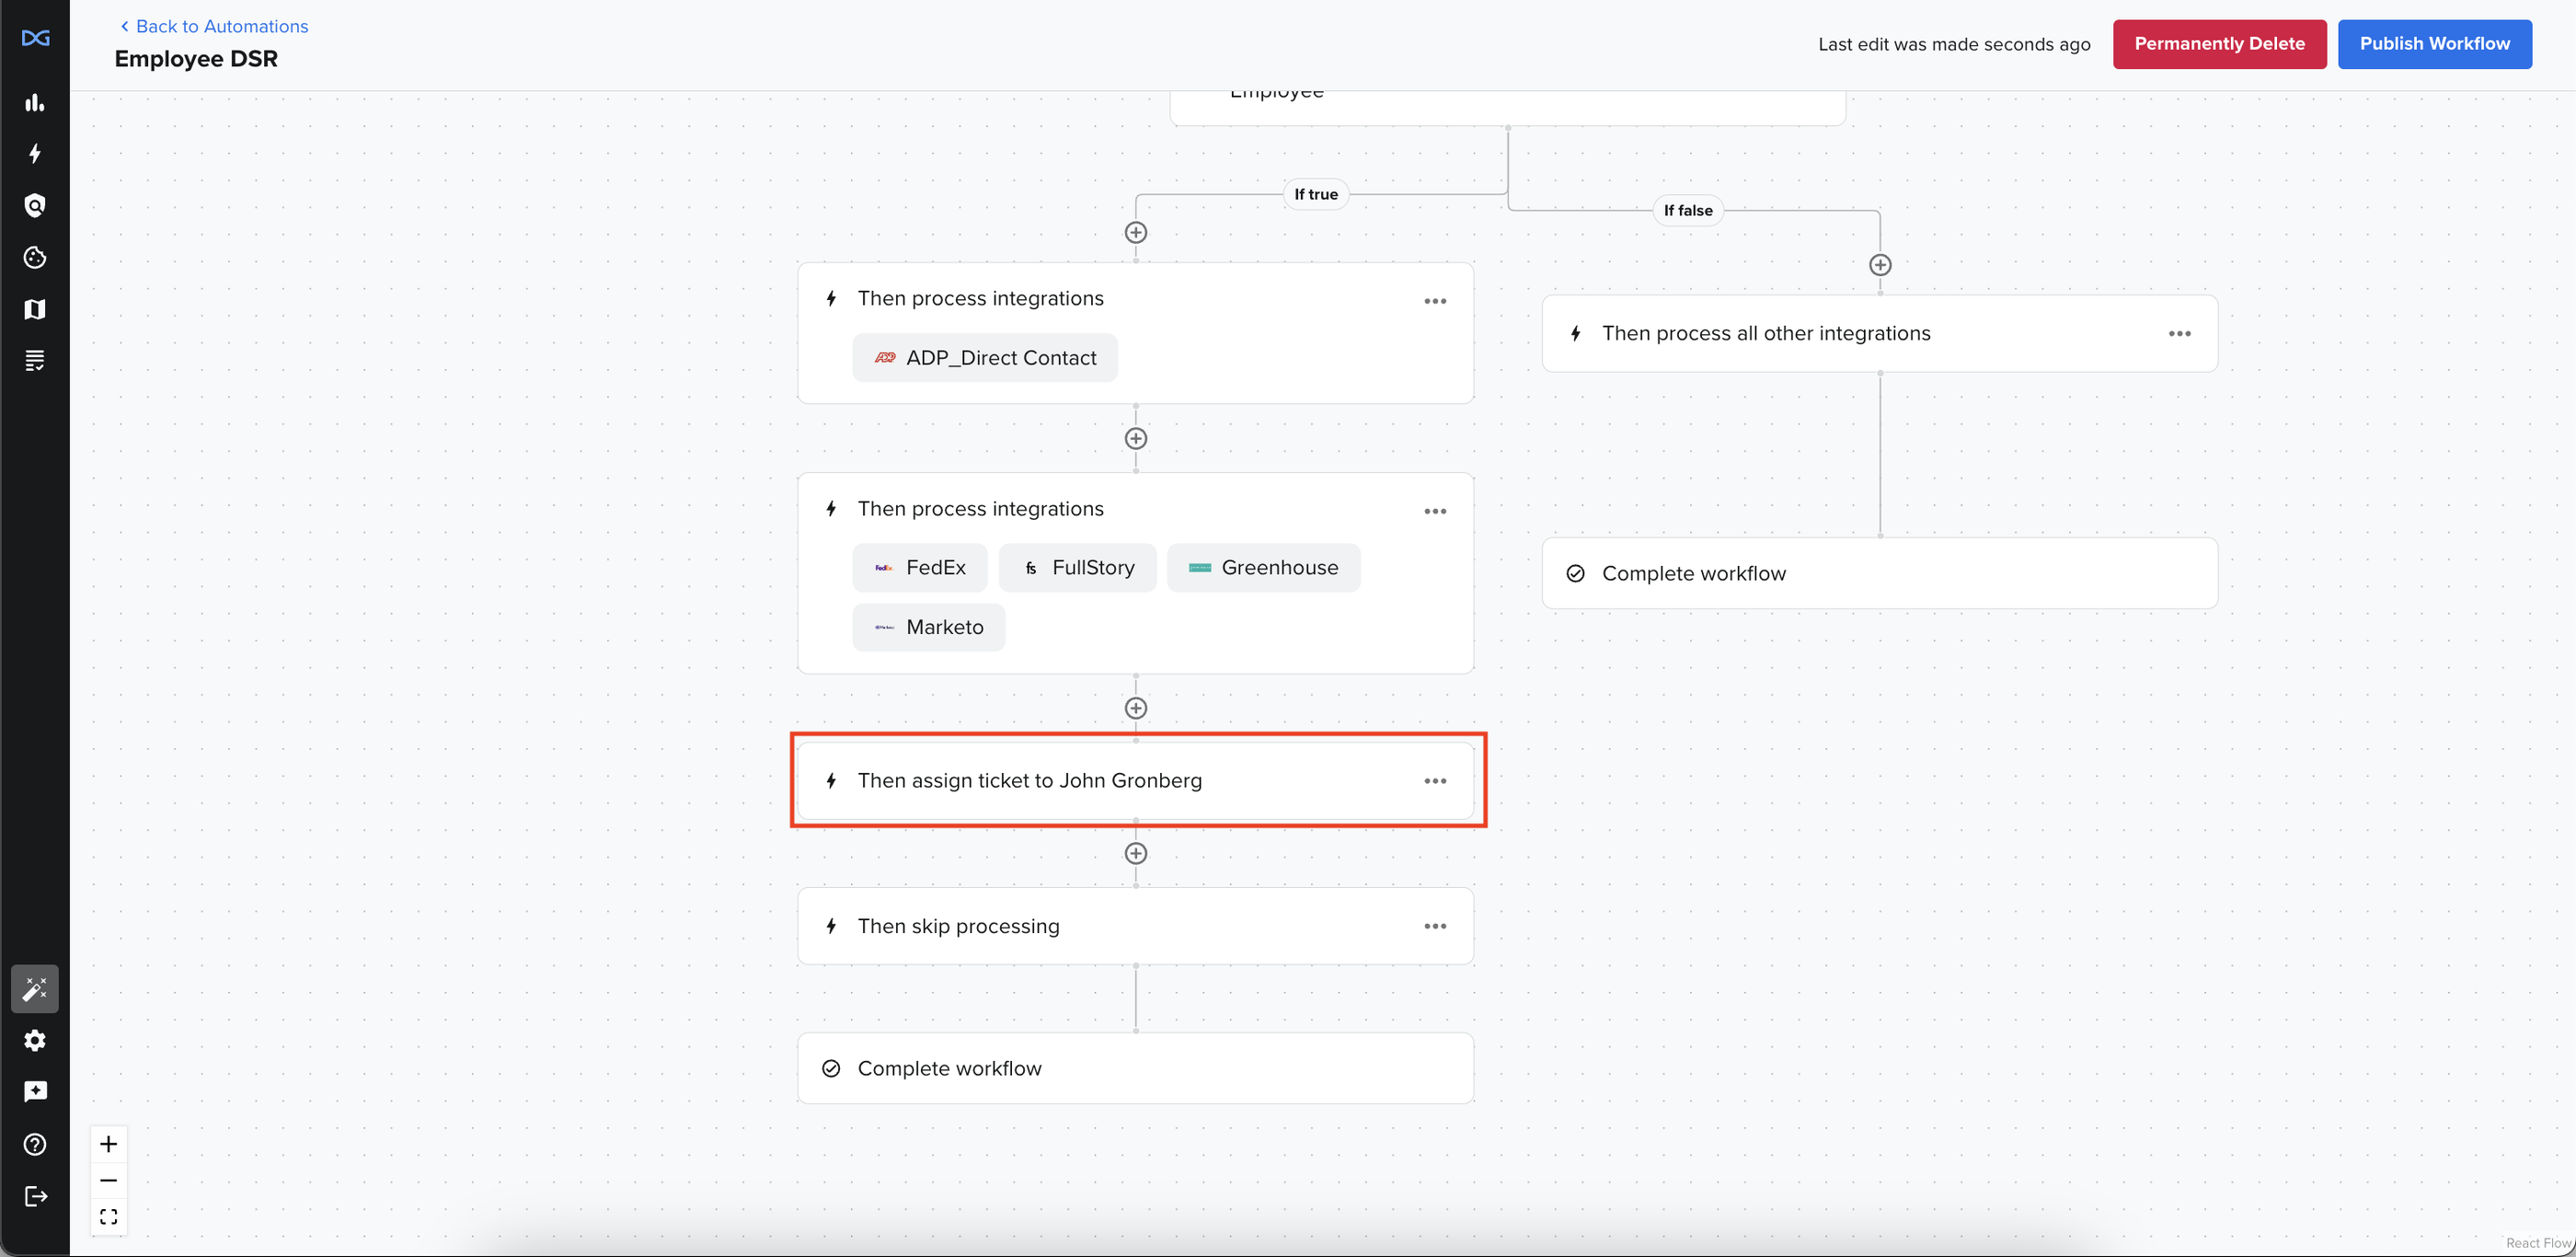
Once a user is assigned, we can apply the action, creating an action node in the workflow.
Publishing a Workflow
Multiple workflows can be created simultaneously, but only one can be published per phase. Once a workflow is published, any ticket that meets the criteria set in the particular workflow phase will be processed according to the workflow phase.
The workflow rules and tiering are evaluated when a workflow is in the extraction or deletion phase. When a portal ticket is in the extraction or deletion phase, its workflow is continually evaluated. Evaluation proceeds through the workflow until an incomplete node is reached. For example, an action node to process specific integrations will block further workflow processing until those integrations have been completed. It will fire if the criteria to begin processing that integration are valid (e.g., if the integration tiers in front of it have run or a specific amount of time has passed). If an integration does not meet that criteria, it will continue to hold and be deferred.
Publishing a workflow is done by hitting the Publish Workflow button, which is permanently anchored at the top of the workflow screen.

This will prompt the user with the following modal:
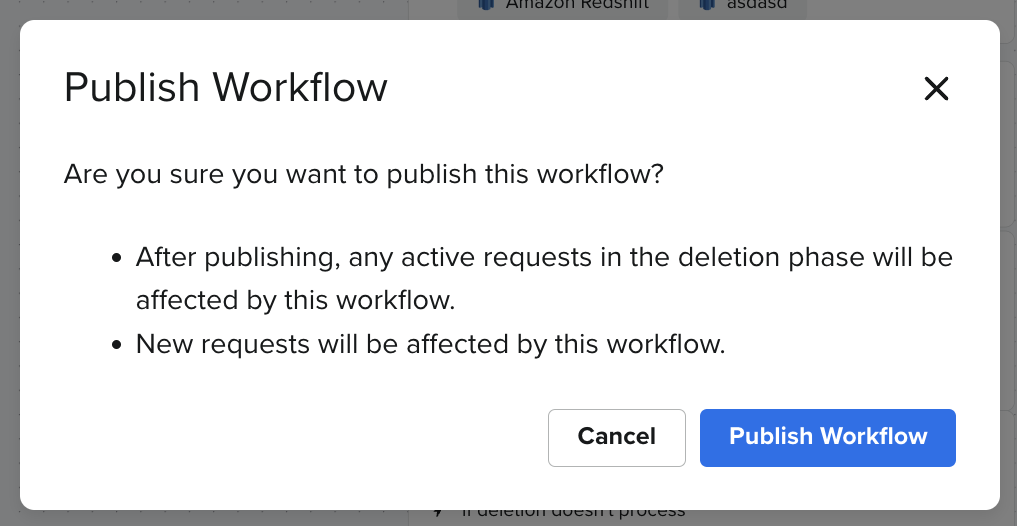
Once users select Publish Workflow, the published workflow will be available on the Automations page, marked as "Published."
Workflow Statuses in DSR Details
To view the status of a workflow, a user will need to review the integrations on the DSR details page. The DSR Details page will display specific statuses when processing. The different statuses that are involved are:
Not Started - "Will process in a workflow"

Processing

The ticket will be completed and closed when all integrations are processed.
Conditions Available for Use in Workflows
Several conditions can be utilized in workflows. Some conditions are only available in specific phases or can only precede certain actions.
Request Policy
Request Policies can be utilized as a condition; the condition evaluates what policy a ticket falls under. The request policies in the DataGrail application are connected to location and can be used as a proxy for location. The workflow dropdown contains all available privacy policies. They may not correspond with the description name set by the customer.
Privacy Right
The Privacy Right condition evaluates the type of privacy right that is available. The values are not dynamic to the request policies selected, meaning that the values shown are static and will always be shown. Privacy Rights that are available for use for conditions are:
- Deletion
- Download (Access)
- Download Data Categories (Access Categories)
- Transfer (Data Transfers)
- Update Inaccuracies (Rectification)
"Opt-Outs" and "Do Not Sell or Share" are not available for workflows
Data Subject Relationship
The Data Subject Relationship field can be configured on the request policy. Only DataGrail's standard Data Subject Relationship values can be used in workflows:
- Business Contact
- Customer
- Employee
- Former Employee
- Job Applicant
- Other
If Data is Found
The "If Data is Found" condition is only available in the Extraction and Pending Delete phases, and can only be added following a "Process Integrations" action. It evaluates whether or not data is found after a processing step.
Time Bound Trigger
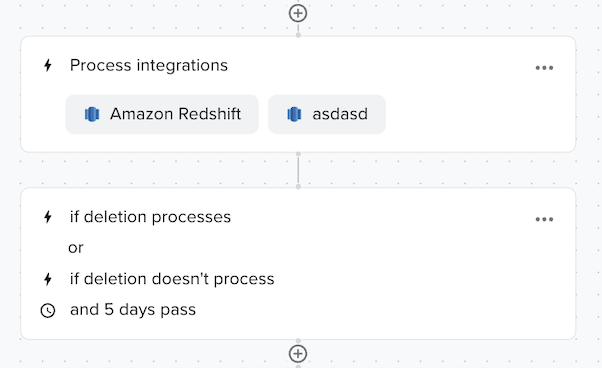
The time-bound condition can only be added to a processing step. This condition evaluates the days until a processing tier is initiated. This is done by configuring the number of days a tier will wait until all the integrations in that tier are processed. Once the configured time condition is met, the workflow will allow the proceeding tier to begin processing if the tier has not finished processing. This will not affect the processing of the integration that did not process; that integration (or integrations) will continue to process unless manually skipped in the UI.
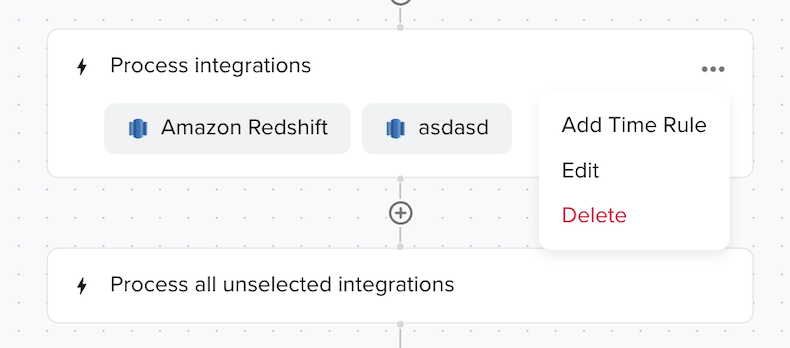
A user must first add a processing integration step for a time-based condition. Once a step has been added, the user can navigate to the ellipses (...) in the node to edit or add a time-based condition. If a user deletes the node associated with a time-based condition, the time-based condition will be removed from the workflow.
Once a user has selected Add Time Rule, a drawer will appear for customers to add a time-based trigger.
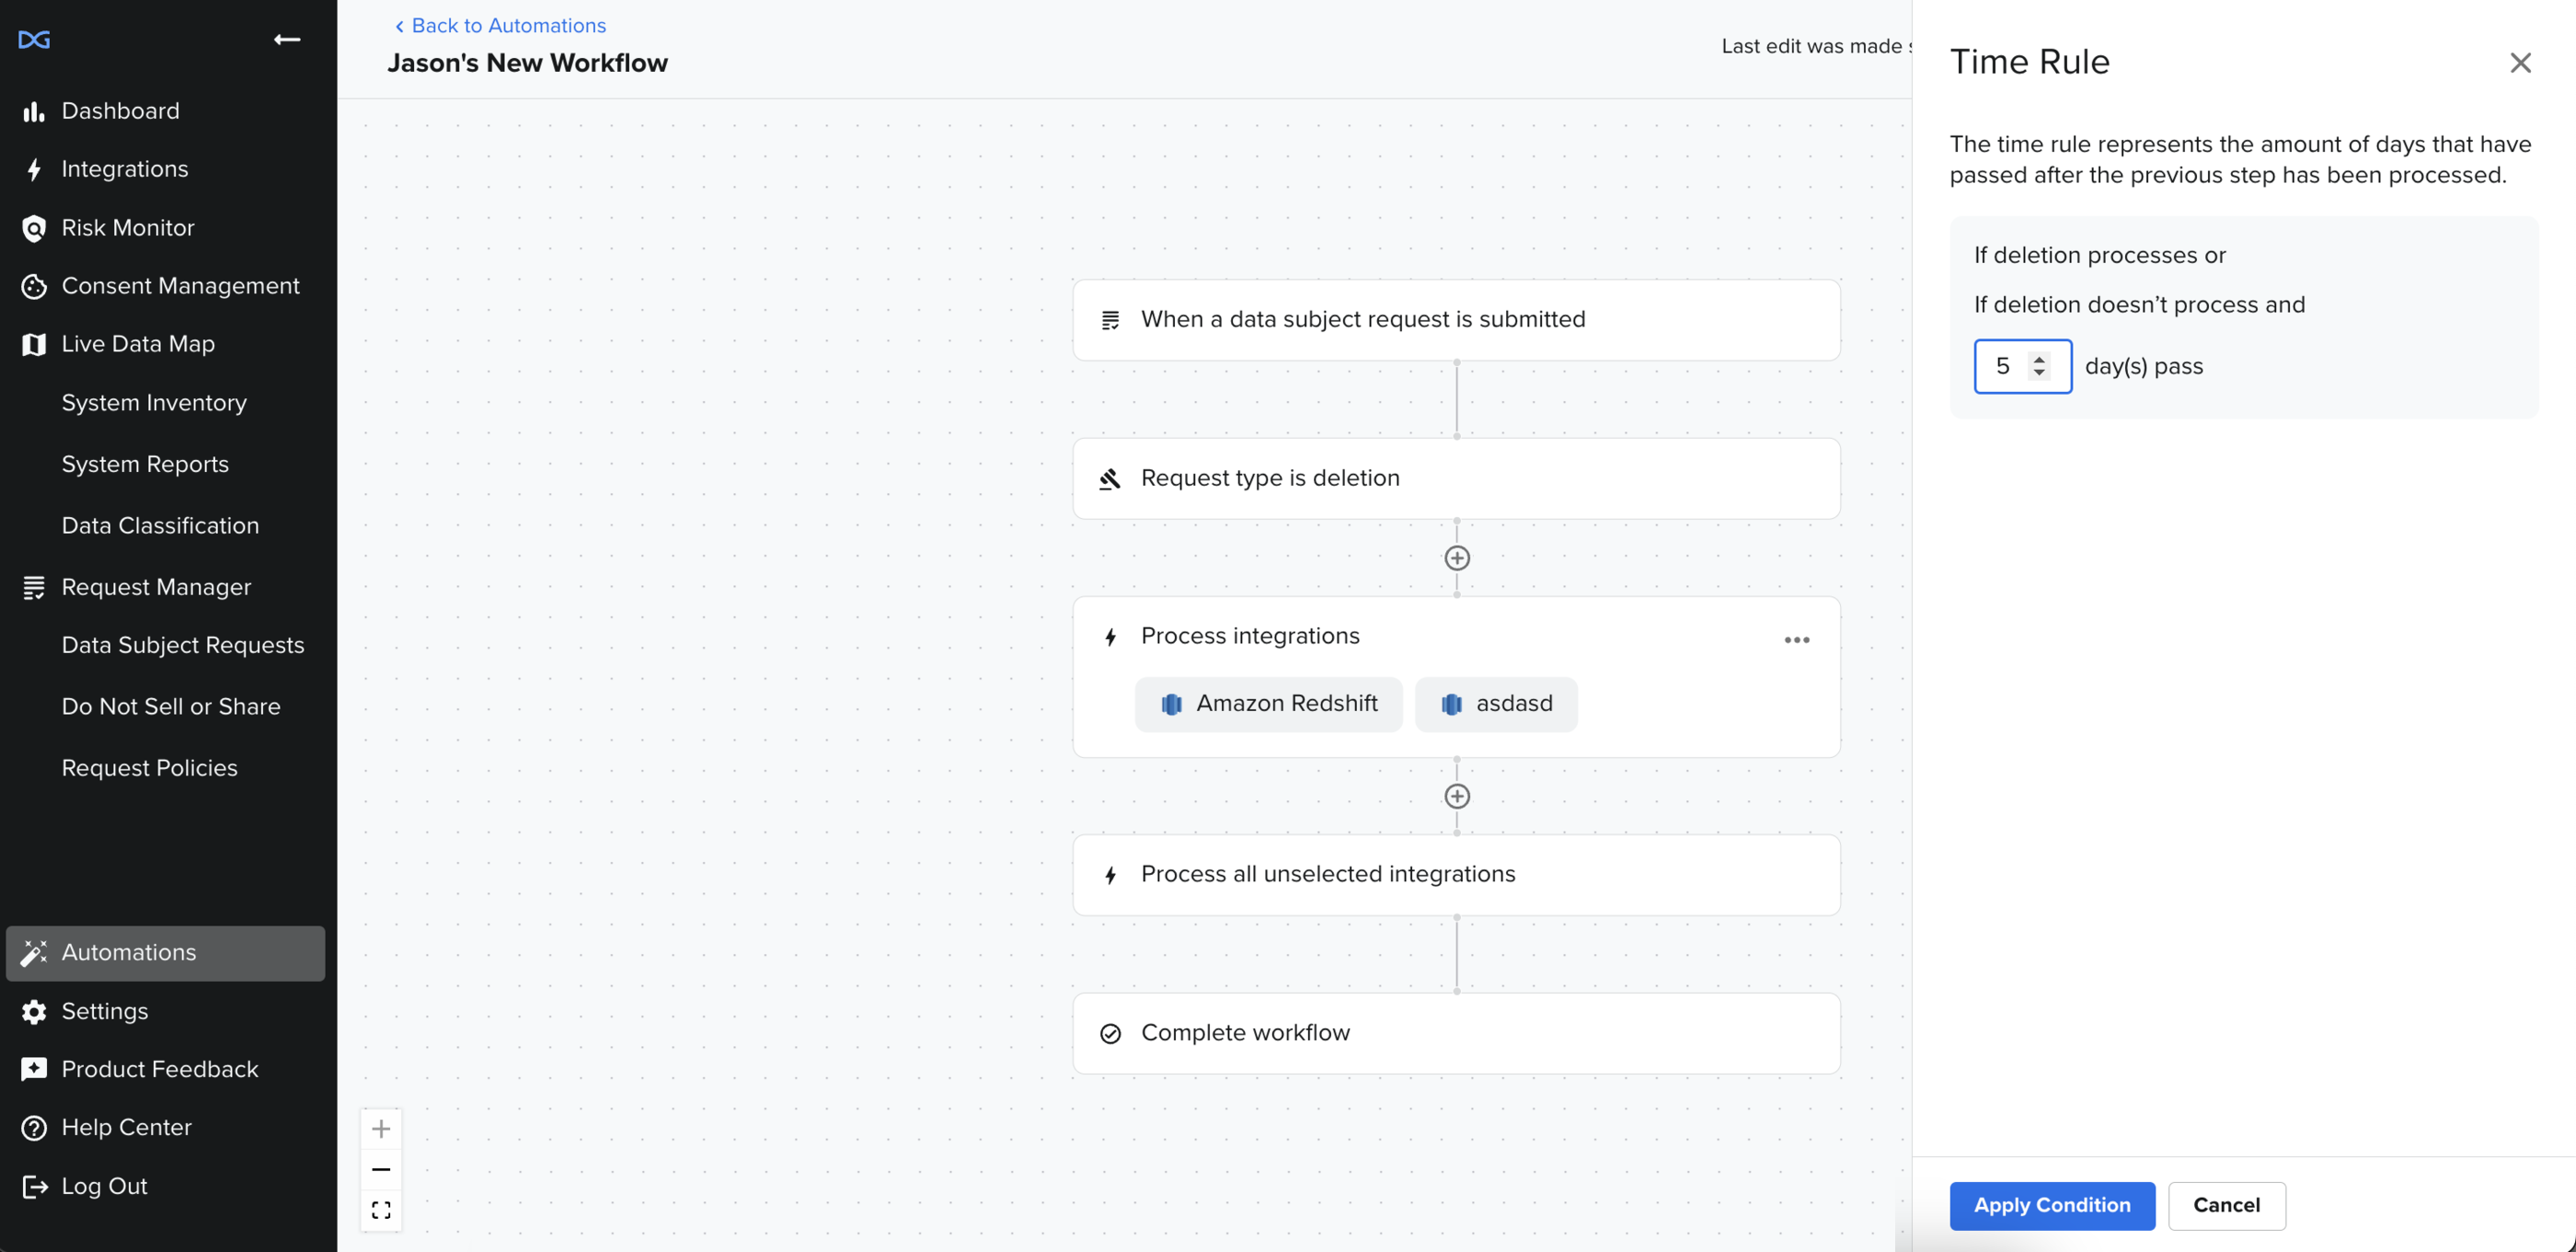
Users can only input integers, and the unit of measure is always in days. Users who input numbers outside 0-99 will receive an error and cannot apply the condition.
Once a user has successfully applied the time-based condition, the condition will be added to the workflow state in a separate node.
Actions Available with Workflows
Actions can be utilized in a workflow to automate manual steps within DataGrail programmatically. There are two types of actions: default actions that the system will always populate depending on the workflow phase and user-defined actions. By default, there are actions that the system will set that are configurable actions by the user, such as terminating actions like "Process all Integrations." User-defined actions can only be used to stop processing in a workflow; these actions are only available at the terminating point in a workflow.
Process Integrations
This action allows users to select which integrations to process within a workflow. Integrations can be used multiple times and are not filtered. This action can be used to define a set of integrations to process. In combination with the default "Skip Processing Node", it will omit all other integrations or can be used to determine a sequence for processing integrations.
Process Integrations are optimized for use from APIs that encompass both access and deletion in their integration process. Direct Contact can be used in this action, but it is recommended that a user consider the request type. For example, suppose a deletion request has a Direct Contact configured for deletion in the processing integration action in the extraction phase. In that case, this may affect the processing because Deletions for Direct Contact bypass the access phase.
Deny Request
The Deny Request action stops the ticket from processing and denies the DSR to the requestor. The Deny Request action can only be added as a terminating action.
Process Request
The Process Request action automates the final "button push" for the pending action state, moving the request to its final processing state. This action is only available in the Pending Action state and can only be added as a terminating action.
Assign a Ticket to a User
This action allows customers to assign a specific ticket type to a DataGrail user. Before the action node is added to the workflow, a DataGrail user must be assigned to it.
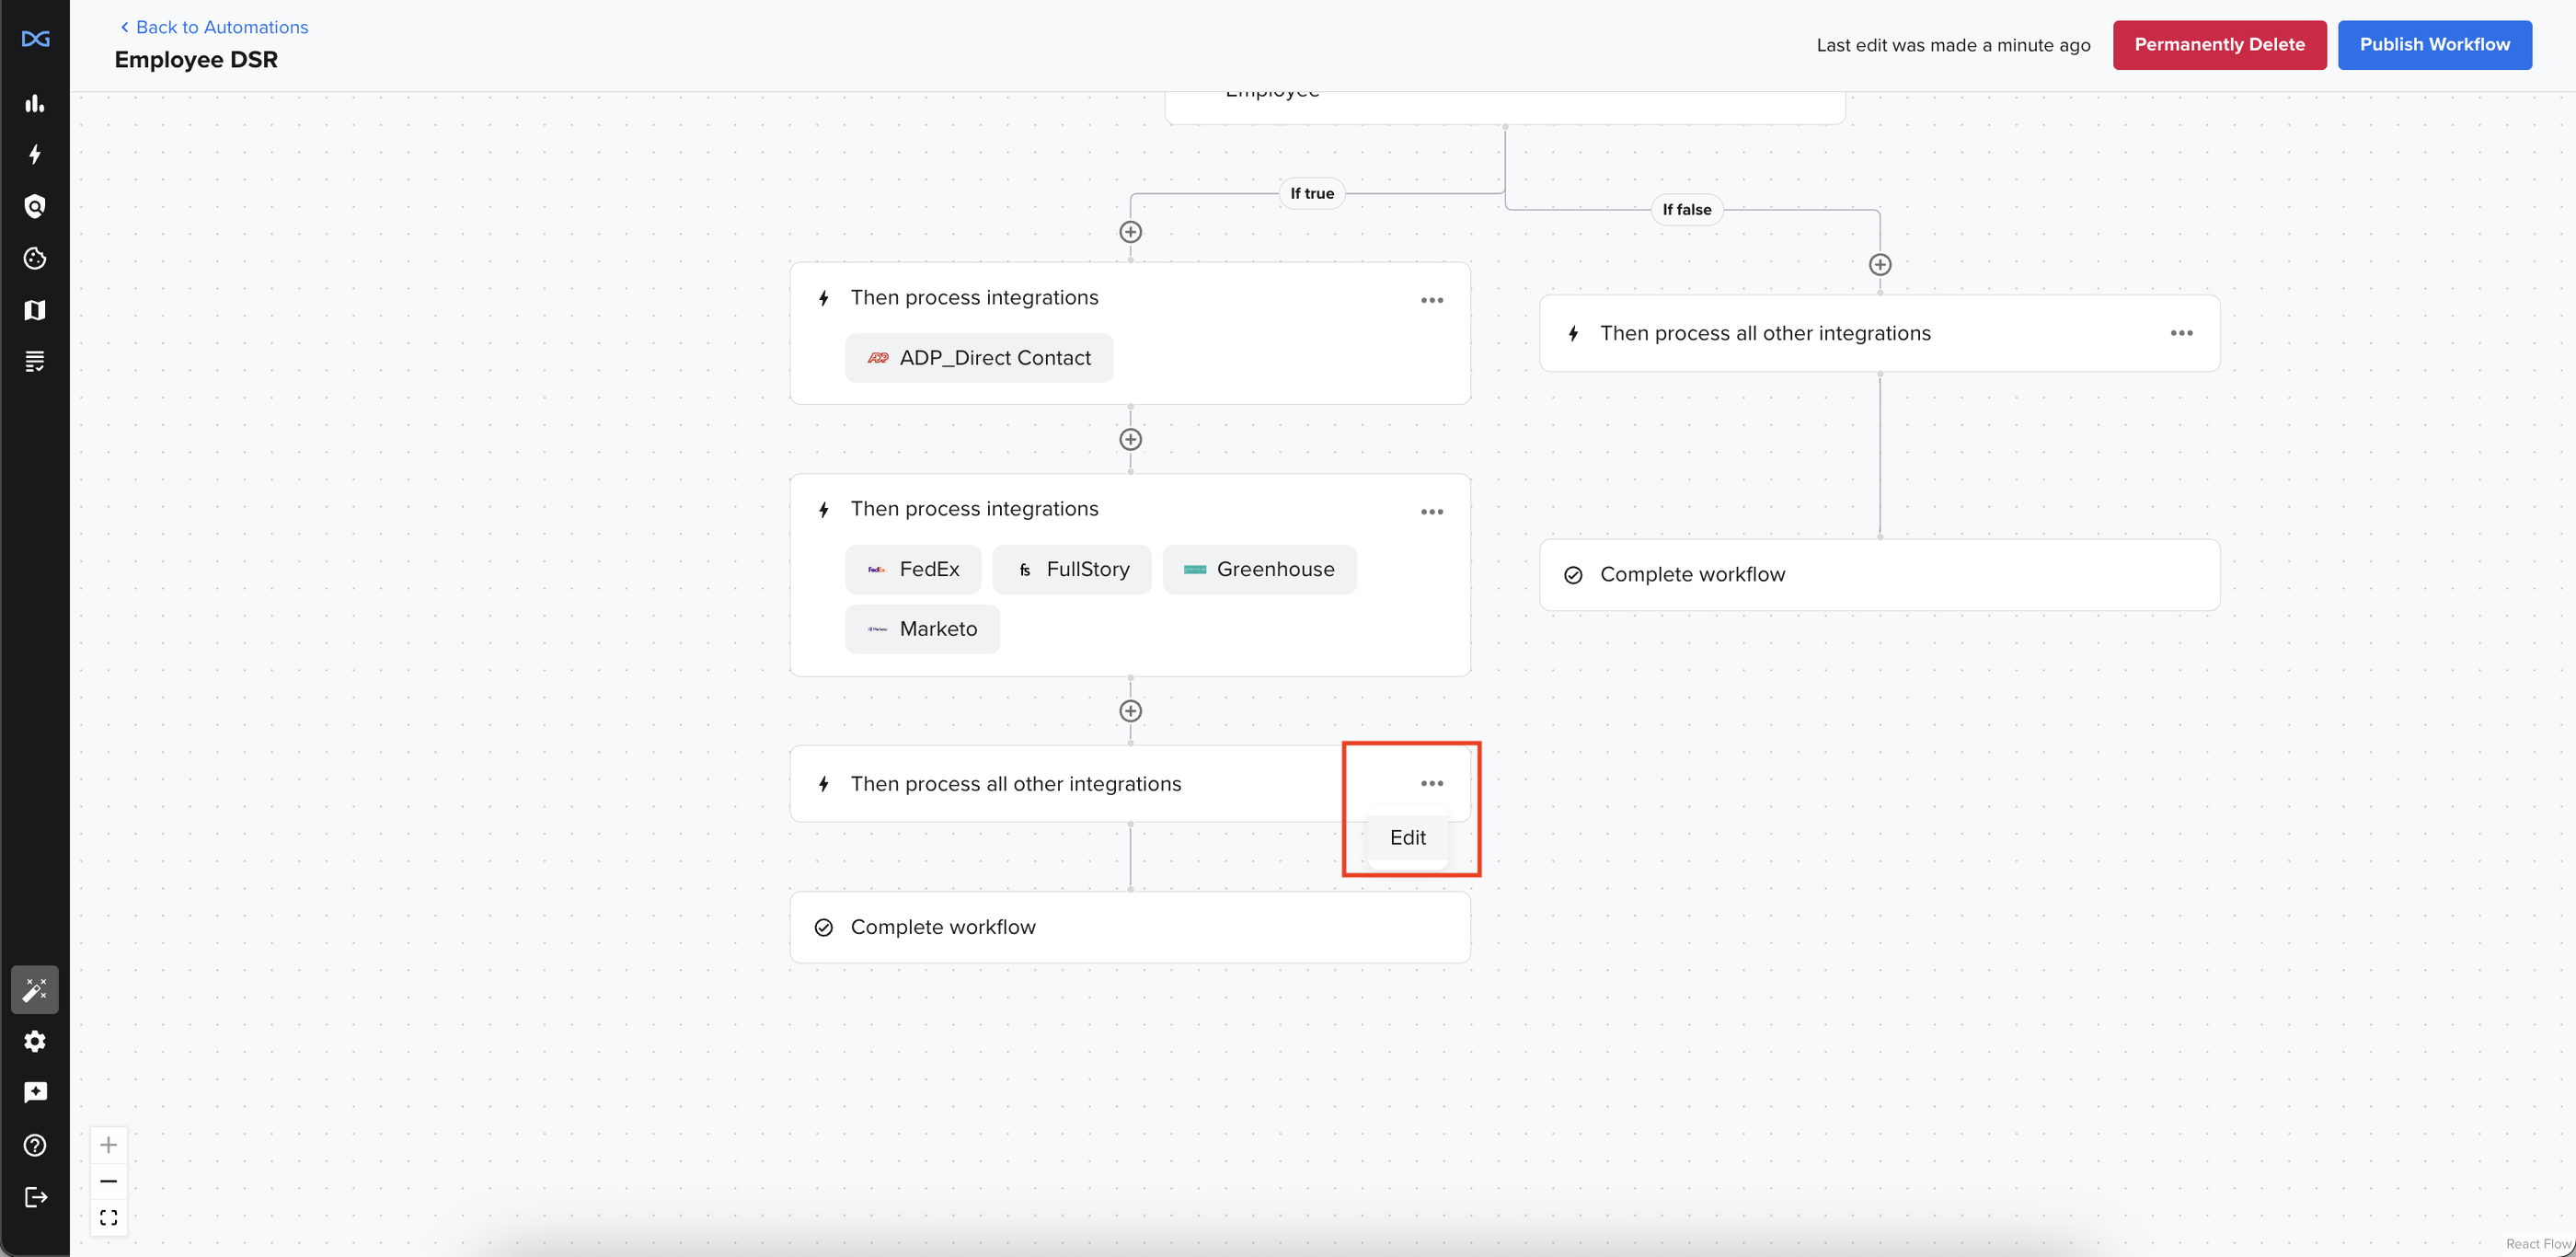
Process/Skip All Other Integrations
This action is a default action in the Extraction phase. The default in processing is to process all configured integrations. When defining how tickets are processed, the workflow must consider what to do when specific conditions are unmet.
For example, in a workflow that defines a specific condition set (e.g., Employee or Former Employee DSRs), while we can set particular processing for that condition, we still want all tickets that do NOT meet that condition to be processed.
If a workflow only needs to consider specific integrations, then the user can edit the default node(s) necessary to skip processing all other integrations. This allows customers to define a particular set of integrations to process rather than processing all integrations.
The default for this final node will be "Process All Integrations." To update this node to "Skip all integrations," a user will edit the node by using the ellipses (...) and selecting Edit.
This will open the edit drawer and provide a drop-down menu for the user to select the preferred processing action.
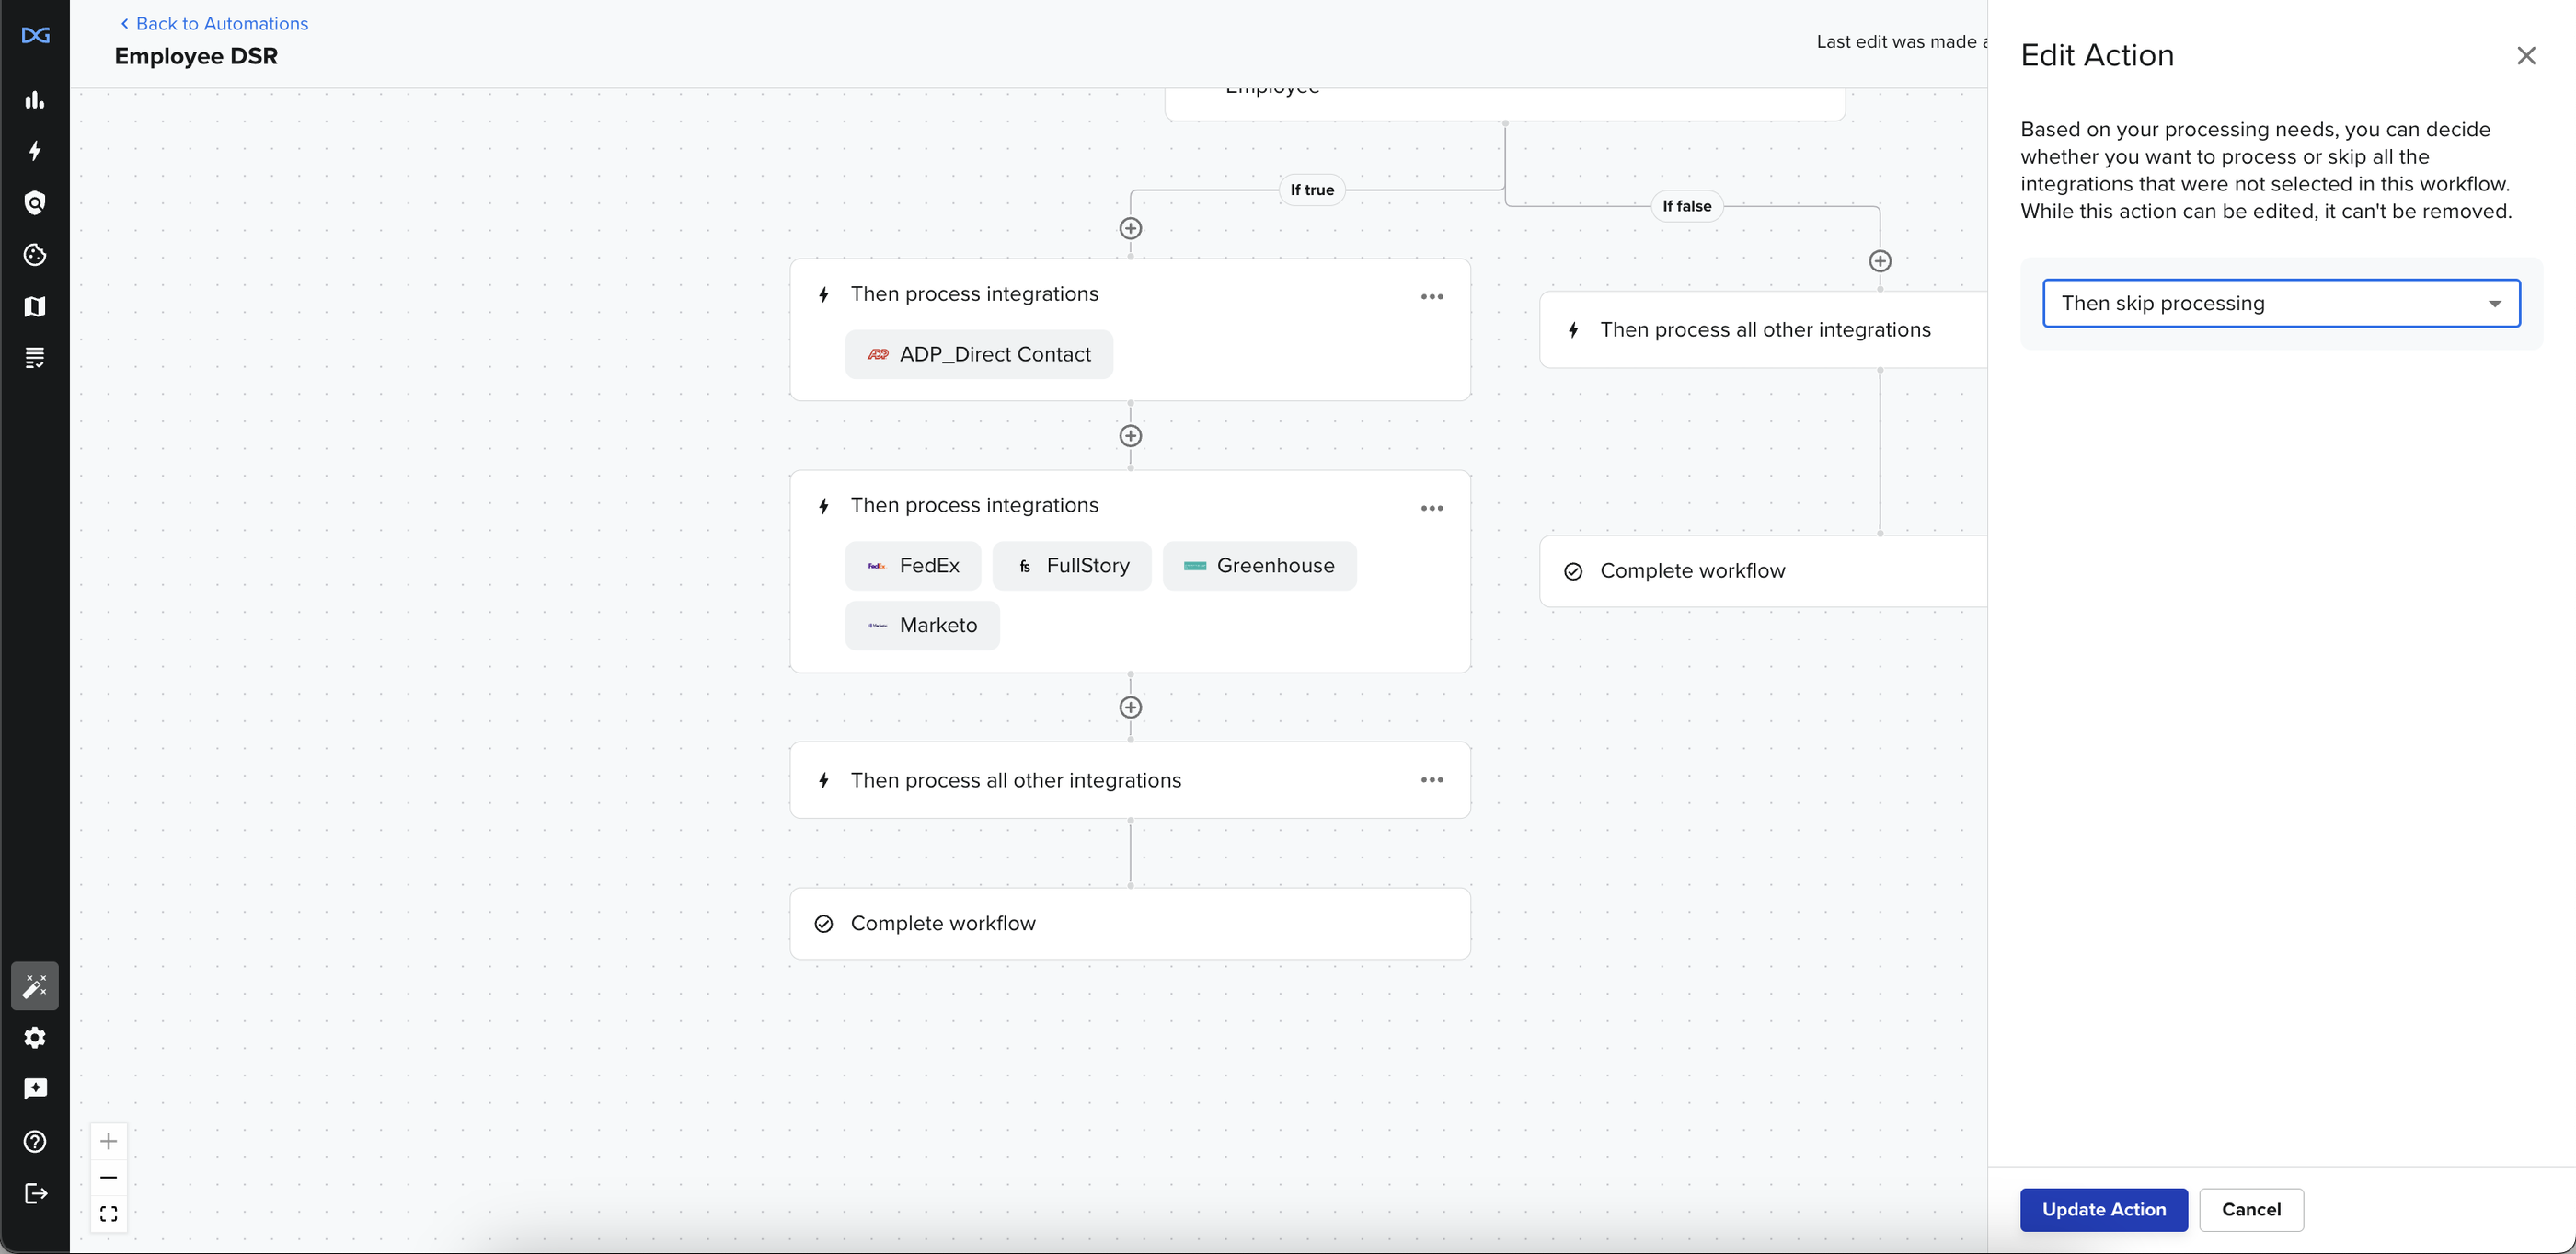
The user will select Update Action, and the node will update.
Exclude Integration
This action is only available in the Pending Action phase. Customers can use this action to exclude integrations from returning data in a download or the deletion phase. This action will allow users to programmatically exclude integrations from processing, similar to the integration or file down-selection in the application today. Any integration or sets of integrations can be selected for exclusion.
Workflow Examples and Videos
How Tickets are Processed Without Workflows
This is a video that walks through how tickets are processed without workflows.
Policy/Location-Based Request Denials
Location-based or Policy denials can be created in workflows to allow customers to only action on requests where privacy rights are granted. Here is an example.
Employee DSR Processing
Here is an example of setting up a workflow in the access phase to manage a workflow to process an employee DSR. This example reviews conditional logic and branching. It also shows a user how to process only specific integrations for employees or former employees.
Tiered DSR Deletion Processing
Tiered processing allows customers to stop the downstream repopulation of data. Customers can do this by setting the sequence for deletion and adding time-based triggers to ensure they stay within their request times. Here is an example.
How Branching Works
Branching through conditions can allow users to generate multiple use cases in the same phase. In this example, we walk through how to build more than one use case in the same workflow.
How Automations Affects Ticket Processing
Integration sequencing can be configured in the Extraction and Pending Delete phases. Users can group integrations by node and define the next steps in processing or add time-based triggers to allow the following tier to process after a configured amount of time.
When Do Workflows Affect Tickets?
When a workflow is published, the workflow is applied to all tickets that meet the criteria during any processing phase. If a workflow is unpublished, workflows being evaluated at that time will be processed by the default processing (all integrations fire simultaneously).
How Integration Sequencing Affects Processing
The sequencing automated workflow allows users to define the processing sequence for their integrations. Therefore, to ensure that data is deleted or retrieved in a manner that does not allow it to repopulate, a customer must select their Tier 1 systems or the integrations that contain sources of truth (that can populate data in downstream systems) in the first set of integrations.
Once the Tier 1 systems are established, a customer can add another node to allow for processing integrations with data dependencies on the Tier 1 systems and can continue adding tiers based on data dependencies.
For integrations that are NOT selected, these will fire alongside the final tier to ensure no issues with repopulation.
How Time-Based Triggers Affect Processing
The only condition that can be set for the processing step and workflows containing integration sequencing is a time-based condition trigger. Customers can configure the number of days a tier will wait until all the integrations in that tier are processed. Once the configured time condition is met, the workflow will allow the subsequent tier to begin processing if the tier has not finished processing. This will not affect the processing of the integration that did not process; that integration (or integrations) will continue to process unless manually skipped in the UI.
Integrations that are "Stuck"
Errors can still occur when processing sequenced integrations; when an error does occur, steps must be taken to resolve it so that the integration can continue processing.
How are "Stuck" DSRs Handled with Workflows?
DSRs that are "stuck" (an integration or integrations are holding up the completion of the ticket) will be picked up by our daily job for stuck tickets. This job runs daily and will continue to retry processing until the errors are fixed and the integrations are considered completed.
If you have reviewed this information and are still unsure if the request is processing normally, reach out to support@datagrail.io and we will be happy to help!
Disclaimer: The information contained in this message does not constitute as legal advice. We would advise seeking professional counsel before acting on or interpreting any material.